TestStand Code Module Development Best Practices
Overview
When creating a test program with TestStand, the core test functionality is implemented in separate code modules. TestStand provides adapters that call code modules developed using various programming environments and languages such as LabVIEW, LabWindows™/CVI™, C#, VB .NET, C/C++, and ActiveX.
This document discusses best practices to consider when developing your test system code modules and calling them from your test sequence. To use this document, it is assumed that you have a basic working knowledge of TestStand, including how to create a basic test sequence. If you are unfamiliar with these concepts, refer to the following getting started resources prior to using this document:
For more specific information on how to implement code modules, refer to the TestStand help topics Built-In Step Types and Module Adapters.
Contents
- Determining a Strategy for Code Module Development
- Choosing Where to Implement Functionality
- Best Practices for Code Module Implementation
- Using Instrumentation within Code Modules
- View Additional Sections of the TestStand Advanced Architecture Series
Determining a Strategy for Code Module Development
Before starting to develop a test system, consider defining a general approach for the following aspects of the test system:
- Granularity of code modules – Define the scope of the functionality of each module.
- Defining a directory structure for test code – A well-defined directory structure makes it easier to share code with other developers and to deploy code to test systems.
Granularity of Code Modules
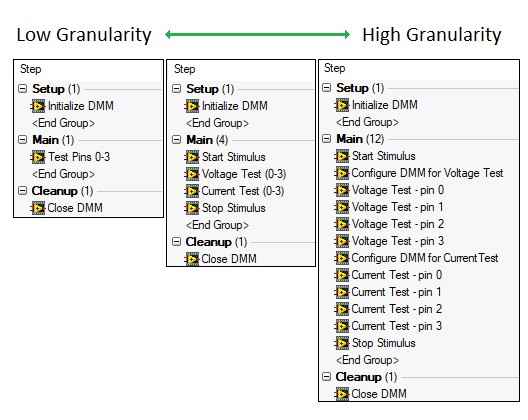
When designing a test system, it is important to define a consistent level of granularity for code modules. Granularity refers to the scope of the functionality of each code module in a test system. A test sequence with low granularity calls few code modules which each perform more functionality, while a sequence with high granularity calls many code modules, each with a smaller scope.
| Low Granularity | High Granularity |
|
|
You should aim for a balance between these extremes, since each has its own advantages.
Implementing a simple test using different levels of granularity
To maintain a consistent granularity across your test system, create a set of standards for code module development, such as:
- Perform hardware initialization and shutdown in separate code modules to allow TestStand to manage hardware sessions lifetimes.
- Determine granularity based on test requirements by creating a single test step for each requirement item. This approach makes it easier to ensure that all requirements are covered. In addition, you can use NI Requirements Gateway with TestStand to create linkages between your test steps and requirements documents. For more information, refer to the Coupling NI Requirements Gateway with TestStand tutorial.
- Use the desired structure of test results to help determine the scope of individual steps. Since each step creates a result entry, creating a one-to-one mapping of test steps to required result entries will make it easier to organize test results with minimal changes to the reporting or database logging.
Defining a Directory Structure for Sequence files and Code Modules
When specifying the path of a code module in a test step, you can choose to use an absolute or relative path. It is recommended to avoid absolute paths for the following reasons:
- If you move the sequence file and its dependencies on disk, the path will no longer be valid.
- If you deploy the sequence file to a target machine, paths will be invalid unless the files are installed in the same location.
When you specify a relative path, TestStand uses a list of search directories to resolve the path. These search directories typically contain the current sequence file directory, TestStand specific directories, and system directories.
It is important to define a file structure for your test sequences and code modules before beginning development. Use the following guidelines to define a strategy for storing sequence files and code modules.
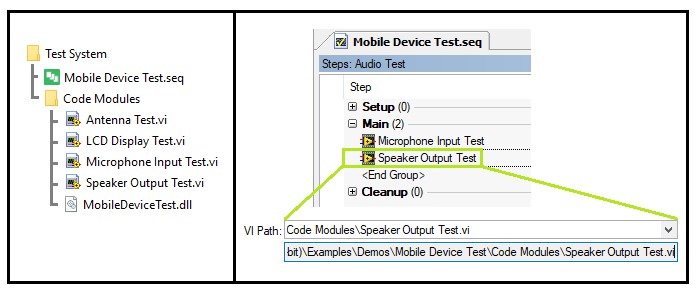
- For code modules which are used in a single sequence file, save the code module files in a subdirectory relative to the sequence file. This will ensure that the sequence file will always be able to find the code modules if moved on the system or copied to another system.
- For code modules that are shared among multiple related sequence files, you can use the same approach as a single sequence file if you save the related sequence files in the same directory. Consider creating a workspace to contain all related sequence files and code modules.
- For code modules that are shared between multiple unrelated sequence files, consider creating a specific directory to contain all shared code modules, and create a new search directory to point to this location. This will ensure that any sequence files on the system can find the files by using a relative path to this search directory. When deploying the code module, you can deploy the search directories configuration file, located in <TestStand Application Data>\Cfg\SearchDirectories.cfg. If you use this approach, do not move code module files within the directory to avoid breaking the paths specified in calling sequence files.
Define a directory structure where code modules are in a subdirectory of the sequence file
When deploying test code using the TestStand Deployment Utility, you can choose specific destinations for sequence files and for dependent code modules. If a relative path exists between the destination directories for the sequence file and the code module, TestStand Deployment Utility updates the path in the sequence file to point to the updated location. In most cases, it is best to match the directory structure of your deployment to that on the development system, to ensure that the deployment is as similar as possible to the code on your development machine.
Choosing Where to Implement Functionality
When defining the scope of code modules for your test system, it is important to define a strategy for which functionality will be implement in the code modules versus in the sequence file. The following sections can help you to determine the most appropriate place to implement common functionality:
- Evaluating test measurements against limits
- Defining stimulus values
- Reporting and logging test results and errors
- Looping operations
- Performing switching operations
- Performing Calculations and Manipulating Data
Evaluating Limits and Test Results
Ideally, the code module should contain functionality directly related to obtaining test measurements, and the test sequence should process the raw test result. This approach has the following benefits:
- Test Limits are easier to manage in the sequence file, since you can use tools such as the property loader to manage limits for multiple steps in a single centralized location.
- Test limits defined in the sequence will automatically be included in the test results, such as the report or database.
- Test limits can be updated without making changes to the code modules and will require less validation since only the test sequence is modified.
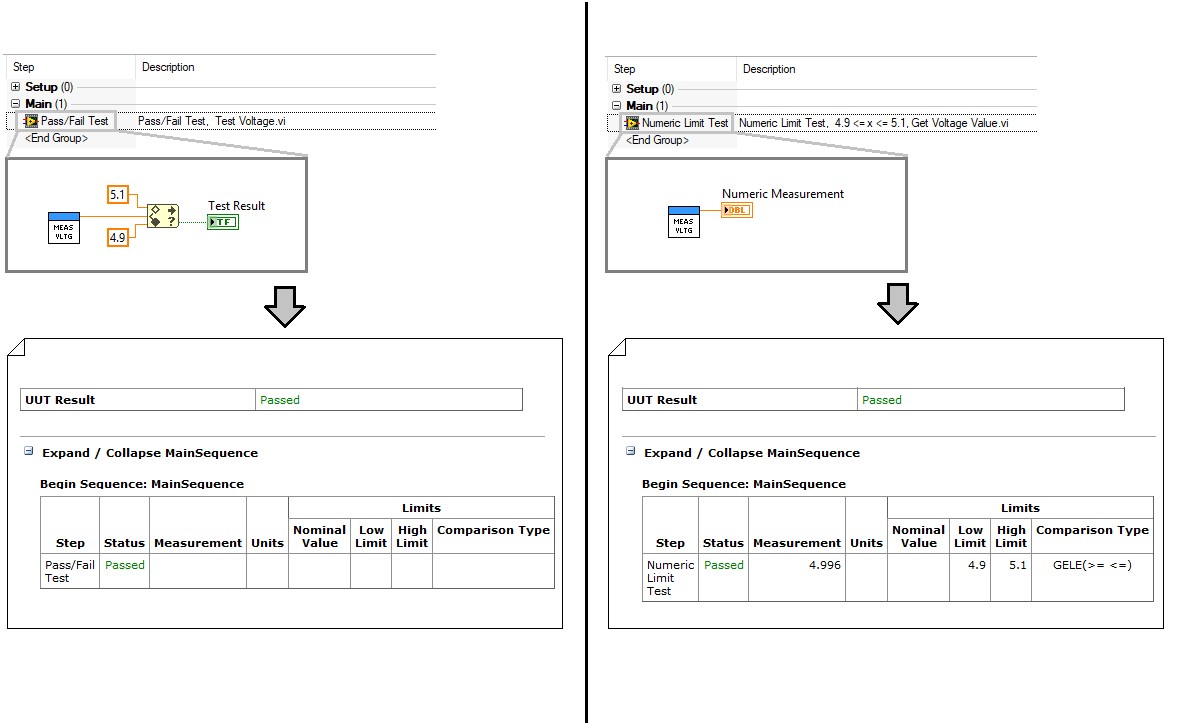
For simpler measurements, the code module can return the raw measurement value to the sequence for processing. For example, if a test step is measuring the voltage on a specific pin of the unit under test (UUT), the code module should return the measured value, rather than performing the check directly in the code module. You can process this value to determine the test result in the sequence file using a numeric limit test step.
Evaluating limits in the test step simplifies code modules and improves result logging
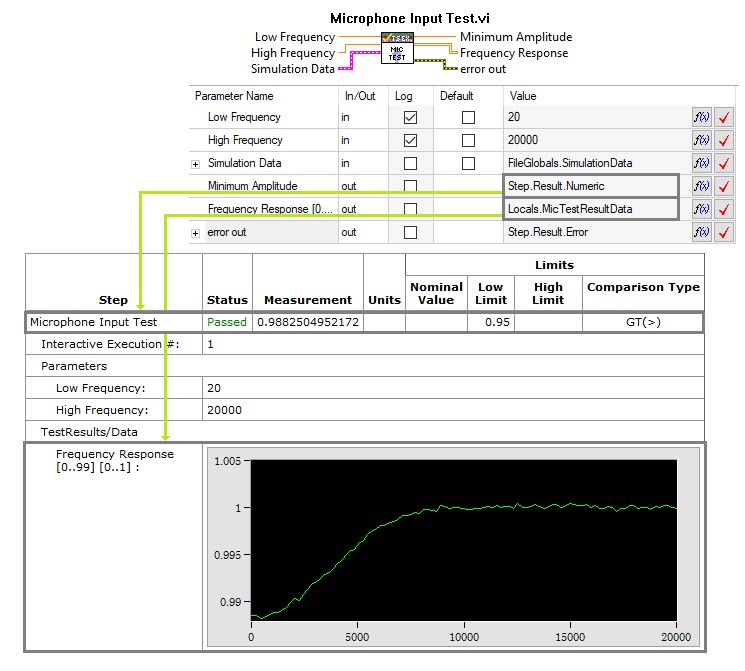
However, due to the complexity of some tests, it is not always possible to process raw test results in the sequence file. For more complex measurements, additional processing of the result data is likely necessary. Complex data can be processed to a single string or numeric result, which can then be evaluated in TestStand using a String or Numeric Comparison. For example, the results of a frequency sweep test are complex and cannot be evaluated directly, but the data can be processed to a single number representing the minimum value. In this case, the code module should evaluate the processed result and return the frequency data in a separate parameter for logging, as shown in the Mobile Device test example below:
For more complex data, process the data in the code module to generate a numeric or string result, and use a parameter to pass out the raw data for logging
If the raw data is very large, passing the data to TestStand may have a significant performance impact. In this case, consider logging data directly to a TDMS file, and linking to the file from the test report. This allows you to reference the data from the report without the need to pass it to TestStand. Refer to the Including Hyperlinks in a Report - TDMS File for more information on this approach.
If the step cannot determine the test result using the types of evaluation available in the Test Steps, consider creating a new step type with additional functionality to handle the required testing type. For more information on creating custom step types, refer to the Best Practices for Custom Step Type Development article in this series.
Defining Test Stimuli
For many tests, the UUT or testing environment must be in a certain state before the test can be performed. For example, an excitation voltage may be required to take a temperature measurement, or a heated chamber must be set to a specified temperature. For these types of modules, use parameters to pass in input values, such as the excitation voltage or desired temperature. This provides many of the same benefits as returning raw data in test code modules versus processing limits directly in the code, as discussed in the previous section.
Logging Test Results
TestStand provides built in functionality for report generation and database logging using the results from test steps. For this reason, avoid implementing any type of data logging directly within code modules. Instead, ensure that any data you want to log is passed out as a parameter and use TestStand to log the data. Some data, such as test results, limits, and error information are automatically logged. To log other data, you can use the additional results feature to specify additional parameters to include in the report.
For more information on adding results to the test report, refer to the Adding Custom Data to a Report example which is included with TestStand.
If you have specific requirements for logging, consider modifying or creating a result processing plug-in. This will allow you to use the built in TestStand result collection to gather results, while you can determine how the results are processed and presented. Refer to the Creating Plug-ins section of the Best Practices for TestStand Process Model Development and Customization document for additional information
Looping Operations
The best approach for implementing looping can be difficult to determine since each approach has its own benefits and drawbacks. Use the following guidelines to help determine which strategy is best for your application:
Looping internally in code module
- Improved performance, especially when looping quickly. Since each code module call can introduce a few milliseconds of overhead, looping hundreds or thousands of iterations with an external loop can impact test speed.
- Allows for more complex looping behavior.
Looping externally in Sequence file
- View and modify loop settings directly in the sequence file with no modifications to code module.
- Easy access to loop index in the sequence file. This is useful for determining switch routes or other behavior that changes based on the current iteration.
- Each iteration of the loop is logged separately, showing the results for each iteration in the report or database.
Performing Switching Operations
Many test systems utilize switching to allow a single piece of hardware to test multiple sites. Switches allows you to programmatically control which pins of a Unit Under Test (UUT) are connected to specific hardware through predefined routes.
You can implement switching in TestStand code modules in the following ways:
- Using the built-in switching properties of a step (Requires NI Switch Executive)
- Using the TestStand IVI Switch steps (32-bit TestStand Only)
- Calling switch driver functions directly code modules
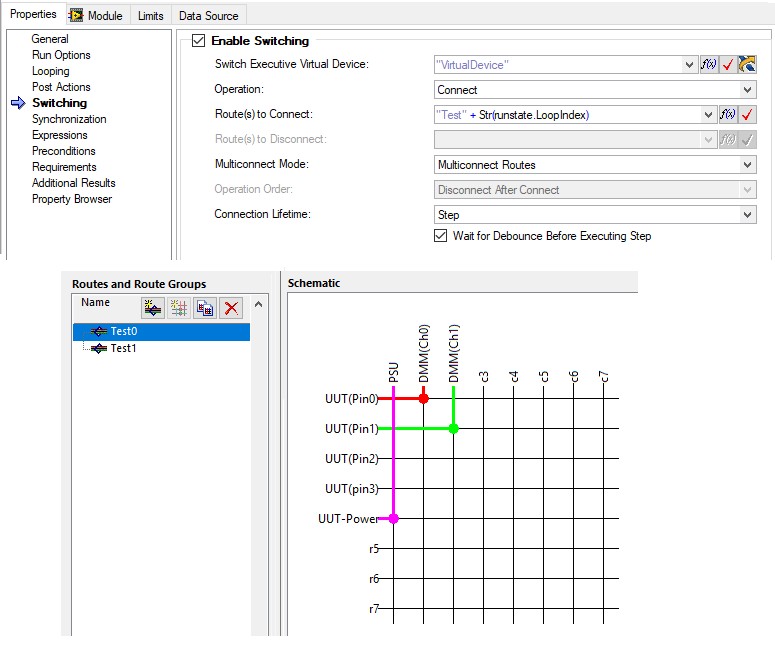
When using NI Switch hardware, you can use NI Switch Executive to quickly define routes. If you have access to NI Switch Executive, using the built-in step settings for switching is typically the best approach, and has the following benefits:
- Defining switch configurations in the step decouples the switching functions from the test code, which can increase the reusability and reduce the complexity of your code modules.
- Many of the fields in the Switching settings are specified by expression which allows you to use the RunState.LoopIndex property or another variable to index the route or route group names for steps that you iterate over.
- For parallel testing, you can use the test socket index (RunState.TestSockets.MyIndex) as part of the routing string to use different switch routes for each test socket.
- You are able to tie the connection lifetime to the step, sequence, thread or execution.
Use NI Switch Executive to specify routes directly from TestStand step settings, including support for TestStand expression to dynamically determine the route using the current loop index or other properties
Performing Calculations and Manipulating Data
To avoid maintaining code modules for simpler tasks, you can use the expression language in TestStand to perform basic calculations and single dimensional array manipulation. More advanced programming requirements should be implemented in code modules, since programming languages provide more robust functionality which is better suited for these tasks. For example, concatenating multi-dimensional arrays is much easier to accomplish with the native LabVIEW build array function than through the expression language.
In some cases, you can use the native classes provided with the .NET framework to avoid creating overly complex expressions. For example, you can use the System.IO.Path class to quickly perform path manipulation without creating a code module.
You can use a .NET step to utilize .NET framework methods without the need for a code module
Best Practices for Code Module Implementation
When implementing code modules, there are many design decisions that will impact many of the code modules you create. This section provides guidelines for the following concepts:
- Communicating data from TestStand to code modules
- Handling sequence termination within code modules
- Reporting code module errors to TestStand
- Managing code module execution speed and memory usage
Communicating Data from TestStand to Code Modules
There are two approaches you can use to access TestStand data within a code module:
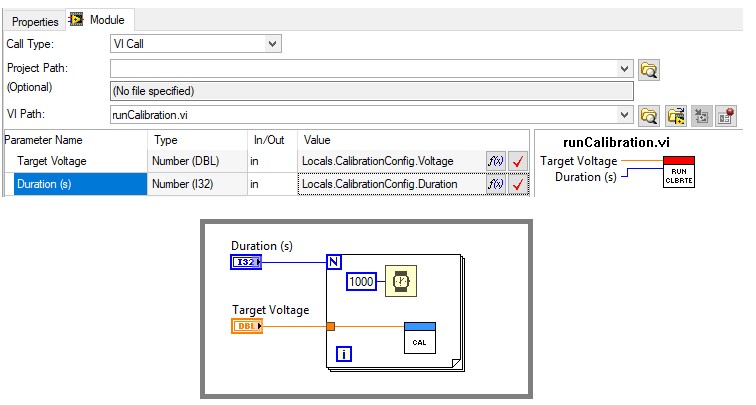
- Pass the data through code module parameters
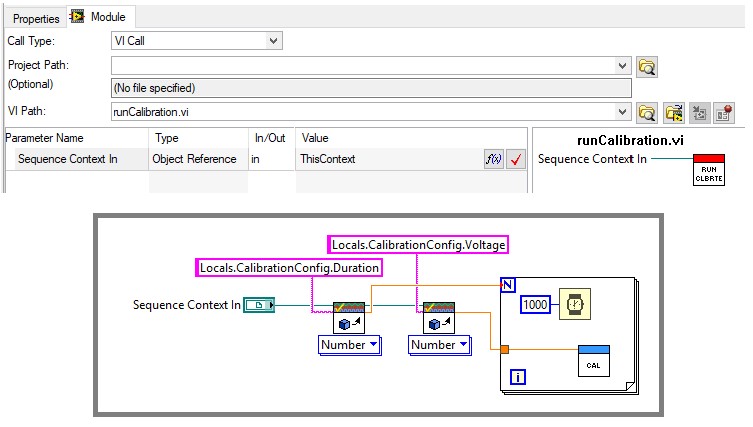
- Access the data directly within the code module using the TestStand API
In most cases, it is a better idea to use parameters to pass data rather than the TestStand API to access them directly for the following reasons:
- Less error prone - Any errors in the property names or data types will be easy to find since the parameter values are defined in the step type settings in TestStand, not directly in the code module.
- More maintainable - Changes to step properties are specified in the parameter configuration in TestStand without any modifications to the code module.
- Easier to reuse outside of TestStand - Since the code module does not rely on the TestStand API, the module can be used outside of TestStand with no modification
When possible, use parameters to pass in required data to code modules
However, using the API to directly access properties can be useful in cases where the code module is accessing a variety of data dynamically, based on the state of the step. Using step parameters in this case can lead to a long list of parameters where only some are actually used in various conditions.
If you do use the TestStand API in a code module, pass a reference to the SequenceContext object (ThisContext) as a parameter. the SequenceContext object provides access to all other TestStand objects, including the TestStand engine and the current Runstate. The sequence context reference is also necessary if you are using the termination monitor or modal dialog VIs.
Use the SequenceContext to access the TestStand API in code modules, which can be used to access data programmatically
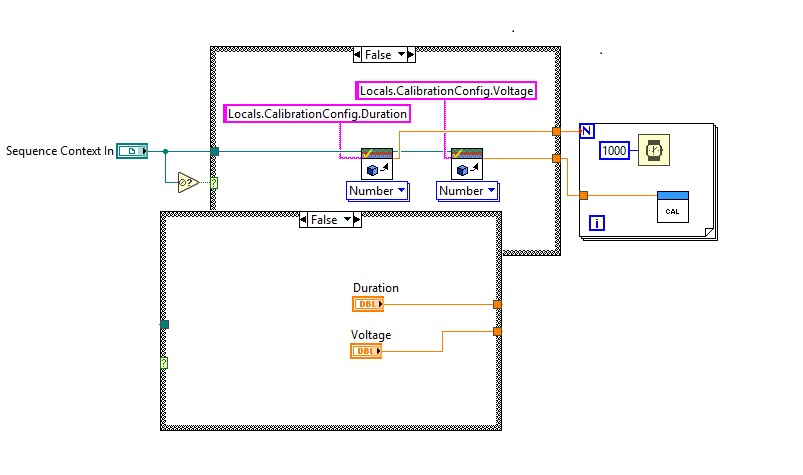
If you are reusing code modules outside of TestStand, keep in mind that any operations which use the TestStand API will only be available if the module is called from a TestStand sequence. Any data the module obtains from TestStand through the API will not be available. You can define an alternate mechanism for obtaining test data in cases where the code module is called outside of TestStand by first checking if the Sequence Context reference is null. In LabVIEW, you can use the Not A Number/Path/Refnum? function, which returns a Boolean value, as shown in Figure 3.
Use Not a Number/Path/Refnum? to check validity of the SequenceContext Object Reference for code modules used outside of TestStand
Handling Large Data Sets in Code Modules
In many cases, code modules can produce large amounts of complex data from measurement or analysis. Avoid storing this type of data in TestStand variables, since TestStand creates a copy of the data when storing it. These copies can reduce runtime performance and/or cause out of memory errors. Use the following approaches to manage large data sets without creating unnecessary copies:
- Operate on large data sets inside the code modules, such as analyzing data in the same code module it is acquired, and only return required results to TestStand
- Pass data pointers between TestStand and code modules. For LabVIEW code modules, use Data Value References (DVRs)
Handling Sequence Termination within Code Modules
When a user presses the Terminate button, TestStand stops the executing sequence and runs any Cleanup steps. However, if the execution has called a code module, the module must complete execution and return control back to TestStand before the sequence can terminate. If the run time of a code module is longer than a few seconds or when the module waits for a condition to occur, such as user input, it can appear to the user that the terminate command was ignored.
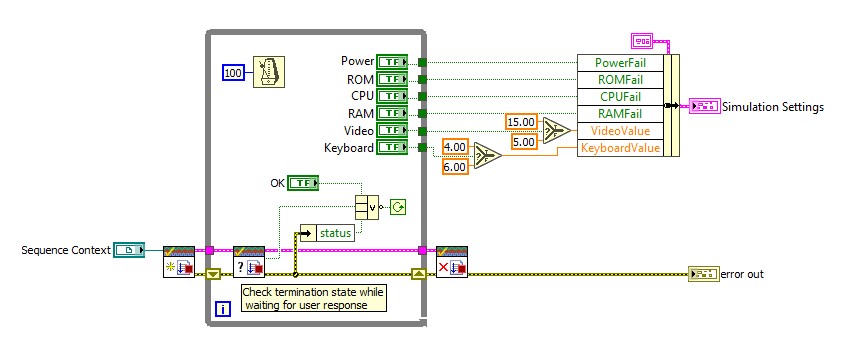
To address this issue, you can use the termination monitor to allow code modules to check and respond to the termination status of the calling execution. For example, the Computer Motherboard Test shipping example uses the termination monitor in the simulation dialog, as shown below. If the test sequence is terminated, the Check Termination state VI returns false, and the loop is stopped.
Refer to the termination monitor examples for more information on using the termination monitor.
Handling Errors
An error in a test system is an unexpected run-time behavior that prevents testing from being performed. When a code module generates an error, pass that information back into the test sequence to determine what action to perform next, such as terminating the execution, repeating the last test, or prompting the test operator.
To provide TestStand with any error information from code modules, use the Result.Error container of the step, as shown below. TestStand automatically checks this property after each step to determine if an error occurred. You do not need to pass the error information from TestStand into the code module. If the code module returns an error to TestStand, execution can branch to another part of the test sequence, such as to the Cleanup step group.
You can use the On Run-Time Error setting, located in the Execution tab of the Station Options to determine how TestStand responds to step errors. Typically, you should use the Show Dialog Box option while developing your sequences to assist in debugging, since this option allows you to break the execution and check the current state of the sequence. For deployed systems, consider using the Run Cleanup or Ignore options to rather than requiring input from test operators. Error information is automatically logged to the test results, which can be used to find the cause of the error.
Pass error information to the Step.Result.Error container to notify TestStand if a step error occurs
Managing Performance and Memory Usage of Code Modules
By default, TestStand loads all code modules in a sequence file into memory when you execute a sequence in the file and keeps them loaded until you close the sequence file. With these settings, an initial delay can occur when you start a sequence while the modules are loaded. However, subsequent executions of the sequence file are faster since the modules remain in memory.
You can configure when a code module is loaded and unloaded in the Run Options tab of the step settings pane. Typically, the default load options provide the best performance, but in some cases it can be better to load the code module only when it is used with the Load dynamically load option. For code modules that are not called in typical execution, such as diagnostics which only run after a particular test fails, should be loaded dynamically since in most cases these modules do not need to be loaded at all.
When you dynamically load code modules, be aware that TestStand does not report issues for the code modules until it loads the code module, which could be toward the end of a lengthy execution. However, you can use the sequence analyzer to verify that there are no errors in a sequence before executing. The analyzer will check both statically and dynamically loaded code modules.
For memory intensive code modules, you can modify the default unload option to reduce total memory usage. For example, setting the module to Unload After Step Executes or Unload After Sequence Executes. However, this change will increase execution times, since TestStand will need to reload the module for each subsequent call. When possible, a better alternative is to use the 64-bit version of TestStand and a system with more physical memory to get the fastest test performance despite high memory usage requirements.
If your code modules maintain shared data, such as static variables or LabVIEW functional global variables, modifying unload options can cause changes in behavior, since global data is lost when modules are unloaded. When changing unload options, be sure that any required data is either passed to the TestStand sequence or stored in a more permanent location to prevent data loss.
Refer to Best Practices for Improving NI TestStand System Performance for more information about other ways to optimize the performance of a test system.
Using Instrumentation within Code Modules
A common use for code modules is interfacing with test hardware to set up stimuli and take test measurements. Methods of communicating with hardware include:
• Using a hardware driver, such as NI-DAQmx, to directly communicate with hardware.
• Using an Instrument driver, which internally sends commands to an instrument via the VISA or IVI hardware driver.
The method of communication you use depends on the type of hardware you are using. For either type of communication, you will open a reference or session to the driver before making driver-specific calls and close the handle after the interaction is complete.
Choosing an Approach for Managing Hardware References
In most cases, you will communicate with the same hardware in multiple test steps. To avoid the performance impact of opening and closing the instrument session in each code module, it is important to consider how you will manage hardware references within your test sequences. There are two common approaches for managing hardware references:
- Manually manage hardware references by calling initialize and close functions from your code modules.
- Use the session manager to automatically manage hardware reference lifetimes.
If you are using an instrument driver, or directly communicating with instruments using the VISA or IVI drivers, use the session manager unless you have a specific need for direct control over hardware session lifetimes. If you are using a hardware driver such as DAQmx, you cannot use the session manager, and you must manage references manually.
Manually Managing Hardware References Using TestStand Variables
When you initialize the instrument, pass the session reference as an output parameter to the calling sequence, then store the reference in a variable. You can then pass the variable as an input to each step that requires access to the instrument.
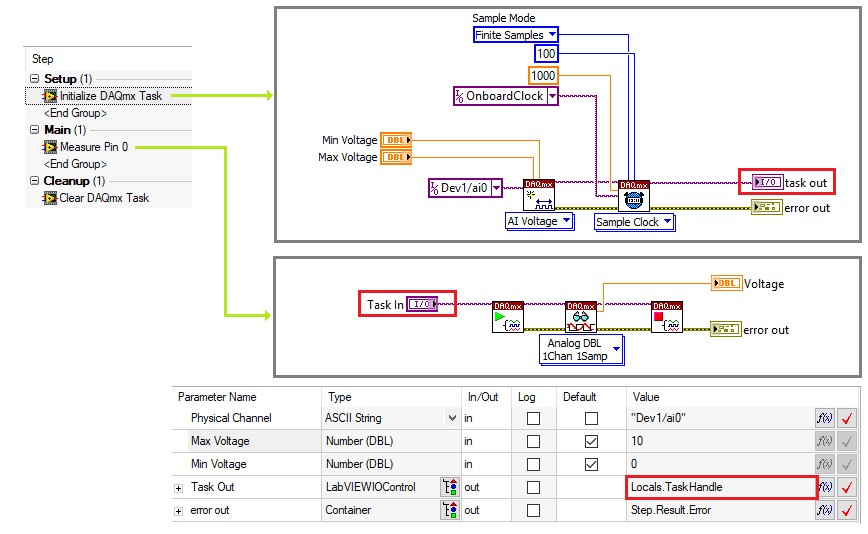
Many drivers, including NI-DAQmx, VISA, and most instrument drivers, use the I/O Reference data type to store session references. Use the LabviewIOControl data type in TestStand to store these references.
Use a variable with the LabVIEWIOControl type to pass hardware references, such as a DAQ task reference, between code modules
When you explicitly pass instrument handles between TestStand and code modules, store the hardware reference in a local variable. If the hardware is used across several sequences, pass the handle as a sequence parameter to each sequence that requires it. Avoid using global variables to store hardware references, since it can be difficult to ensure that the instrument has been initialized before using the reference.
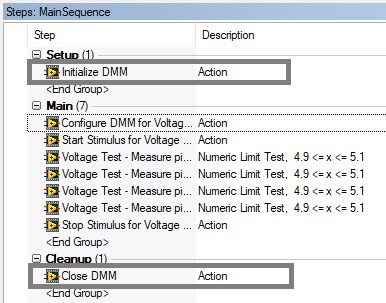
Use the Setup step group to initialize hardware, and the Cleanup step group for closing hardware references for these reasons:
- Hardware references will still be closed if the user terminates the sequence execution, since the cleanup step group always executes when an execution is terminated.
- Allows you to interactively execute steps which use the hardware reference, since the setup and cleanup step groups will execute before and after the selected steps.
Use the Setup & Cleanup groups to initialize and close hardware references
Automatically Managing Hardware References Using Session Manager
For VISA and IVI instrument handles, you can use the Session Manager to automatically manage hardware references. Using the session manager provides many benefits, including:
- Reduced Coupling—You do not have to pass instrument handle variables among software components. Instead, each component specifies a logical instrument name to obtain a session.
- Reduced Programming Language Barriers—Code modules written in different languages can share the same session without passing handles that might not easily convert among languages.
- Lifetime Control—Because instrument sessions are ActiveX objects with reference counts, you can tie the lifetime of the session to the lifetime of an ActiveX reference variable and eliminate the need to explicitly close the instrument in languages that support ActiveX reference variables.
The Session Manager automatically initializes the handle after the session is created and automatically closes the handle when the last reference to the session is released. Code modules and sequences pass a logical name, such as “DMM1”, to obtain a session object from the Session Manager, which contains the corresponding instrument handle.
When using the session manager, store the session object in a TestStand object reference variable. Since the session lifetime is linked to the lifetime of the object reference variable, the instrument handle will be initialized and closed one time per execution, no matter how many of the sequence code modules and subsequences access the same session.
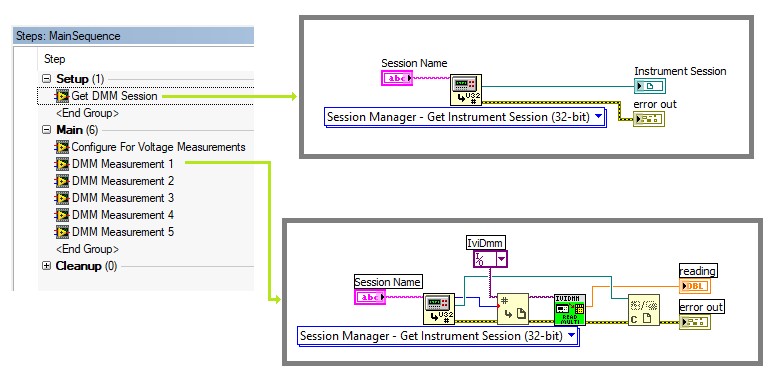
In the example below, the Get DMM Session step obtains a reference to the instrument session object for the DMM for the logical name. The step stores the session reference in a local variable so that the session remains initialized for the duration of the sequence execution.
Use the session manager to allow you to reference instruments using a logical name. The session manager VI obtains the DMM IO reference using the logical name
Refer to the NI Session Manager Help, located in <Program Files>\National Instruments\Shared\Session Manager, for more information about how to use Session Manager.
The previous example sequence obtains the session from a LabVIEW code module that calls the Session Manager instead of calling the Session Manager directly because this example configured the LabVIEW Adapter to run VIs in a separate process. Refer to the NI Session Manager Help located in <Program Files>\National Instruments\Shared\Session Manager, for more information about how to use Session Manager.
Calling Hardware Driver Libraries
To communicate with any type of hardware, you use driver libraries, which provide a set of functionalities designed to allow you to perform a set of tasks using a programming language. When using driver libraries, you often call several VIs or functions to perform a single logical operation, such as taking a measurement or configuring a trigger. Creating a code module to implement this functionality, rather than calling the library functions directly from a TestStand step, has several benefits:
- Avoids overhead of step functionality around each function
- Provides a layer of abstraction between driver calls and TestStand sequences
- Makes it easier to share implementation across test programs
