Chapter 5: Application Examples
Overview
This document is part 5 of the Guide to Selecting an RF Switch. This 5-part guide is an accumulation of insightful content that will arm you with the necessary knowledge to design your RF switch network. This section will discuss the process of picking components and designing an actual RF switch network for optimal performance Please see the related link section below to navigate to the first page of the guide.
Contents
- Introduction
- Selecting a Switch Module Based on Performance Requirements
- Example: 16-channel stimulus response test system with 4 2547s and 2 2548s
- How NI Switch Executive Makes the Process of Building this System Simple
- NI Switch Executive Calibration Feature
- How to configure and deploy such a large scale RF switch system with National Instruments software
Introduction
Everyday National Instruments customers configure switch systems to solve a broad range of application-specific challenges. In reference to radio frequency (RF) applications, customers are challenged with how to build sparse and full RF matrices, bigger RF multiplexers, and custom RF switch configurations – while still maintaining key specifications. The actual questions these customers have range from “What hardware should I use?” to “What is the best way to program such a large-scale system?”
These switch configuration challenges can typically be solved using a variety of solutions, but it is not always easy to determine the best one. The challenge in creating a switch system for RF applications lies in maintaining signal integrity throughout the modifiable transmission line. Once you have designed the configuration to achieve your desired RF specifications, including but not limited to the aforementioned Insertion Loss, VSWR, Isolation, Crosstalk, and connectivity requirements referenced in previous Chapters, you have accomplished your task in finding a valid solution.
The next step after designing such a solution is configuring and deploying that solution. Should you use lower-level APIs and independently control each switch in the application or is there an easier method to set up and program the entire system? Are there any deployment issues to consider?
This chapter discusses how to select a switch module based on performance requirements, design a scalable RF switch network, and explain how to configure and deploy such a large scale RF switch system with National Instruments software.
Selecting a Switch Module Based on Performance Requirements
The best way to choose a switch module for a test application is to start with the performance requirements and select modules based on those requirements. Two examples follow that illustrate this concept.
Example 1: Considering only NI hardware
The requirements for the first example system are two 4x1 multiplexers that must each have VSWR performance better than 1.4:1 and better than 1dB of insertion loss at 4 GHz. Considering only modules made by National Instruments, the PXI-2595 (a PCB mount relay design), which has a listed bandwidth specification of 5 GHz, may initially appear to be a good solution. Two units would be required to satisfy the dual 4x1 multiplexer requirement. Furthermore, the typical VSWR performance of the module which is approximately 1.2 at 4 GHz seems to meet requirements (see figure 1):
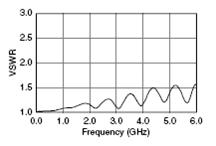
Figure 1: VSWR performance of PXI-2595
However, the typical insertion loss plot shows almost 1.5 dB of loss at 4 GHz, making the PXI-2595 module unsuitable for the application.
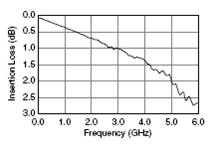
Figure 2: Insertion loss performance of PXI-2595
To meet the requirements of this particular application, the PXI-2596, a two slot dual 6x1 multiplexer, which has a bandwidth of 26.5 GHz, is the best option. Performance of this module exceeds all design requirements as can be seen by the graphs below.

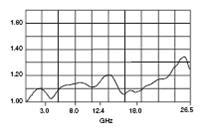
Figure 3: Insertion Loss & VSWR performance of PXI-2596
While more expensive than two PXI-2595 modules, the PXI-2596 it is the only module in consideration that can meet the low loss requirements of this test system.
Example 2: Comparing Different Manufacturers
Comparing switch modules from different manufacturers can prove even more difficult due to differences in how manufacturers specify their modules. Remember that the manufacturer specifies a bandwidth rating based on the maximum frequency they think the module can be used, and this can vary considerably depending on the vendor’s definition of ‘acceptable’. The acceptable frequency range for a module in a test system being designed may be higher or lower than the frequency rating the manufacturer specifies.
The requirements for the second example system are a 75 Ohm switch operating at 2.5 GHz with VSWR of 1.5:1 or better and insertion loss of no more than 2dB. Two modules are being considered. The first, manufactured by vendor A, has a bandwidth rating of 3 GHz. Analysis of the module’s specifications shows Insertion Loss and VSWR performance in the two following graphs.
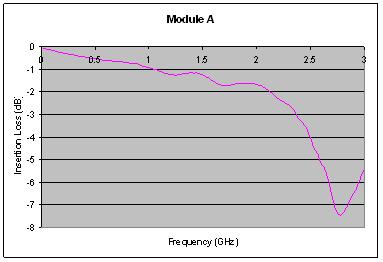
Figure 4: Insertion Loss of module A
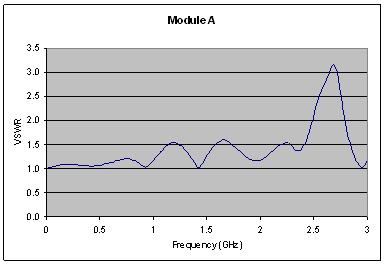
Figure 5: VSWR of module A
Although the module is rated as ‘3 GHz’ by the manufacturer, its performance as seen in the graphs does not meet the needs of the specified test system due to VSWR exceeding 1.5 at frequencies as low as 1.2 GHz and insertion loss performance of -4dB at 2.5 GHz.
The second module, manufactured by vendor B, has a bandwidth of 2.5 GHz which is less than its Vendor A counterpart. This lower rating does not however translate to worse performance than the 3 GHz module. The two following figures show performance of module B. As can be seen, vendor B has as much as 1.75 dB better insertion loss than vendor A’s at 3 GHz even though it has a lower bandwidth rating. Similarly its VSWR is better than vendor A’s throughout the 3 GHz frequency range.
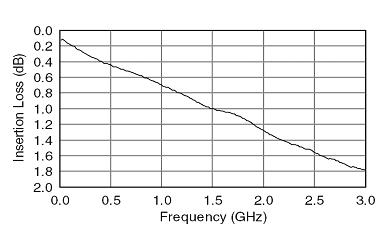
Figure 6: Insertion Loss of module B
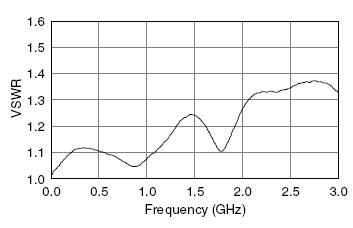
Figure 7: VSWR of module B
After analysis, it is found that the 2.5 GHz module manufactured by vendor B is in fact a better option than the 3 GHz module by vendor A for this test system whose frequency of concern is 3 GHz. This example illustrates the need for careful examination of a module’s specifications (or gathering data not present in the specifications from the manufacturer) before designing it into a test system.
Example 3: Building a 16x1 multiplexer for a 3.0 GHz application
In building a larger scale switch system, it is sometimes necessary to use multiple switch modules as building blocks. As an example, consider connecting a 3.0 GHz signal to one of 16 test points. The requirements for this example system are that the 16x1 multiplexer has better than 3dB of insertion loss at 3.0 GHz. In this example system, the added requirement of minimal cost will also be under consideration.
As discussed in Chapter 2, cascading multiple switches will result in worsened specifications due to cable length and having to pass through an additional switch (and thus creating a longer transmission line). When creating a scaled system, it is important to calculate the insertion loss and VSWR of each individual component to compute the total system specifications.
One solution in creating a 16x1 multiplexer is to use multiple 26.5 GHz switches. As shown in figure 3, these modules have very good insertion loss and VSWR specifications. This solution requires two PXI-2596 modules in their inherent dual 6x1 multiplexer topology. This solution would look similar to the following:
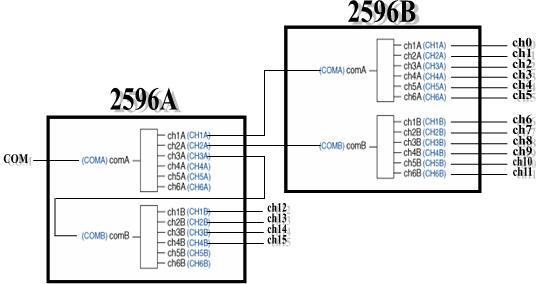
Figure 8: Cascading two PXI-2596 modules to form a 16x1 multiplexer
The total insertion loss for the system can be calculated by adding the losses of each component in the system. The PXI-2596 has an insertion loss specification of <0.2dB at 3 GHz. There are two in the system for a total of <0.4dB. There are at least 3 cables in the system. A 0.15m SMA 100 cable has an insertion loss specification of <0.125dB at 4 GHz. The worst-case insertion loss at 3 GHz is then 0.4 + 0.375 = 0.775dB, well within specifications. However, because cost is a factor, perhaps there is a cheaper solution.
A lower cost alternative is to use two PXI-2547 modules in their inherent 8x1 multiplexer topology and a PXI-2548 in its SPDT topology. Figure 9 shows the solution.
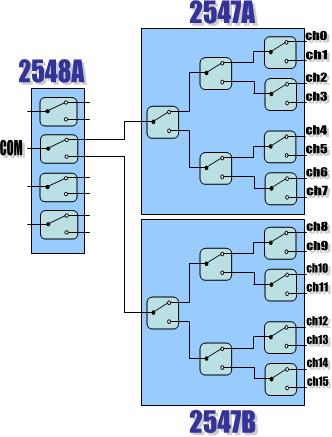
Figure 9: Cascading two PXI-2547s and a PXI-2548 to form a lower-cost 16x1 multiplexer
Once again, the total insertion loss for the system can be calculated by adding the losses of each component in the system. The PXI-2547 has an insertion loss specification of 1.8dB (typical) at 3 GHz. The PXI-2548 has an insertion loss specification of 0.6dB (typical) at 3GHz. There are at least 3 cables in the system. The typical insertion loss at 3 GHz is then 1.8 + 0.6 + 0.375 = 2.775dB. This switch system is lower cost and still within signal integrity specifications.
Example: 16-channel stimulus response test system with 4 2547s and 2 2548s
A RF application that may utilize multiple 16x1 multiplexers is a 16-channel stimulus response test system. In this application, a RF Signal Generator (RFSG) produces a 2.7 GHz signal and it is routed to one of 32 I/O pins on a device under test (DUT). The DUT will input the RF signal on any one of its pins and will output a corresponding 2.7 GHz RF signal on another pin located across from the first. A RF signal analyzer (RFSA) is used to acquire the signal from the output pin of the DUT. This system as described could be used for s-parameter testing (S12 and S21). When used for such a test, the insertion loss specification can be less of a factor (the insertion loss of the switches can be calibrated out). For this example, the requirements are that the system has better than 9dB insertion loss.
Incorporating the previous example, the 16x1 multiplexers in this example can be created using two PXI-2547s and one PXI-2548 module. To include the functionality of being able to route the 2.7 GHz signal generated by the RFSG to any of the DUT’s 32 I/O pins, additional SPDTs can be implemented as shown in the following configuration.
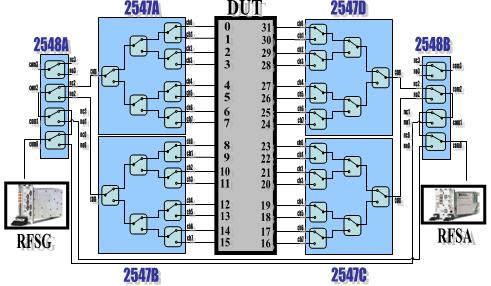
Figure 10: 16-channel stimulus response test system with 4 2547s and 2 2548s
In total, four 8x1 multiplexer modules (PXI-2547) and two 4-SPDT modules (PXI-2548) are utilized as building blocks in this configuration, and a signal will propagate through the two 2548s six times and the 2547s twice during each and every measurement. Incorporating cables, the insertion loss specifications should be calculated before considering this an acceptable solution.
The PXI-2547 has an insertion loss specification of 1.8dB (typical) at 3 GHz. The PXI-2548 has an insertion loss specification of 0.6dB (typical) at 3GHz. There are 10 cables in every path from RFSG to RFSA. The typical insertion loss at 3 GHz is 3.6 + 3.6 + 1.25 = 8.45dB.
Once again, one option to lower the system insertion loss would be to use 26.5 GHz switches in place of several 2.7 GHz switches. For example, if the two PXI-2548s were replaced with 3 PXI-2599s, the total insertion loss would be reduced as shown in Table 1.

Table 1: Reduction in Insertion Loss using three PXI-2599s in place of two PXI-2548s
For this specific example, 8.45dB insertion loss is within the required specifications, and therefore the cost-effective PXI-2547 and PXI-2548 system is the optimal solution.
How NI Switch Executive Makes the Process of Building this System Simple
The design of the 16-channel stimulus response test system is finished. The only choice remaining is what software should be used to program the switch hardware. NI-SWITCH, DAQmx Switch and third-party device drivers can be effective low-level APIs, but there is an easier method to build this and every other switch system configuration: NI Switch Executive. One of the core reasons National Instruments created Switch Executive was to work with large-scale systems similar to the proposed 16-channel stimulus response test system. Below, Switch Executive is compared to the alternative low-level APIs, and shown through this comparison is how Switch Executive makes the process of building this system simple.
1. Switch Executive enables you to configure all the switch modules in your large-scale RF system as one virtual device. This means you can integrate and control multiple switch types and topologies (NI PXI-2547 8x1 Multiplexer and a NI PXI-2548 4-SPDT) as one device in your application; you can connect “routes” across multiple switches with one function call, and you create routes by simply selecting two endpoints within your configuration.
Lower-level driver software such as the NI-SWITCH API, the DAQmx Switch API, and third party drivers typically control each switch module independently, leaving it to the user to verify the overall switch configuration is performing correctly.
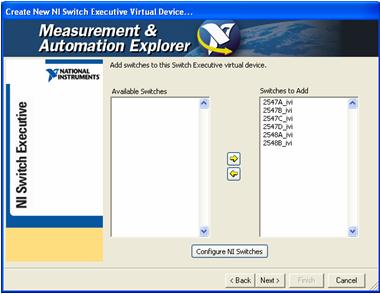
Figure 11. Switch Executive allows you to integrate and control multiple RF switch types and topologies as one virtual device
2. Switch Executive allows you to choose intuitive channel names. Batch renaming assigns names to multiple channels simultaneously to easily configure large systems.
Low-level drivers often use channel names based on individual switch module functionality/topology.
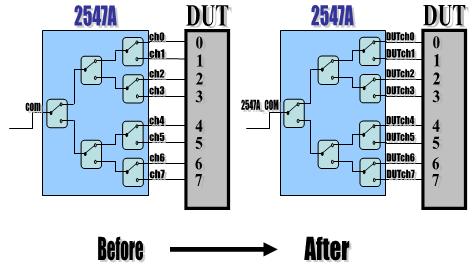
Figure 12: Switch Executive allows you to use intuitive channel names
3. Switch Executive provides interactive endpoint to endpoint routing capabilities. With Switch Executive, you can define hardwires to link switch modules for cross-module routing and group dependent routes into route groups.
With low-level drivers, a user must perform additional software techniques to verify correct connectivity. Maintaining the overall system state often involves programming to check the relay states of individual modules or utilizing “Disconnect All” commands betweens configurations.
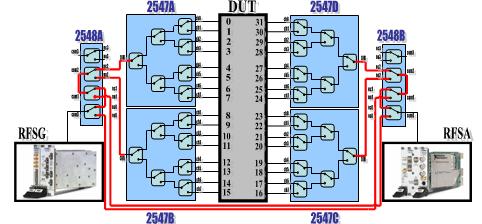
Figure 13: Define hardwires to link switch modules for cross-module routing
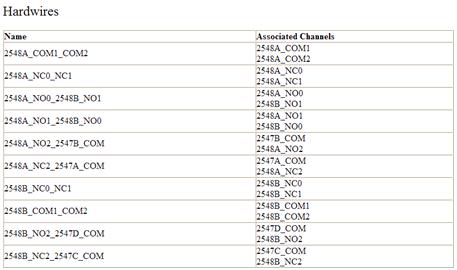
Figure 14: Hardwire list generated with Switch Executive HTML report tool
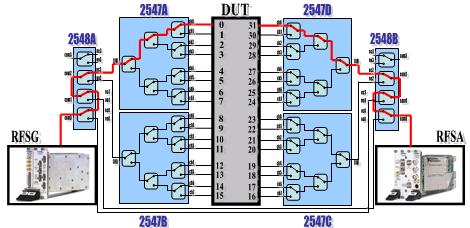
Figure 15: Group dependent routes into route groups
Figure 16: Portion of Route Group list generated with Switch Executive HTML report tool
4. Switch Executive has a tool to validate the system’s devices, routes, and route groups to verify there are no errors within the system configuration and that all user-defined exclusions are maintained. If a route or route group attempts to connect terminals that are mutually excluded or attempts to disconnect channels that are hardwired, Switch Executive will throw an error upon validation and execution. Because Switch Executive is built on the IVI-C class driver, the user has the additional option of simulating hardware during validation.
Using low-level drivers, the user must perform additional software techniques to verify the desired channel connections do not interfere with each other or with user-defined exclusions. Programming a system using lower-level driver software in this manner can be tedious, as it often involves additional programming to check the relay states of individual modules.
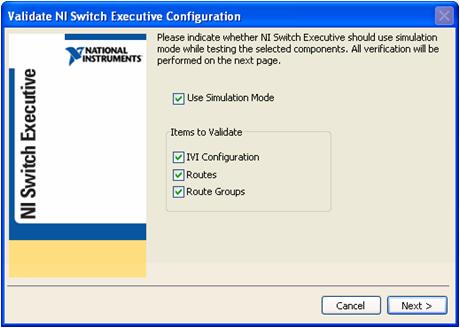
Figure 17: Switch Executive has the option of simulating hardware during validation
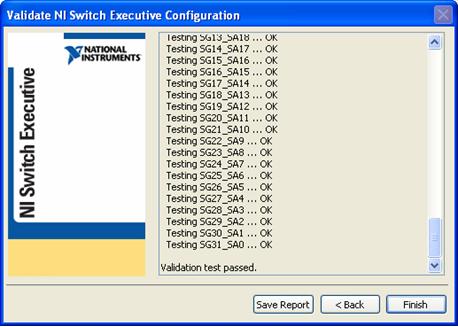
Figure 18: Switch Executive verifies there are no errors within the system configuration
5. Switch Executive has system-wide documentation tools to generate an HTML report and to export configuration data into Microsoft Excel. Leveraging Excel’s inherent spreadsheet functionality, you can make large-scale changes and can then import the configuration back into Switch Executive. In addition to these tools, Switch Executive will automatically document specific information about each National Instruments switch module used in a configuration, and includes Comment sections for any third party and/or additional documentation (such as calibration values, as discussed previously).
If programming with low-level drivers, a user can print code for documentation, but ultimately the user must create their own report. To record hardware interface information, users will often maintain an Excel spreadsheet. In a complex switch configuration, users can create numerous spreadsheet documents in order to remember how devices interconnect.
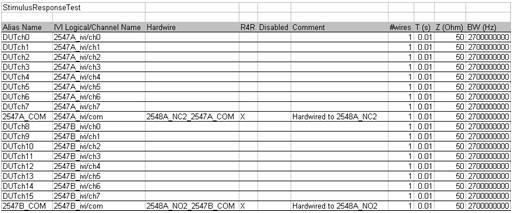
Figure 19: Switch Executive has a tool to export the system configuration to Excel
6. Switch Executive is intuitive to program and the code is easy to maintain. In your program routes and route groups are simply connected and disconnected. If you want to add a possible route to the configuration, or see if one already exists, simply open the Virtual Device and choose the two endpoints of the route. Through abstraction, the amount of Switch Executive programming remains constant even though the complexity of the system may increase with the addition of switches and signal routes.
With low-level drivers, the difficulty of programming is largely dependent on the chosen API. The amount of function calls is greater for lower-level APIs due to multiple connections being created for every desired route, often resulting in untidy code. Code can be designed for maintainability; however, it is typically more difficult to maintain lower-level code if the switch hardware changes or if new switches/signal routes are added after the initial code development.
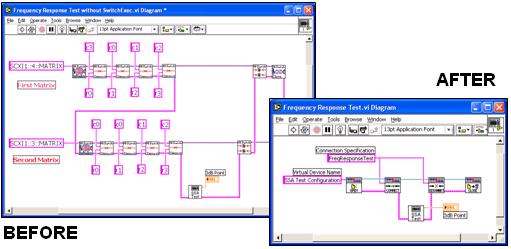
Figure 20: Instead of separate sessions and multiple connections, Switch Executive simply connects and disconnects routes and/or route groups to maintain clean, easy-to-maintain code
7. Switch Executive is built on top of the IVI switch class driver and works with any IVI-C compliant switch driver. You can integrate and control PXI, SCXI, GPIB, and VXI switch modules from not only National Instruments, but from any third-party IVI-C compliant switch vendors.
Unless the IVI Switch low-level driver is used, integrating modules with different form factors and/or vendors will likely force the use of multiple lower-level APIs. Using more than one API may decrease code uniformity and cleanliness.
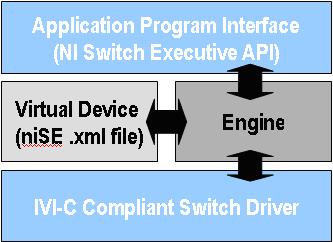
Figure 21: Switch Executive is built on top of the IVI switch class driver and works with any IVI-C compliant switch driver
8. When National Instruments switch hardware is used, Switch Executive has an additional predictive maintenance feature, where the relay count of NI switch modules used within the configuration can be accessed. Relay count is currently the best indication of how much life a relay has left.
If NI-SWITCH or DAQmx Switch is used, relay count can also be accessed for NI switch modules. Third-party switch vendors may or may not have this feature.
Ultimately, NI Switch Executive simplifies large-scale switch system configuration and increases test performance, thus lowering your cost of test. If you’ve just finished designing a large-scale RF solution and need to configure and deploy that solution, NI Switch Executive is strongly recommend.
NI Switch Executive Calibration Feature
Within Switch Executive, there are Comment sections where you can insert any additional information about specific channels, hardwires, routes, and route groups. This information will appear in generated html and Excel reports and is also available programmatically by using the Switch Executive Configuration API. In RF applications, customers use these Comment sections to store calibration information for each specific route group.
For example, you may be interested in calibrating out the insertion loss caused by the switch configuration shown above so that you can accurately calculate the insertion loss caused by the DUT. In other words, you may be interested in automating the following calculation:
Loss DUT = Loss TOTAL – Loss SWITCHES
To calculate Loss SWITCHES, you would disconnect the DUT from the configuration, short the connections the DUT would usually create, connect the route groups one at a time, and measure the insertion loss caused by the switches and cables. As you receive the insertion loss values of interest, programmatically store these values in the Comment section for each route group. This calibration data will now be programmatically accessible, and as shown in figure 16, the data will be displayed next to the route group in any generated reports.
In your program, the next step in calibrating out the insertion loss caused by the switch configuration is to calculate Loss TOTAL. To calculate Loss TOTAL, reconnect the DUT, connect the route groups one at a time, and measure the insertion loss caused by the switches and cables.
As your program logs the values of Loss TOTAL, it can also automatically calculate Loss DUT, as the Loss SWITCHES values you previously stored in the Comments section of each route group can be programmatically retrieved and subtracted from Loss TOTAL.
How to configure and deploy such a large scale RF switch system with National Instruments software
To begin using Switch Executive, you want to open Measurement and Automation Explorer (MAX) and create a new NI Switch Executive (niSE) Virtual Device. When creating a niSE Virtual Device, Switch Executive prompts you for the switches you would like to add. Once all the switches in the system are added, click Next, wait for Switch Executive to build the device and then click Finish.
Once Switch Executive has finished building the Virtual Device, you can begin assigning aliases, configuring hardwires, and creating routes and route groups. You can input this information using the Switch Executive graphical user interface, or you can use the Switch Executive Configuration API to enter this information programmatically. Either way, once you’ve finished inputting this information, you’re ready to enjoy the features of Switch Executive. Within Switch Executive, you have the option to validate the routes and route groups to check for any detectable errors, open a Switch Executive Test Panel to close individual routes and route groups interactively, export your Switch Executive configuration for deployment on other machines, and generate an html and/or Excel report for a hardcopy reference.