Precision Voltage Reference Testing using the NI PXIe-4081 DMM
Overview
Voltage references must be thoroughly tested to verify their accuracy, as they will become trusted sources for other equipment or circuits. A major concern for performing this testing, however, is the accuracy and reliability of the test and measurement equipment that is used to verify the reference. Since the performance of a reference can only be characterized in relation to the performance of another reference or standard, the accuracy of the test equipment and test setup used are paramount to achieving precise results.
The NI PXIe-4081 DMM is one of the industry’s best instruments for performing tests on voltage references because of its superior accuracy and calibration cycle. This paper is an analysis of the factors that affect voltage references and the best practices for accurately characterizing them with the NI PXIe-4081 DMM.
Contents
- Test Accuracy Ratio
- Factors Affecting Stability
- The NI PXIe-4081 DMM's Onboard Reference
- Performing Voltage Reference Tests with the NI PXIe-4081 DMM
- Hardware Requirements
Test Accuracy Ratio
When testing a component such as a voltage reference, it is important to make sure that the accuracy of your measurement equipment is substantially larger than the accuracy of the component being measured. If this criterion is not satisfied, measurement error can be significantly caused by both the device under test and the test equipment, making it impossible to know the true source of error. Because of this, the concept of Test Accuracy Ratio (TAR) is employed to illustrate the relative accuracy of the measurement equipment and the component under test.
TAR = Desired Accuracy of the Component Under Test / Accuracy of Measurement Equipment
Acceptable values for Test Accuracy Ratio range from 4 and above depending on the test being performed and the test certainty that is required.¹ The industry leading accuracy of the NI PXIe-4081 7½ digit DMM makes it a great choice for testing references by keeping this ratio as high as possible.
Factors Affecting Stability
Voltage references are designed to provide stable output values regardless of changes in temperature, input voltage and the passage of time. However, these factors always affect stability, and the quality of a reference device is gauged by how resilient it is to these changes. Because of this, there are multiple specifications that are given to references to characterize their stability in relation to each of these factors. Interestingly, these factors also apply to the instruments that make use of references, as their overall performance is tightly related to the performance of these essential components.
Described below are the factors affecting the stability of precision references and the instruments that use them:
Part I: Initial Accuracy
The design of voltage reference devices combined with variations in the production process result in a tolerance on the initial voltage, as its true can only be known with some finite certainty. This initial accuracy of a reference is defined as its worst-case tolerance after production. It is specified as a ratio:
Tolerance = (Actual Output Value) - (Target Value) / Target Value
Accuracies are generally specified as parts per million (or ppm) of the desired voltage. For instance if a 5 volt reference were to deviate to 5.0005 volts, the result would be a change of 100ppm:
(5.0005 – 5) / 5 = .0001 = .01% = 100ppm
Initial accuracies typically range from hundreds of ppm to a few percent, and can vary greatly depending on the cost and specialty of the reference being used.
When very small tolerances are of the utmost importance, techniques such as laser trimming are sometimes used as a final step in the production process. However, initial accuracy is not always important to an application as this initial tolerance can often be calibrated out. In this case, the variation from this calibration point becomes the most important concern.
Part II: Temperature Stability
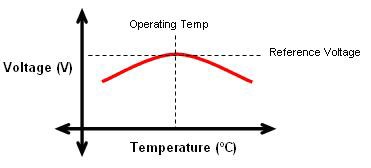
Temperature variation is one of the largest contributing factors that affect stability after initial production. Shown below is the accuracy curve for a typical reference plotted against temperature. Notice that within a certain region around the desired operating temperature, the effects are minimal, but outside of that range, the reference value can change drastically.
Figure 1 - Reference Voltage vs. Temperature
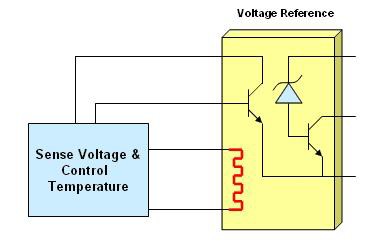
Since high stability over a wide temperature range is a key requirement for a variety of components, several techniques have been designed to minimize the effect of temperature changes such as voltage compensation and oven stabilization. Voltage compensation employs a temperature feedback component that is used to apply corrections to the changing output value in order to keep it as constant as possible. Oven stabilized devices, on the other hand, eliminate the problem at the source by heating components to a constant, well-controlled temperature within an enclosure, ensuring that the temperature change experienced by the sensitive component(s) is nearly eliminated.
Figure 2 - Diagram of an Oven Controlled Voltage Reference\
Temperature stability is generally specified in ppm / ºC or percent / ºC and is mapped to be more or less linear. The stability of an oven stabilized device is typically on the order of .1 - .5 ppm / ºC, where non-oven-stabilized devices generally offer performance in the range from 2 – 10 ppm / ºC.
Part III: Time Stability
Along with the initial accuracy of a reference and its ability to perform well despite changes in temperature, there is a third, more subtle, class of device drift which characterizes the behavior of a device due to the passage of time. For example, in semiconductor production processes, temperatures routinely reach many hundreds of degrees Celsius. Subsequently, the device is packaged or encapsulated, which induces further stresses on the sensitive semiconductor chip inside. While these stresses are minimized for the most part, precision references are sensitive to very small changes in device parameters brought on by packaging stress. Although these same changes would not be important to other circuit components, voltage references must provide values that are stable to within 10ppm, making these minute fluctuations very noticeable.
When the device is subsequently assembled into the circuit board soldering process, further stresses are introduced as the assembly cools and the molten solder hardens (again at several hundreds of degrees C). As the device cools it experiences even more stresses which slowly dissipate over time. The net result of these stresses is an initial time drift that may be higher than the ultimate performance that is possible to achieve from the semiconductor device itself.
Time stability aims to characterize this device drift as a voltage per unit of time. Time stability is typically specified as ppm/√1000 Hours. Typical values for time stability are on the order of 3 to 100 ppm / √1000 Hours.
The NI PXIe-4081 DMM's Onboard Reference
The NI PXIe-4081 is one of the industry’s best DMMs for performing tests on voltage references. One of the reasons for this is the performance of the on-board ultra precision reference that it employs: the LTZ1000. This voltage reference utilizes an oven controlled device for optimum performance and offers among the best temperature and time stability of any reference on the market. This design makes the PXIe-4081 DMM an incredibly stable measurement device. With a maximum reference temperature coefficient of less than 0.3 ppm/ºC and time stability on the order of 8 ppm/year, no other DMM in this price range offers this reference source and the accompanying stability. Furthermore, the PXI-4081 DMM offers a 2-year accuracy specification for long term reliability. Because of this, the desired test accuracy ratio (4x minimum) can be easily achieved on a variety of devices under test for an extended time without calibration.
Performing Voltage Reference Tests with the NI PXIe-4081 DMM
Listed below are the accuracy specifications of the NI PXIe-4081 DMM on the 10V range (ranges down to 100mV are available on this device). Note that the accuracy specifications are listed in reference to the two major classes of stability discussed earlier in this paper: temperature and time.
Figure 3 - Specifications of the NI PXIe-4081 on the 10V Range
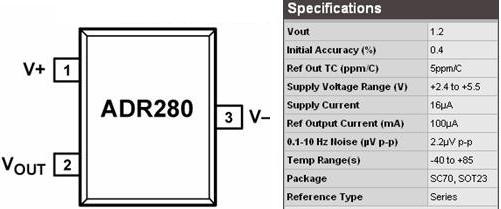
Now, let’s consider testing a particular reference such as the Analog Devices ADR280. The ADR280 (shown below) has an initial accuracy of .4 percent (4000ppm) and a temperature coefficient of 5 ppm/ºC.
Figure 4 - The Analog Devices ADR280 1.2 V Ultralow Power High PSRR Voltage Reference (courtesy of www.Analog.com ²)
Using the equation for Test Accuracy Ratio described previously, we can calculate the relative accuracy of our test system, but first we must calculate the accuracies of our instrument and component under test. For now, we can assume that temperature fluctuations experienced by the ADR280 will be minimal, and that we want to characterize the accuracy of this device at a constant temperature. Resultantly, we can use the ADR280’s initial accuracy specification of 4000ppm on its 1.2V output to get the accuracy of our component under test in volts:
(4000*10^-6) * 1.2V = 0.0048V
Furthermore, let’s assume that we wish to characterize the behavior of this device with respect to time, so a 2-year continuous test would be ideal. Taking the 2-year specification of the 4081 with this voltage level and range, we get:
15ppm of Reading + 0.5ppm of Range
= (12*10^-6) * 1.2V + (0.5*10^-6) * 10V = .000015V
Finally, calculating the TAR for this system, we get
TAR = Desired Accuracy of the Component Under Test / Accuracy of Measurement Equipment
TAR = .0048V / .000015V = 322.148
This shows us that our measurement equipment is approximately 300 times more accurate than reference we are characterizing, putting us well beyond the desired TAR of 4 or better. Because of this, the NI PXIe-4081 could be used to perform extremely reliable tests on the ADR280 for 2 years and more without needing to be calibrated.
Due to the industry leading accuracy of the NI PXIe-4081 the same test could be applied to voltage references that are more than 50 times more accurate than the ADR280 while still maintaining a TAR above 4. For example, even devices that have a very good initial accuracy of .01 percent (100ppm) would still be 4 times less accurate directly after production than the PXIe-4081 would be after 2 years of continuous operation. Because of this, the vast majority of voltage references on the market today can be tested continuously during the 2-year calibration cycle of the NI PXIe-4081.
Technology, however, is perpetually improving and voltage references are becoming both cheaper and more accurate. Because of this, the need can arise to test voltage references with tolerances small enough to surpass the acceptable limit of what can be tested using the 2-year specification of the NI PXIe-4081. In this case, a shorter calibration cycle can be used to substantially increase the guaranteed accuracy of the NI PXIe-4081. For instance, as we saw above, the 2-year specification for the PXI-4081 measuring a 1.2V reference within a +/-5 ºC environment is:
15ppm of Reading + 0.5ppm of Range
= (12*10^-6) * 1.2V + (0.5*10^-6) * 10V = .000015V
But with a 24-hour calibration cycle and a +/-1 degree temperature range the specification is:
2ppm of Reading + 0.5ppm of Range
= (2*10^-6) * 1.2V + (0.5*10^-6) * 10V = .0000029V,
which is nearly 10 times better than the 2-year specification. With this shorter calibration cycle and the resulting performance increase, references with accuracies down to .001% can be reliably tested with the PXIe-4081.
In order to make use of the 24-hour accuracy of the PXIe-4081, however, a voltage reading from an external standard must be taken daily by the PXIe-4081 so that any minute offset in its measurement can be compensated for. Once this single voltage measurement is made and the offset error is calculated, the calculated offset can then be subtracted from all subsequent measurements performed in the next 24-hour period and the certainty of the PXIe-4081’s 24-hour specification can be attained. Voltage standards such as the Fluke 734A that offer sub-ppm accuracy can be used in such applications where constant calibration of the PXI-4071 is required. ³
Hardware Requirements
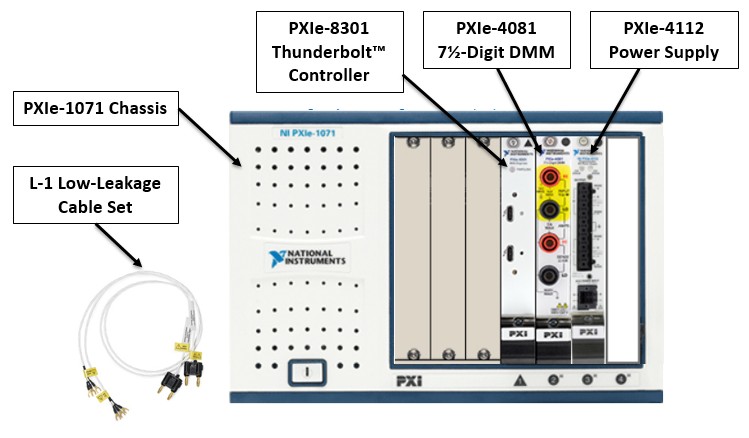
The NI PXIe-4081 DMM is offered only in the PXIe form factor, as the shielding and stable power source provided by PXI are integral to its industry leading performance. Another PXI module that can also be important for testing voltage references is the PXI-4110 programmable power supply, as every voltage reference requires an input power source. Furthermore, this programmable power supply module can be used to finely adjust the voltage at the input to the reference in order to characterize the effect on the output voltage.
For this system, the PXIe-1071 four-slot chassis and PXIe-8301 remote control module were selected. In this case, the PXI system will be controlled by an external laptop or desktop PC using a Thunderbolt 3 connection.
The hardware components used in this system are:
- NI L-1 Low-leakage Cable Set
Figure 5 - PXIe System Hardware for Performing Voltage Reference Testing
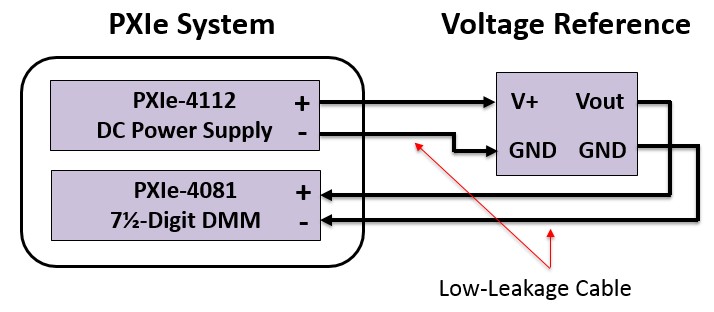
The above components can be connected as shown in the following diagram to achieve a system capable of performing accurate tests on a variety of voltage references.
Figure 6 - Voltage Reference Testing Connection Diagram
It is important to note that the PXI system described above is just one of many implementations that can be used for voltage reference testing. Since the Chassis, Controller, and Instruments used in this system are all modular, each system can be customized to suit the needs of a particular application. For instance, multiple PXIe-4081 DMM modules can be used to test voltage references in parallel, or PXI switching can be used with a single PXIe-4081 DMM to scan through thousands of channels in a single chassis. To interactively customize a PXI system today, visit the PXI Advisor.
Conclusion
The reliability of a test system is mainly dependent on the ratio of the measurement equipment accuracy to the accuracy of the component being measured. The industry leading accuracy and stability of the NI PXIe-4081 DMM combined with its unique 2-year calibration cycle make it ideal for performing tests on voltage references and other precision DC circuitry. For more information on the architecture of the PXI-4081 DMM, or information on specifications and pricing please visit the links below.
Related Links
- NI PXIe-4081 7½-Digit PXI Digital Multimeter (DMM) and 1000 V Digitizer
- Understanding the NI PXI-4081 7½-Digit FlexDMM Architecture
- NI PXIe-4112 Programmable Power Supply
- Learn how to use the PXIe-4081 to characterize batteries and power consumption
- Consider purchasing the PXIe-4081 as part of the PXI Digital Multimeter Bundle
