Analog Sample Quality: Accuracy, Sensitivity, Precision, and Noise
Overview
Learn about sensitivity, accuracy, precision, and noise in order to understand and improve your measurement sample quality.
Contents
- Measurement Sensitivity
- Accuracy
- Precision
- Noise and Noise Sources
- Noise Reduction Strategies
- Summary
- Next Steps
Measurement Sensitivity
When referring sample to quality, you want to evaluate the accuracy and precision of your measurement. However, it is important to understand your oscilloscope’s sensitivity first. Sensitivity is the smallest change in an input signal that can cause the measuring device to respond. In other words, if an input signal changes by a certain amount—by a certain sensitivity—then you can see a change in the digital data.
Don’t confuse sensitivity with resolution and code width. The resolution defines the code width; this is the discrete level at which the instrument displays values. However, the sensitivity defines the change in voltage needed for the instrument to register a change in value. For example, an instrument with a measurement range of 10 V may be able to detect signals with 1 mV resolution, but the smallest detectable voltage it can measure may be 15 mV. In this case, the instrument has a resolution of 1 mV but a sensitivity of 15 mV.
In some cases, the sensitivity is greater than the code width. At first, this may seem counterintuitive—doesn’t this mean that the voltage changes by an amount that can be displayed and yet not be registered? Yes! To understand the benefit, think about a constant DC voltage. Although it would be great if that voltage was really exactly constant with no deviations, there is always some slight variation in a signal, which is represented in Figure 1. The sensitivity is denoted with red lines, and the code width is depicted as well. In this example, because the voltage is never going above the sensitivity level, it is represented by the same digital value—even though it is greater than the code width. This is beneficial in that it doesn’t pick up noise and more accurately represents the signal as a constant voltage.
Figure 1: Sensitivity that is greater than the code width can help smooth out a noisy signal.
Once the signal actually starts to rise, it crosses the sensitivity level and then is represented by a different digital value. See Figure 2. Keep in mind that your measurement can never be more accurate than the sensitivity.

Figure 2: Once the signal crosses the sensitivity level, it is represented by a different digital value.
There is also some ambiguity in how the sensitivity of an instrument is defined. At times, it can be defined as a constant amount as in the example above. In this case, as soon as the input signal crosses the sensitivity level, the signal is represented by a different digital value. However, sometimes it is defined as a change in signal. After the signal has changed by the sensitivity amount specified, it is represented by a different signal. In this case, it doesn’t matter the absolute voltage but rather the change in voltage. In addition, some instruments define the sensitivity as around zero.
Not only does the exact definition of the term sensitivity change from company to company, but different products at the same company may use it to mean something slightly different as well. It is important that you check your instrument’s specifications to see how sensitivity is defined; if it isn’t well documented, contact the company for clarification.
Accuracy
Accuracy is defined as a measure of the capability of the instrument to faithfully indicate the value of the measured signal. This term is not related to resolution; however, the accuracy can never be better than the instrument’s resolution.
Depending on the instrument or digitizer, there are different expectations for accuracy. For instance, in general, a digital multimeter (DMM) is expected to have higher accuracy than an oscilloscope. How accuracy is calculated also changes by device, but always check your instrument’s specifications to see how your particular instrument calculates accuracy.
Accuracy of an Oscilloscope
Oscilloscopes define the accuracy of the horizontal and vertical system separately. The horizontal system refers to the time scale or the X axis; the horizontal system accuracy is the accuracy of the time base. The vertical system is the measured voltage or the Y axis; the vertical system accuracy is the gain and offset accuracy. Typically, the vertical system accuracy is more important than the horizontal.
The vertical accuracy is typically expressed as a percentage of the input signal and a percentage of the full scale. Some specifications break down the input signal into the vertical gain and offset accuracy. Equation 1 shows two different ways you might see the accuracy defined.
Equation 1: Calculating the Vertical Accuracy of an Oscilloscope.
For example, an oscilloscope can define the vertical accuracy in the following manner:
With a 10 V input signal and using the 20 V range, you can then calculate the accuracy:
Accuracy of a DMM and Power Supply
DMMs and power supplies usually specify accuracy as a percentage of the reading. Equation 2 shows three different ways of expressing the accuracy of a DMM or power supply.
Equation 2: Calculating the Vertical Accuracy of a DMM or Power Supply.
The term ppm means parts per million. Most specifications also have multiple tables for determining accuracy. The accuracy depends on the type of measurement, the range, and the time since last calibration. Check your specifications to see how accuracy is calculated.
As an example, a DMM is set to the 10 V range and is operating 90 days after calibration at 23 °C ±5 °C, and is expecting a 7 V signal. The accuracy specifications for these conditions state ±(20 ppm of Reading + 6 ppm of Range). You can then calculate the accuracy:
In this case, the reading should be within 200 μV of the actual input voltage.
Accuracy of a DAQ Device
DAQ cards often define accuracy as the deviation from an ideal transfer function. Equation 3 shows an example of how a DAQ card might specify the accuracy.
Equation 3: Calculating the Accuracy of a DAQ Device.
It then defines the individual terms:
The majority of these terms are defined in a table and based on the nominal range. The specifications also define the calculation for noise uncertainty. Noise uncertainty is the uncertainty of the measurement because of the effect of noise in the measurement and is factored into determining the accuracy.
In addition, there may be multiple accuracy tables for your device, depending on if you are looking for the accuracy of analog in or analog out or if a filter is enabled or disabled.
Precision
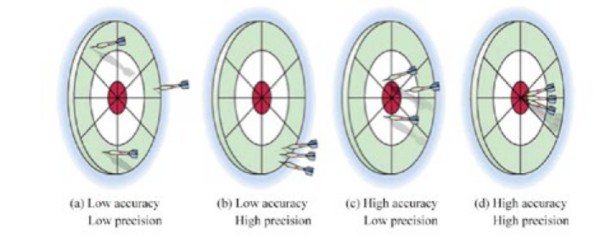
Accuracy and precision are often used interchangeably, but there is a subtle difference. Precision is defined as a measure of the stability of the instrument and its capability of resulting in the same measurement over and over again for the same input signal. Whereas accuracy refers to how closely a measured value is to the actual value, precision refers to how closely individual, repeated measurements agree with each other.
Figure 3: Precision and accuracy are related but not the same.
Precision is most affected by noise and short-term drift on the instrument. The precision of an instrument is often not provided directly, but it must be inferred from other specifications such as the transfer ratio specification, noise, and temperature drift. However, if you have a series of measurements, you can calculate the precision.
Equation 4: Calculating Precision.
For instance, if you are monitoring a constant voltage of 1 V, and you notice that your measured value changes by 20 µV between measurements, then your measurement precision can be calculated as follows:
Typically, precision is expressed as a percentage. In this example, the precision is 99.998 percent.
Precision is meaningful primarily when relative measurements (relative to a previous reading of the same value), such as device calibration, need to be taken.
Noise and Noise Sources
Don’t confuse sensitivity with resolution and code width. The resolution defines the code width; this is the discrete level at which the instrument displays values. However, the sensitivity defines the change in voltage needed for the instrument to register a change in value. For example, an instrument with a measurement range of 10 V may be able to detect signals with 1 mV resolution, but the smallest detectable voltage it can measure may be 15 mV. In this case, the instrument has a resolution of 1 mV but a sensitivity of 15 mV.
Thermal Noise
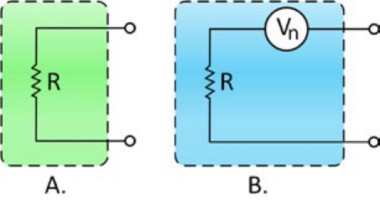
An ideal electronic circuit produces no noise of its own, so the output signal from the ideal circuit contains only the noise that was in the original signal. But real electronic circuits and components do produce a certain level of inherent noise of their own. Even the simple fixed-value resistor is noisy.
Figure 4: An ideal resistor is reflected in A, but, practically, resistors have internal thermal noise as represented in B.
Figure 4A shows the equivalent circuit for an ideal, noise-free resistor. The inherent noise is represented in Figure 4B by a noise voltage source Vn in series with the ideal, noise-free resistance Ri. At any temperature above absolute zero (0 °K or about -273 °C), electrons in any material are in constant random motion. Because of the inherent randomness of that motion, however, there is no detectable current in any one direction. In other words, electron drift in any single direction is cancelled over short time periods by equal drift in the opposite direction. Electron motions are therefore statistically decorrelated. There is, however, a continuous series of random current pulses generated in the material, and those pulses are seen by the outside world as a noise signal. This signal is called by several names: Johnson noise, thermal agitation noise, or thermal noise. This noise increases with temperature and resistance, but as a square root function. This means you have to quadruple the resistance to double the noise of that resistor.
Flicker or 1/F Noise
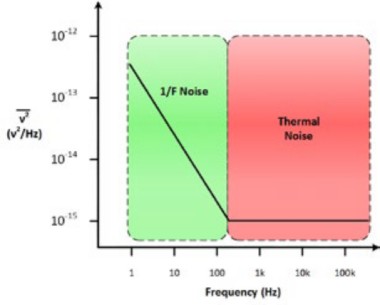
Semiconductor devices tend to have noise that is not flat with frequency. It rises at the low end. This is called 1/F noise, pink noise, excess noise, or flicker noise. This type of noise also occurs in many physical systems other than electrical. Examples are proteins, reaction times of cognitive processes, and even earthquake activity. The chart below shows the most likely source of the noise, depending on the frequency the noise occurs for a particular voltage; knowing the cause of the noise goes a long way in reducing the noise.

Figure 4: An ideal resistor is reflected in A, but, practically, resistors have internal thermal noise as represented in B.
Noise Reduction Strategies
Although noise is a serious problem for the designer, especially when low signal levels are present, a number of commonsense approaches can minimize the effects of noise on a system. Here are some strategies to help reduce noise:
- Keep the source resistance and the amplifier input resistance as low as possible. Using high value resistances increases thermal noise proportionally.
- Total thermal noise is also a function of the bandwidth of the circuit. Therefore, reducing the bandwidth of the circuit to a minimum also minimizes noise. But this job must be done mindfully because signals have a Fourier spectrum that must be preserved for accurate measurement. The solution is to match the bandwidth to the frequency response required for the input signal.
- Prevent external noise from affecting the performance of the system by appropriate use of grounding, shielding, cabling, careful physical placement of wires, and filtering.
- Use a low-noise amplifier in the input stage of the system.
- For some semiconductor circuits, use the lowest DC power supply potential that does the job.
Summary
- Sensitivity is the smallest change in an input signal that causes the measuring device to respond.
- Accuracy is defined as a measure of the capability of the instrument to faithfully indicate the value of the measured signal.
- The accuracy and sensitivity are documented in the specifications document; because companies and products at the same company may use these terms differently, always check the documentation and contact the company for clarification if needed.
- Precision is defined as a measure of the stability of the instrument and its capability of resulting in the same measurement over and over again for the same input signal.
- Noise is any unwanted signal that interferes with the wanted signal.
- There are different types of noise and different strategies to help reduce noise.
Next Steps
- Learn about grounding technologies to reduce noise
- Understand how anti-aliasing filters work
- Learn about NI PXI DMMs, oscilloscopes, and DAQ devices for automated characterization, validation, and production test
- Download all instrument fundamentals content
- Differences Between Accuracy, Code Width and Bits of Resolution


