Using NI VeriStand with Other Software Environments to Create Real-Time Test Applications
Overview
This article provides a brief overview of NI VeriStand and how to create real-time testing applications, it examines the different ways you can different software enviroments as NI LabVIEW to create additional functionality like importing models, personalizing FPGA and adding NI LabVIEW run-time controls as workspace objects.
Contents
- What Is NI VeriStand?
- How Does NI VeriStand Work?
- Using LabVIEW and Other Environments With NI VeriStand
- Next Steps
What Is NI VeriStand?
NI VeriStand provides a framework for creating real-time testing applications more efficiently. Consider real-time test systems such as durability test cells, environmental test systems, or hardware-in-the-loop (HIL) simulators; depending on the application, you need to create many of the following features in your real-time test software:
- Hardware I/O interfaces
- Data logging
- Stimulus generation
- User interface
- Host system communication
- Execution of control algorithms, analysis routines, or simulation models
- Alarms
- Procedures to respond to alarms
- Calculated channels
These tasks and more are implemented and optimized inside the NI VeriStand framework, ready to configure and use. This out-of-the-box functionality implemented in a well-tested architecture accelerates your real-time test application development and reduces your application support and maintenance costs. Although NI VeriStand provides most of the functionality required by a real-time testing application, it is designed to be customized and extended using LabVIEW and other software environments to ensure it always meets your specific application requirements.
How Does NI VeriStand Work?
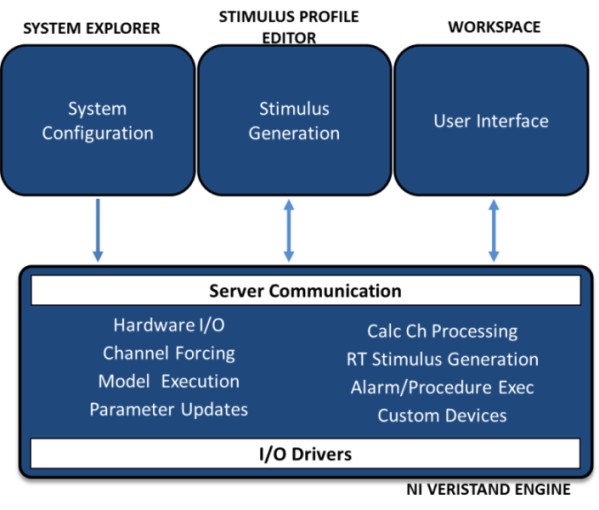
Before examining the different ways to use LabVIEW with NI VeriStand, you need to understand how NI VeriStand works. Figure 1 shows how a real-time test application is created using NI VeriStand.
Figure 1. Configure the NI VeriStand Real-Time Engine using the System Explorer window and then interface with the engine using the NI VeriStand Workspace.
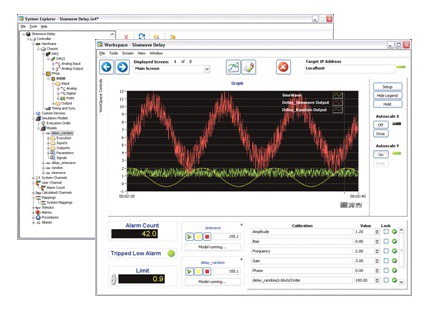
The NI VeriStand System Explorer window is used to configure the NI VeriStand Real-Time Engine that is running on a real-time execution target such as a real-time PXI system or NI CompactRIO system. Once this configuration is deployed to the NI VeriStand Real-Time Engine, the NI VeriStand Workspace window provides a run-time interface to the engine and includes a variety of tools that you can use to monitor and interact with your real-time test application.
Figure 2. System Explorer (background) and Workspace (foreground)
To see short video demonstrations of how to create and run a real-time testing application with NI VeriStand, view the NI VeriStand video demonstrations.
Using LabVIEW and Other Environments With NI VeriStand
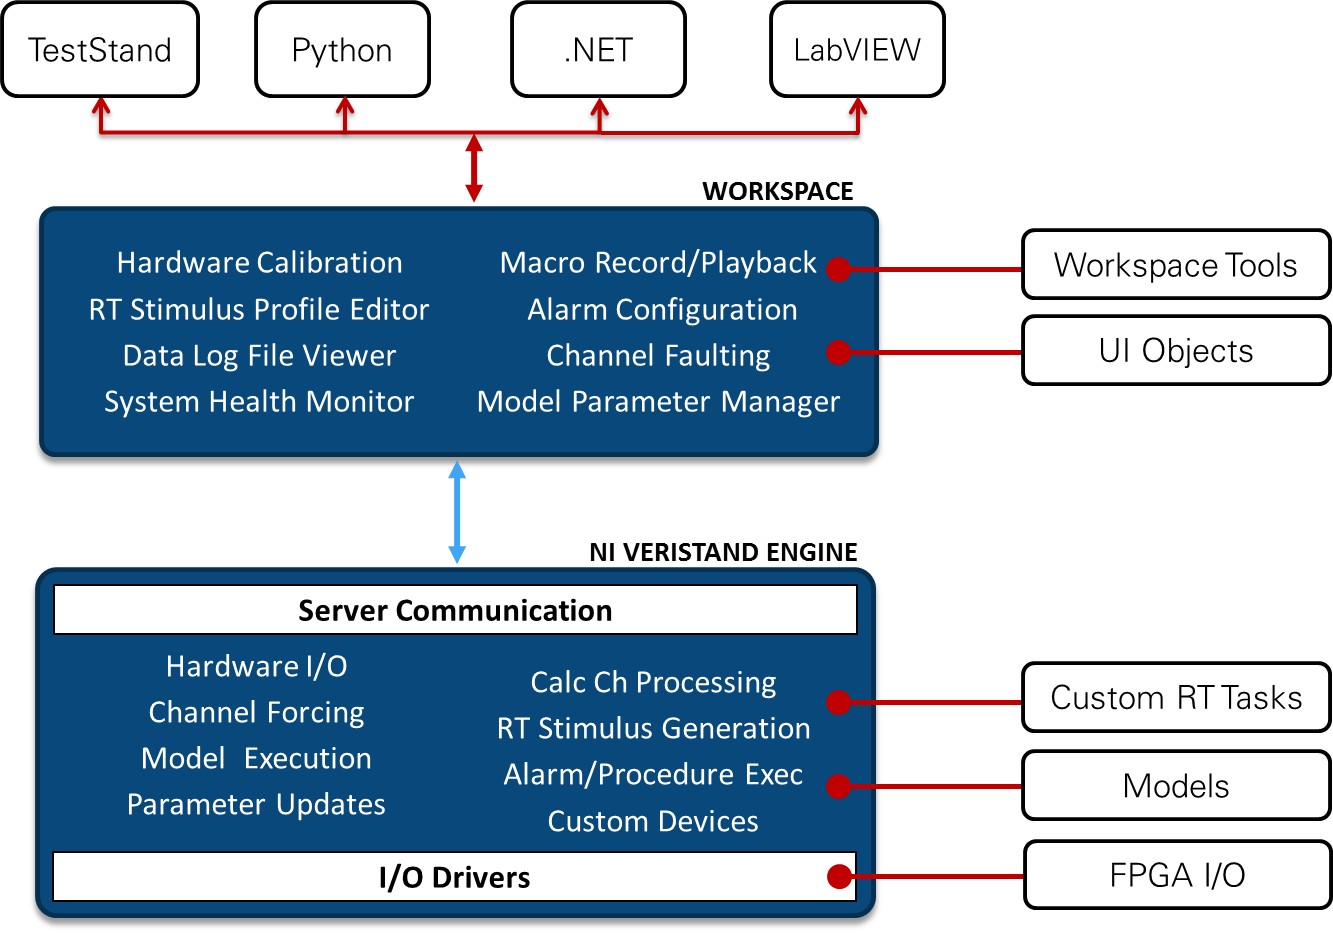
Using LabVIEW and other environments, you can customize the edit-time and run-time capabilities of an NI VeriStand application. Figure 3 shows where you can add more functionality to the application. Note that the blue components are configured using the NI VeriStand environment. The white components can be created using LabVIEW or other environments and added as native components of the NI VeriStand application that work seamlessly with the environment.
Figure 3. NI VeriStand provides a framework of configurable functionality that can be supplemented with additional capabilities created using LabVIEW and other environments.
API Libraries
NI VeriStand provides a .NET-based API for the Workspace and the System Explorer that you can use to create custom interfaces for NI VeriStand or to implement automation of the configuration and/or operation of NI VeriStand applications. For example, you can use the System Explorer API library to create a custom configuration window that limits the changes a user can make to an NI VeriStand application or to simplify the configuration process by making it possible to specify the application parameters in a spreadsheet. Additionally, you can use the Workspace API library to automate the operation of an NI VeriStand application or to create a completely custom run-time interface. These .NET-based APIs can be used by LabVIEW, NI TestStand, and a variety of other environments capable of using .NET interfaces.
Workspace Objects
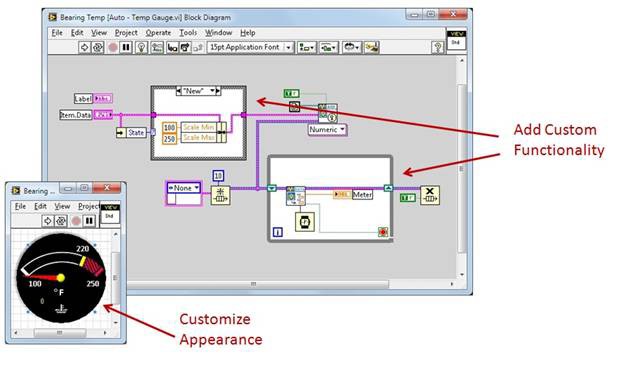
The Workspace is a run-time editable user interface for NI VeriStand applications. To use the Workspace, you simply drag and drop user interface objects to a Workspace screen and then right-click on them to bring up their configuration dialog. NI VeriStand offers a variety of user interface objects, but you can also use LabVIEW to create controls and indicators for NI VeriStand that provide a customized appearance or even run-time functionality such as inline data processing. To make these modifications, simply open the NI VeriStand user interface object in LabVIEW and make your changes.
Figure 4. Create custom user interface objects with LabVIEW.
To learn more, read the white paper titled Creating Custom Workspace Objects for NI VeriStand.
Workspace Tools
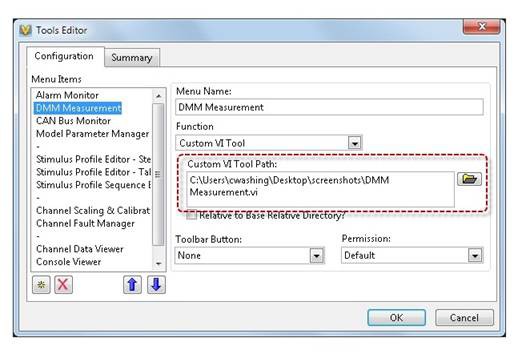
The Workspace also features many tools that you can use to monitor or interact with your NI VeriStand application such as alarm monitors, hardware calibration, and stimulus profile editors. You can use LabVIEW to create custom tools for your NI VeriStand application and place them in the tools menu with the other Workspace tools. For example, you can create a tool that offers an interface to a modular instrument such as a digital multimeter (DMM) to provide specialized measurements as part of a validation procedure.
If you would like to learn more about creating workspace tools for NI VeriStand, read the paper titled Adding a Custom Tool to the NI VeriStand Workspace.
Figure 5. Add LabVIEW VIs to the NI VeriStand Workspace menu with a simple configuration dialog.
Models
The previous customization options affect the NI VeriStand host-side components (the Workspace and the System Explorer); however, you can also add custom functionality to the NI VeriStand real-time application in several ways.
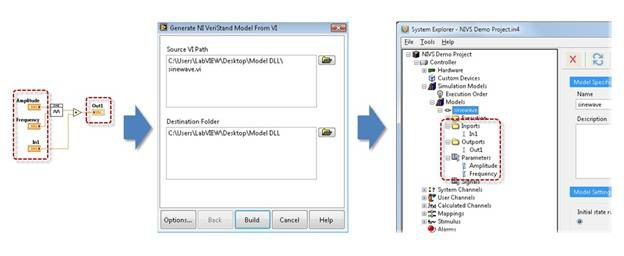
The most common way to add functionality to NI VeriStand using other environments is by importing compiled models to the NI VeriStand real-time application. NI VeriStand can import compiled code from functions or models you create in LabVIEW, The MathWorks, Inc. Simulink® software, SimulationX from ITI, MapleSim from Maplesoft, GT-POWER from Gamma Technologies Inc., and many other modeling and programming environments. With this capability, you can add real-time closed-loop control, system simulation, signal processing, and signal generation to NI VeriStand applications. These components have a standard edit-time interface in the System Explorer, making it easy to use compiled models from a variety of environments within the same application or to switch between compiled models from different environments.
These complied versions of the models are typically produced using a single configuration dialog from the environment’s C-code generation utility. For example, when importing LabVIEW subVIs or subsystem models, you simply select the NI VeriStand Model Generation Utility from the LabVIEW tools menu, select the destination directory, and then import the compiled model using the System Explorer as shown in Figure 6.
Figure 6. Add LabVIEW subVIs and subsystems to your NI VeriStand real-time application.
Every time the NI VeriStand real-time application calls the compiled model, the inputs are latched, the code is executed, and the outputs are updated. Model parameters, or variables, within the model are updated on demand as opposed to each execution iteration. NI VeriStand models provide the simplest technique for adding custom functionality to your NI VeriStand real-time application.
Although many environments are already supported, you can use the NI VeriStand Model Framework that is provided with the product to add support for other environments capable of producing C code.
Learn more about importing simulation models into NI VeriStand.
Custom Devices
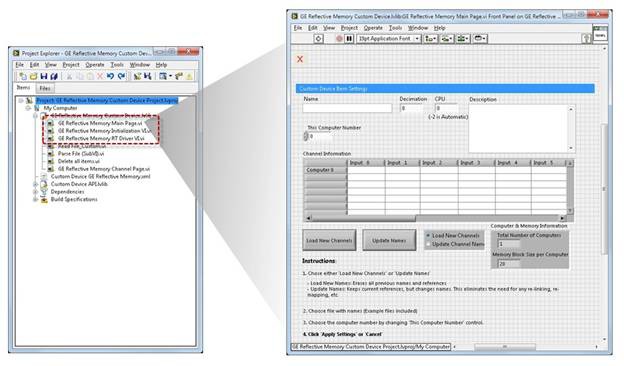
Another way you can add custom functionality to a NI VeriStand real-time application is through the use of custom devices. Compared to NI VeriStand models, custom devices give you more freedom regarding the execution architecture and give you the ability to customize the edit-time experience in the System Explorer. NI VeriStand custom devices are created with LabVIEW using a template library. The template library requires both an edit-time component that is embedded in the System Explorer and a run-time component that executes with the NI VeriStand Real-Time Engine and has access to the engine’s timing and data resources. Examples of how this interface is used include creating support for additional hardware interfaces or implementing custom functionality such as real-time signal processing.
Figure 7. Add custom edit-time and run-time functionality to your NI VeriStand real-time application.
Learn in-depth techniques for building custom devices for NI VeriStand.
FPGA Personalities
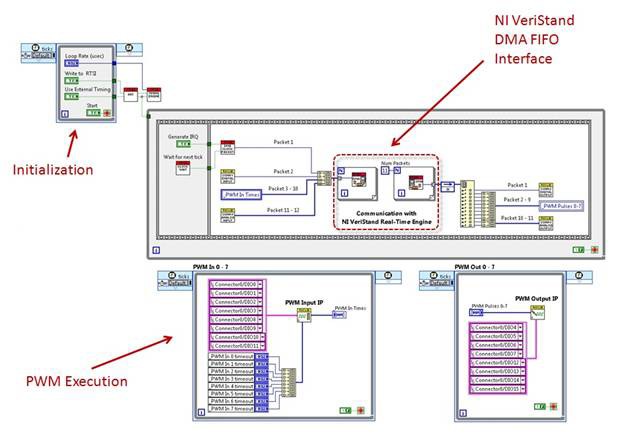
When adding real-time I/O hardware interfaces to NI VeriStand, you can quickly configure a variety of standard analog, digital, and communication bus interfaces; however, NI VeriStand also provides the ability to create user-defined I/O hardware using LabVIEW FPGA-based reconfigurable I/O (RIO) devices. You can use this capability to create custom I/O hardware interfaces that implement signal processing, simulation, triggering, and/or control tasks that execute at rates as fast as 25 ns and that do not consume any of the processing bandwidth of your real-time processor running the NI VeriStand Engine. Additionally, because the I/O interface is FPGA-based, you can easily reconfigure the personality or behavior of the device to adapt to new requirements or to create test systems capable of being used for multiple applications without changing I/O interface hardware.
Figure 8. Use LabVIEW FPGA to create custom, reconfigurable hardware interfaces.
To learn more, read the white paper titled Creating FPGA-Based I/O Personalities for NI VeriStand.
Next Steps
NI VeriStand helps you create real-time testing applications more efficiently by providing a framework that includes both ready-to-use functionality as well as integrated sockets for adding custom functionality with LabVIEW. In addition to the advantage provided by the out-of-the-box functionality, applications built on this framework benefit from the quality, functionality, and performance improvements added to NI VeriStand with each revision.
- Browse downloadable NI VeriStand add-ons
- View NI VeriStand demonstration videos
- Download an evaluation copy of NI VeriStand
- Watch a webinar about how to expanding VeriStand with LabVIEW
Simulink® is a registered trademark of The MathWorks, Inc.
