Do More with LabVIEW FPGA & C Series Digital Modules using CompactRIO
Overview
National Instruments offers over 20 C Series Digital Modules that you can use to input and output digital signals within a NI CompactRIO System. C Series Digital Modules are available in a variety of signal levels, speeds, and channels so you can build a system to meet your specifications. Digital modules provide an excellent way to accomplish basic tasks such as monitoring states or turning machines on and off. When using CompactRIO with DAQmx , you can even implement counter tasks using the DAQmx API, which has the advantage of simpler programming. However, you can extend the capabilities of your digital modules even further when you use LabVIEW FPGA.
This paper examines seven ways that you can increase the functionality of your digital module. The examples below show how to program using LabVIEW FPGA and the FPGA Interface. For these examples to work properly, they must be configured properly for your specific NI CompactRIO Chassis.
Note: Each C Series Digital Module provide different timing characteristics. Be sure to select a module with the timing characteristics that meet your application needs. Also, the example file paths listed below are for LabVIEW 2012. Starting with LabVIEW 2013 the FPGA examples were revamped and placed in new file paths. The file paths for the LabVIEW 2013 and later examples are the new examples that map closely to the examples used in this paper.
Contents
Event Counting
Event counting is one of the simplest tasks that you can accomplish with a digital module. Event counting, the process of counting every rising and/or falling edge on a digital signal, is useful in a wide variety of applications, from measuring a motor to accounting for the volume of liquid flowing through a pipe. Programming with NI-DAQmx driver requires your to use the dedicated on-board counters or a separate counter module to perform counting operations, which is sufficient for many applications. Alternatively, you can create your own counter applications using the FPGA, which increases the number of counters you can implement without the need for an additional counter module. The number of counters is only limited by the number of digital lines in your system and the size of your FPGA.
The following example demonstrates how to implement an event counter using LabVIEW FPGA . The example uses Boolean logic to determine whether a rising or falling edge has occurred. This example can be found in the LabVIEW Example Finder and navigating to:
LabVIEW 2013 and later: Hardware Input and Output»CompactRIO»Signal Generation and Processing»Digital»Counters»Edge Counter»Edge Counter.lvproj.
LabVIEW 2012 and earlier: Hardware Input and Output»CompactRIO»FPGA Fundamentals»Counters»Event Counters»Event Ctr, Either Edge – cRIO.lvproj
Configuring Your Event Counting VI
- Connect the line you want to be counted to any digital input line.
- Open and modify the block diagram of the Quad Ctr VI so the digital input channel of the physical signal replaces the A and B Boolean controls.
- Run the VI to compile it and use it in interactive mode.
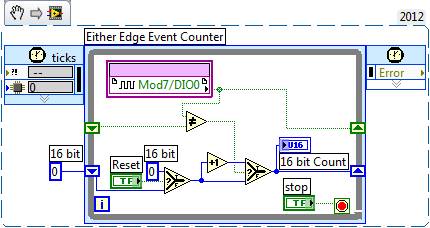
Figure 1. Modify Your Code for Counting External Signals
PWM
Use pulse width modulation (PWM) to output a series of digital pulses to control an analog circuit. You can vary the length and frequency of these pulses to determine the total power delivered to the circuit. PWM signals are most commonly used to control DC motors, but apply to many other applications, such as controlling valves or pumps or adjusting the brightness of an LED.
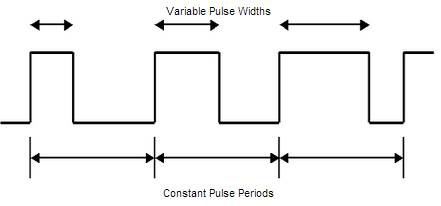
The digital pulse train that makes up a PWM signal has a fixed frequency and varies the pulse width to alter the average power of the signal. The ratio of the pulse width to the period is referred to as the duty cycle of the signal. For example, if a PWM signal has a 10 ms period and its pulses are 2 ms long, the signal is said to have a 20 percent duty cycle. By controlling the duty cycle of the PMW, you can control how much power the analog circuit uses. You can use NI digital modules to output your controlling PWM or measure the duty cycle of an existing PWM.
If your CompactRIO controller supports NI-DAQmx programming, you can also implement PWM tasks in NI-DAQmx. However, because PWM requires counters, the number of PWM tasks is limited by the number of onboard counters in your CompactRIO. Programming this task in FPGA increases the number of PWM tasks that you can implement.
Figure 2. Pulse Width Modulation
The following example uses the Loop Timer.vi to control the length of a pulse’s high and lows This example can be found in the Example Finder and navigating to:
LabVIEW 2012 and earlier: Hardware Input and Output»CompactRIO»FPGA Fundamentals»Counters»Event Counters»PWM Out, Simple - cRIO.lvproj.
LabVIEW 2013 and later: Hardware Input and Output»CompactRIO»Signal Generation and Processing»Digital»Pulse Width Modulation»PWM Generation» PWM Generation.lvproj.
Configuring Your PWM VI
- Connect the line you want counted to any digital input line.
- Modify the block diagram of the PWM Out, Simple VI with the digital output channel on which you want to generate your PWM.
- Run the VI to compile it and use it in interactive mode.
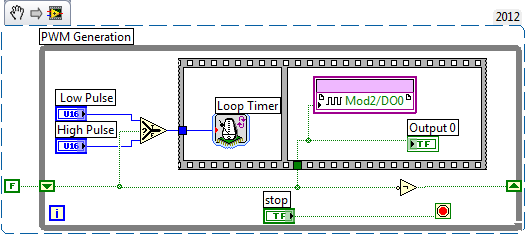
Figure 3. Modify Your Code to Generate a PWM Signal
Encoders
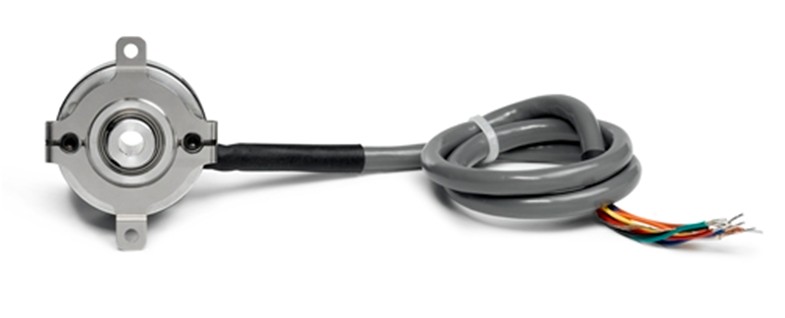
An encoder is an electromechanical device used to measure motion or position, in applications such as medical device or industrial machine testing. Most encoders use optical sensors to provide electrical signals in the form of pulse trains. Multiple pulse trains provide more information about the signal. A digital module such as the NI 9401, can capture these pulse trains and use the FPGA, to translate the signals into motion, direction, or position information. You can also use C Series Digital Modules to mimic the output of an encoder for other applications such as Hardware in the Loop (HIL) testing. Because they service so many types of applications, encoders can come in many different shapes, sizes, and output levels. NI offers multiple digital modules you can integrate with the specific encoder your application requires. Use the NI 9421 to read 0 – 24V signals in an industrial environment. Use the NI 9401 to read Transistor-to-Transistor Logic (TTL) or 0 – 5V signals in a clean laboratory environment.
Again, if your CompactRIO controller supports NI-DAQmx programming, you can also implement Encoders tasks in NI-DAQmx, but the number of Encoder tasks will be more limited. Programming this task in FPGA increases the number of Encoder tasks that you can have.
The following example demonstrates how to use LabVIEW FPGA and your CompactRIO system to implement encoder measurements. The example uses Boolean logic to determine whether an AB Quadrature encoder is turning and which direction it is turning. This example can be found in the Example Finder and navigating to:
LabVIEW 2013 and later: Toolkits and Modules»FPGA»CompactRIO»Signal Generation and Processing»Digital»Quadrature Encoding»Quadrature Decoder» Quadrature Decoder.lvproj.
LabVIEW 2012 and earlier: Hardware Input and Output»CompactRIO»FPGA Fundamentals»Counters»Quadrature Input»Quad Ctr – cRIO.lvproj.
Configuring Your Encoder Application
- Connect your A and B signals to two digital lines.
- Modify the block diagram of the Quad Ctr.vi with the digital input channel of the physical signal to replace the A and B Boolean controls.
- Run the VI to compile it and use it in interactive mode.
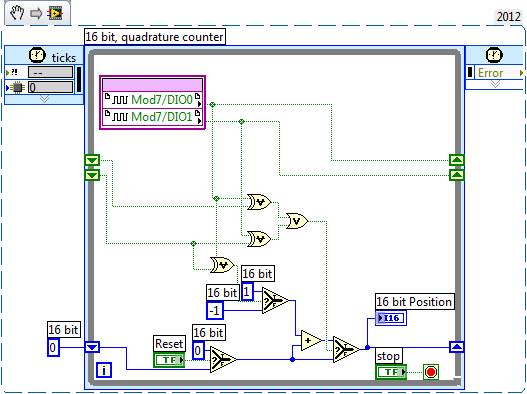
Figure 4. Use Boolean logic within the FPGA to Track Position
Frequency
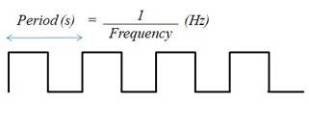
The frequency of a digital signal is the rate at which the period occurs, where the period is the time between either rising or falling edges, or the inverse of the period with a unit of Hertz (Hz). The frequency of a digital signal can be extremely useful in a wide variety of applications, from determining speed or angular velocity to decoding the intensity of a light source. Use LabVIEW and CompactRIO to program your C Series Digital Module to transfer the digital signal to the FPGA, which uses a period decoding algorithm. The period is then transferred to a host application, which extrapolates the frequency. After you acquire the frequency, you can map it to a known physical phenomenon.
Once again, by programming frequency input tasks in LabVIEW FPGA, you can increase the number of FPGA input tasks compared to NI-DAQmx. This may be especially useful, as some frequency input tasks require two counters.
Figure 5. Period and Frequency of a Digital Signal
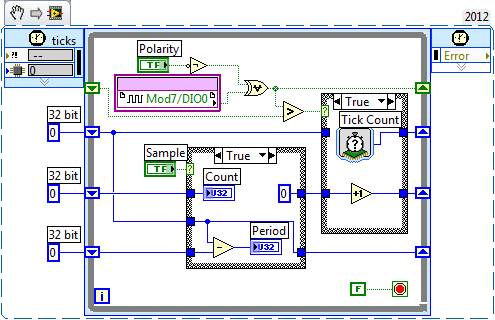
The following example describes how to implement frequency measurements using LabVIEW FPGA and a CompactRIO system. The example uses Boolean logic to determine when an edge occurs and then uses the FPGA clock to determine the time between pulses. This example can be found in the Example Finder by going into LabVIEW and navigating to:
LabVIEW 2013 and later: Hardware Input and Output»CompactRIO»Signal Generation and Processing»Digital»Period and Phase Measurement»Period and Phase Measurement.lvproj.
LabVIEW 2012 and earlier: Hardware Input and Output»CompactRIO»FPGA Fundamentals»Counters»Frequency Measurement»Count and Period – cRIO.lvproj.
Configuring Your Frequency Measurement
- Physically connect signal of interest to a digital line.
- Modify the block diagram of the Count and Period (FPGA) VI with the digital input channel of the physical signal to replace the A and B Boolean controls.
- Run the VI to compile it and use it in interactive mode.
Figure 6. Determine the Period and Frequency of a Digital Signal
Learn more about using NI hardware for frequency measurements https://www.ni.com/en/shop/data-acquisition/measurement-fundamentals/frequency-measurements-how-to-guide.html
Digital Filtering
Environmental factors such as ambient noise or the mechanical “bouncing” of an industrial switch or sensor can make it difficult for your data acquisition system to receive clear signals. A CompactRIO system with FPGA allows you to implement a technique known as digital filtering or digital de-bouncing. Digital filtering is the process of verifying that a signal has remained at its new level for a specified period of time before allowing the signal change to propagate to the processing aspect of the system. This method filters glitches or noise on the line and reduces unwanted behavior in the system.
The following example demonstrates how to filter digital lines using Boolean logic, LabVIEW FPGA, and a CompactRIO system. The signal must remain at its new level for the specified amount of time before the filtered input will reflect the change. This example can be found in the Example Finder by going into LabVIEW and navigating to:
LabVIEW 2012 and earlier: Hardware Input and Output»CompactRIO»FPGA Fundamentals»Digital Filter»Digital Filter – Continuous – cRIO.lvproj.
LabVIEW 2013 and later: An equivalent example no longer exist. You can drag snippet below into a blank VI.
Filtering Your Digital Line
- Physically connect the signal of interest to a digital line.
- Modify the block diagram of the Digital Filter – continuous VI with the digital input channel of the physical signal to replace the input control.
- Run the VI to compile it and use it in interactive mode.
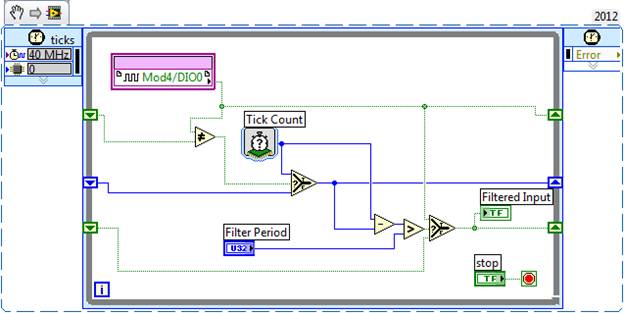
Figure 7. Filter Your Digital Signal Using the FPGA
Communication
CompactRIO systems and C Series Modules include many standard communication protocols, which vary from serial and Ethernet to industrial protocols like PROFIBUS and MODBUS. However, these standard protocols can be limited in their ability to communicate to devices that use different protocols or connectors. A CompactRIO system allows you to still communicate with these devices, using a digital module and LabVIEW FPGA.
Figure 8. Implement the SPI Communication Protocol Using LabVIEW and LabVIEW FPGA
Refer to Understanding the SPI Bus with NI LabVIEW for a deeper explanation of this protocol, and Implementing SPI Communication Protocol in LabVIEW FPGA for a detailed example of how to implement the SPI bus protocol using LabVIEW FPGA.
Custom Triggering
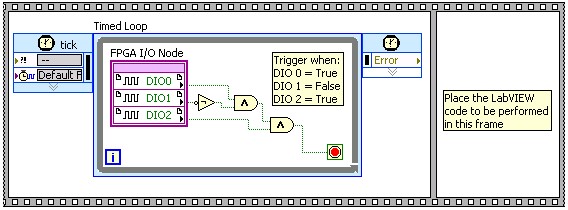
Triggering is an essential feature in any data acquisition or control system. Use triggering for synchronization, alarms, or startup/shutdown tasks. However standard trigger functions in NI-DAQmx do not offer custom functionality, such as the ability to use multiple input triggers or to trigger off either edge or both edges. Use FPGA with a CompactRIO system to create custom triggering applications.
Refer to Creating Triggers and Counters (FPGA Module) for an example of how to generate a trigger only when a digital pattern occurs.
Figure 9. Generate a Trigger only when a Digital Pattern Occurs
Next Steps
- Watch short videos on Writing Your First LabVIEW FPGA Program.
- Learn how to Simplify System Design with the CompactRIO platform.
- Learn more about the C Series Digital Module.
