LabVIEW Equivalent of If, If-Else, and Switch Statements
Overview
In text-based languages, you may be familiar with the if, if-else, or switch statements; LabVIEW’s equivalent structures are the Select structure for simple if statements and the Case Structure when having more input choices is necessary like an if-else or switch statement. Like their text-based equivalents, the LabVIEW code that executes depends on the value of an input. This document discusses how you might structure code to execute similarly to the if, if-else, or switch statements.
Contents
If Statements
Select Function
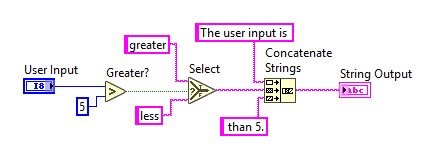
For simple conditions and actions, the Select Function completes the equivalent job of an if-statement. You can find the select function under Functions» Programming >> Comparison >> Select. The Select Function accepts three inputs. Those inputs listed in order from top to bottom can be seen below:
- The desired output of the TRUE case
- A TRUE/FALSE Selector
- The desired output of the FALSE case
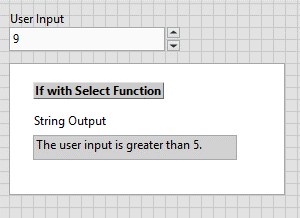
The selector input takes in Boolean data. Depending on the value of the selector data, the Select function returns the value wired to the true or the false input. The true and false outputs can be various data types. See the example below using a string data type.
Case Structure
The select function is useful is you only need to change your output depending on your input. However, if you need to change what code is executed depending on your input, you will want to use a Case Structure.
You can find the Case structure on the Functions Palette under Programming >> Structures >> Case Structure. There are three sections of a case structure:
- The selector label
- The subdiagrams or cases
- Case selector
The Case Structure defaults to one True case and one False case. For each case, you can write LabVIEW code that will be executed if the condition of the case is met.
The Case Structure has a green question mark input terminal called the case selector terminal. For using the case structure in the default True/False cases, wire a Boolean input to this terminal to set the conditions for which case should be executed.
The example below shows similar code to the Select example. The key difference is the with the Case Structure, you able to execute code selectively. (If using a Select function, you would not be able to manipulate your data (i.e. execute code) in a variable way as seen below.)
In this simple example, if the user input is greater than 5, the case selector reads a true Boolean and executes the true case in which the user input is multiplied by a random number. Alternatively, if the user input is less than 5, the case selector reads a false Boolean and executes the false case where the input undergoes a multiplication of larger random number. Each case has distinct code and outputs different from the alternative case.
If-Else and Switch Statements
Case structures in their default true/false form can be used as an if statement. However, one advantage of using Case Structures is that you can change the data type of the selection terminal and add cases to create if-else statements and switch statements.
After you have created a case structure, you can change the data type of the input selector to string, integer, enumeration, or error cluster data types. Wiring an input of your desired data type to the case selector automatically changes the selector label options to fit your new data type. For example, see in the figure below that a numeric data type User Input is wired to the selector terminal, and the selector label now shows a numeric option.
You can add subdiagrams to the case structure for the other comparisons (or possible states) you would like to make. The default case of the Case Structure serves as your “else” in the if-else statement or the “default” case of the switch statement. In each case, the code executed is based on the input wired to the selector terminal.
The architecture of Case Structures used as switch statements offers flexibility regarding data types the user can input as well as modification for future use. Instead of a numeric input, the Case Structure can also use an easily modifiable enumerated input as its case selector input.
Additional Resources
For more information on adding, rearranging, and duplicating cases in the case structure please reference tutorials in the Case Structure LabVIEW Help.
Refer to the Case Structure - Selector Data Types VI in the labview\examples\Structures\Case Structure directory for an example of using the Case Structure.
(Note that different versions of LabVIEW may have slightly different titles for their example folder structure.)
Attached is an example VI with the three structures discussed here: an if statement with a Selector function, an if-else statement with a Case Structure, and an if-else or switch statement with a Case Structure.


