Serial, GPIB, and VXI Instrument Control with Measurement Studio VISA
Overview
You can configure and control serial, GPIB, and VXI instruments through a single interface -- VISA, the Virtual Instrument Software Architecture application programming interface (API). It is a high-level driver that calls the lower-level drivers for each instrument. This application note introduces VISA and explains how you can take advantage of VISA using the Measurement Studio VISA (CWVISA) ActiveX control in Visual Basic to perform instrument control with serial, GPIB, and VXI instruments -- with a single programming interface.
- Note
Contents
What is VISA?
VISA is a driver software architecture developed by NI to unify communication with serial, GPIB, and VXI instruments and simplify your instrument control programs. The VISA API accesses serial, GPIB, and VXI instruments through operating system calls and the NI-488.2 and NI-VXI driver software, as shown in Figure 1.

Figure 1. VISA Structure
VISA offers the following benefits:
- Interface independence, whereby VISA uses the same methods to communicate with instruments, regardless of the interface type. For example, the VISA command to write an ASCII string to a message-based instrument is the same for serial, GPIB, and VXI. With this feature, you can use a single API to work with different instruments.
- An object-oriented architecture that can easily adapt to new instrumentation interfaces as they are developed in the future. You can easily include new interfaces.
Built-in functionality for instrumentation programming in a very compact command set.
What is CWVISA?
CWVISA is an ActiveX control that abstracts the VISA API, so you can interface with serial, GPIB, and VXI instruments through interactive property pages and a simplified API. For example, use the CWVISA property pages to interactively find and communicate with your instruments, uncover interface problems, or verify communication with your instrument during design time. You can use the VISA ActiveX control in any ActiveX control container, including Microsoft Visual Basic, Visual C++, and Borland Delphi.
How Can I Use CWVISA?
| Begin by placing the CWVISA control on the user interface form. Notice that Visual Basic names this control CWVisa1. Right click on the control and select Properties. The rest of this application note explains how to use the property pages to select the resource and communication properties, test communication, and parse data from the instrument, as well as how to programmatically control communication through the simplified API. |
Determining the Instrument Resource Name
A resource is the serial, GPIB, or VXI instrument or controller with which you want to communicate. The resource name specifies the exact name and location of the VISA resource. For example, the resource name ASRL1::INSTR describes the instrument on COM port 1 of your computer, and GPIB0::13::INSTR, shown in Figure 2, describes a GPIB instrument at address 13.
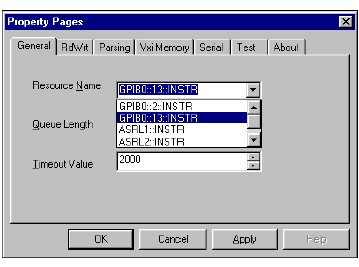
Figure 2. Selecting an Instrument from the General Property Page
The first challenge in interacting with an instrument is often determining its address and resource name. CWVISA searches your computer for all available COM ports and active GPIB and VXI instruments; it includes all available resources in the Resource Name list. If you know the resource name of the instrument with which you want to communicate or you want to change the resource during run time, specify the resource name programmatically, as in the following line of code:
CWVisa1.RsrcName = "GPIB::13::INSTR"
Configuring Read and Write Settings
Configure the following general interface and communication settings in the RdWrt property page. Figure 3 shows one way you might configure communication settings.
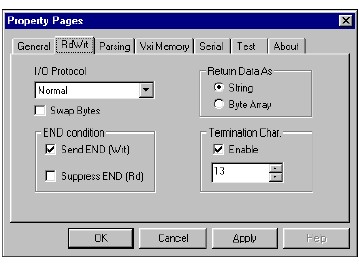
Figure 3. Configuring General Communication Settings with the RdWrt Property Page
Serial I/O Protocol -- Select either Normal or ASRL488. Use the ASRL488 setting if your serial instrument accepts 488.2-style commands. With the ASRL488 setting, you can communicate with your instrument as you would any other message-based device, as in the following example:
Dim status As Variant
'Set the I/O Protocol ASRL488 data transfer
CWVisa1.RdWrt.IOProtocol = cwvisaProtocolASRL488
'Clear device
CWVisa1.Clear
'Write "*IDN?" to the instrument
CWVisa1.Write "*IDN?"
'Get the serial poll value (status byte)
status = CWVisa1.ReadSTB
'Read and display the response in a text box on the user interface
Text1.Text = CWVisa1.Read
GPIB I/O Protocol -- Select either Normal for normal IEEE488 communication or HS488 for high-speed 488 data transfer.
VXI I/O Protocol -- For most VXI instruments, select Normal. A few instruments support the FDC (Fast Data Channel) I/O.
Swap Bytes reverses the bytes from the device. Enable this option if your device is Big Endian. Refer to your device documentation to determine if the instrument returns data in Big Endian format.
'Big Endian format (most significant byte first)
CWGPIB1.SwapBytes = True
Termination Char specifies the character you want to use to terminate read operations. Refer to your instrument documentation to determine if you need to use a termination character and what that termination character must be.
'Use carriage return character as termination character
CWVisa1.RdWrt.TerminationCharacter = 13
'Enable the use of termination characters
CWVisa1.RdWrt.TerminationCharacterEnable = True
Configuring Interface Settings
If you are communicating with serial or VXI instruments, you need to set some additional interface properties.
Serial Communication -- Use the Serial property page to set the baud rate, data bits, stop bits, and the flow control method, as shown in Figure 4, or set the serial properties programmatically, as in the following examples:
CWVisa1.Asrl.BaudRate = 9600
CWVisa1.Asrl.DataBits = cwasrlDataBits8
CWVisa1.Asrl.StopBits = cwasrlStopBits1
CWVisa1.Asrl.FlowControl = cwasrlFlowNone
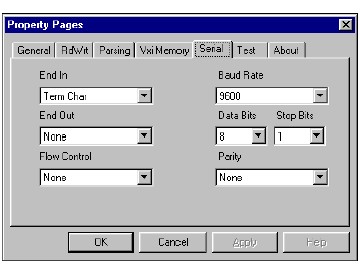
Figure 4. Setting Serial Interface Settings with the Serial Property Page
VXI Communication -- Use the VXI Memory property page to set the properties related to VXI register access. Register-based instruments have processor devices called registers to temporarily store data during processing. Source and Destination properties apply to high-level register access operations, while Window properties apply to low-level register access. Specify the VME access privilege with the Access Priv. property., and use Address Incr. to increment the destination address by 1 after each transfer using the MoveIn or MoveOut methods.
Figure 5 shows one way you might transfer data with a VXI instrument.
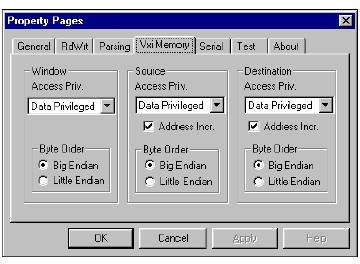
Figure 5. Using the VXI Memory Property Page to Set VXI Register-Access Properties
You can set these same communication properties programmatically. The following example configures the CWVisa1 control for accessing a FIFO (nonincrementing address):
'Source Access Priv to Data Privileged
CWVisa1.VxiMemory.SrcAccessPriv = cwVxiMemoryDataPriv
'Byte Order to Big Endian
CWVisa1.VxiMemory.SrcByteOrder = cwVxiMemoryBigEndian
'Address Incr. to 0
CWVisa1.VxiMemory.SrcIncrement = 0
Testing Instrument Communication
Measurement Studio makes it easy to test communication so you can verify that your instrument is working.
1. Open the Test property page. From this property page, you can write and read message-based commands. All serial and GPIB instruments and many VXI instruments recognize a variety of message-based command strings.
2. Type a command in the Send string field, such as the *idn? identification query. Refer to your instrument documentation to determine which message-based strings it recognizes.
3. Press Execute. Notice the response that appears in the String received indicator. Figure 6 shows the response received from an NI GPIB and Serial Device Simulator. You also may press Write to write data to the instrument and Read to read the response from the instrument.
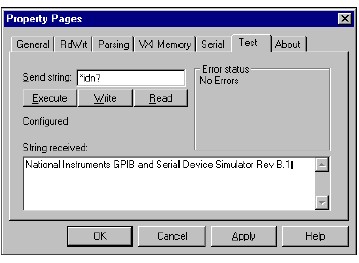
Figure 6. Using the Test Property Page to Read to and Write from an Instrument
Opening a VISA Session
Open a session and begin communicating with the instrument from your program. A session is a connection or link from the CWVISA control to the resource, and you can open one with the Open method. The Open method initializes resources and configures the VISA communication session with the settings that you specified in the property pages or programmatically. For example, you might want to open a VISA session when users click on an Open Session button on the front panel, as in the following event procedure:
'Open session
Private Sub OpenSession_Click()
End Sub
Transferring Data
CWVISA can communicate with serial, GPIB, and both message-based and register-based VXI instruments and controllers. Message-based instruments implement the defined VXIbus registers and communication protocols and recognize Word Serial Protocol. All serial and GPIB instruments and many VXI instruments recognize a variety of message-based command strings. You will use a standard set of method calls to write to and read from all message-based instruments. The CWVISA control provides a set of register access methods you can use with VXI instruments. For high-level register access, use the In and Out methods. For low-level register access, use the Peek and Poke methods.
Message-Based Synchronous I/O -- Use the Write and Read methods to perform synchronous message-based I/O. For example, the following code sends an identification query to an instrument and then displays the instruments response in a text box on the user interface:
CWVisa1.Open
CWVisa1.Write "*IDN?" & vbLf
Text1.Text = CWVisa1.Read
Message-Based Asynchronous I/O -- You can use WriteAsync and ReadAsync to perform asynchronous I/O so the write and read operations start and return immediately. When a ReadAsync method completes, the CWVISA control generates an event and passes the data to the DataReady event procedure. When a WriteAsync method finishes, the CWVISA control generates a WriteComplete event. You can use these asynchronous methods and events to continue executing other tasks during long read or write operations. For example, when you call ReadAsync, your program finishes reading data and the CWVISA control generates the DataReady event, which calls the following event procedure:
Private Sub CWVisa1_DataReady(ByVal taskNumber As Integer, data As Variant)
Text1.Text = data
End Sub
High-Level Register Access with the In and Out Methods -- To read data from a high-level VXI register, use the In8, In16, and In32 methods to read 8-, 16-, and 32-bit values, as in the following example:
'Read a 32-bit value from offset 0 in A32 space on the VXI bus
X = CWVisa1.In32 cwVxiA32Space, 0
Use the corresponding Out methods to write data to the specified offset, as in the following example:
'Write the 32-bit value Y from offset 0 in local space on the VXI bus
CWVisa1.Out32 cwVxiLocalSpace, 0, Y
Low-Level Register Access with the Peek and Poke Methods -- Before using the Peek and Poke methods, map a part of the VXI memory space to local memory with the MapAddress method. MapAddress accepts as parameters the address space, the base VXI address, the size of memory in bytes, and a suggested local address to which the memory can be mapped. The method returns the actual local address to which the specified base VXI address was mapped. Then use the Peek and Poke methods to read and write data from the mapped space.
The following code maps a space in local memory, peeks and pokes the space, and unmaps the space:
'Map 16 bytes of memory in A16 space
X = CWVisa1.MapAddress(cwVxiA16Space, &hC000, 64, False, 0)
'Read the 16-bit value at the beginning of the address space
Y = CWVisa1.Peek16(X)
'Write the 16-bit value 35 to the register at the second byte of the address space
CWVisa1.Poke16 X + 2, 35
'Free the space in local memory
CWVisa1.UnmapAddress
Note: Use the MapAddress method to map a region of a VXI address space to local memory. Check the mapped window size and window base properties to make sure you do not access an area outside this window.
Using Events to Synchronize Communication
Events provide communication between VISA resources and your program. If you want your program to respond to any of the following conditions, define event procedures for the appropriate event:
- ServiceRequest -- Notifies your program when a device requests service from its controller. This event returns the status byte that was obtained by serial polling the device generating the request. This event is primarily produced by GPIB instruments asserting the GPIB SRQ line and message-based VXI instruments.
- Trigger -- Notifies your program when a device asserts a trigger line on the VXI backplane. The returned VISA event contains a TriggerId property specifying the trigger line with which the event is associated.
- VxiSignalProc -- Notifies your program when a device asserts an interrupt on the VXI backplane or generates a VXI signal. When a VXI interrupt or signal occurs, the StatusId value is returned by the VXISignalProc event. The lower eight bits of the StatusId are set to the logical address of the instrument creating the signal or interrupt.
- VxiVmeInterrupt -- Notifies your program when an instrument asserts an interrupt on the VXI backplane. This event is similar to the VxiSignalProc event except it is produced only for VXI or VME interrupts, not signals.
The CWVISA control queues events so that you can access and handle them later. CWVISA automatically calls the EnableEvent method on all event types except Trigger when an Open method is called. You can use the EnableEvent method to add just the events you want placed in the event queue. For example, the following Visual Basic code enables event queuing for the VxiVmeInterrupt event so that when this event occurs, it is placed in a queue rather than calling its event procedure:
CWVisa1.EnableEvent cwvisaEventVXIVMEInterrupt
The following Visual Basic code checks the event queue to determine if a VXIVMEInterrupt event is in the queue, and, if one is, it obtains the StatusId value of the interrupt:
Dim ReturnEvent As CWVisaEvent
Dim stat As Boolean
stat = CWVisa1.WaitOnEvent(cwvisaEventVXIVMEInterrupt, 0, ReturnEvent)
If stat Then
Text1.Text = ReturnEvent.StatusId
End If
If you are concerned about events that occur at certain points in your program, you can empty the queue or disable event queuing. To empty the queue of all events of the same type, use the DiscardEvents method:
CWVisa1.DiscardEvents cwvisaEventVXIVMEInterrupt
To disable events from being placed in the queue, use the DisableEvent method:
CWVisa1.DisableEvent cwvisaEventVXIVMEInterrupt
Parsing Data
Instruments are notorious for sending back cryptic binary strings or strings containing a combination of header and data information. It is often frustrating to parse these strings into a usable data format. The CWVISA control provides built-in data parsing to make working with instrument data easier.
Use the Parsing property page to create a parsing task. A parsing task describes how you want data parsed. You then execute this task from your code to automatically parse the data returned from an instrument. You can specify as many parsing tasks as you need, so that you can parse each type of interaction with an instrument differently.
The CWVISA control provides a built-in task called the Number Parser. The Number Parser converts a delimited string into an array of numbers, stripping out headers and other nonnumerical information. For example, suppose that you have an instrument that responds to the DATA? command by returning a comma-separated list of numbers preceded by some header information. The string might look something like WFM3.246,3.295,4.653,3.334. Without the Number Parser task, you would parse the string to retrieve each ASCII-represented number and convert it to a real numeric type. With the Number Parser task, you parse and read data with the same method call. The following Visual Basic code demonstrates how to open a VISA session, query a message-based instrument with the Data? command, and read parsed data:
'Variant will hold an array of doubles - the parsed data
Dim data As Variant
'Open a VISA session
CWVisa1.Open
'Write Data? to the instrument
CWVisa1.Write "Data?"
'Read the response
data = CWVisa1.Tasks.Item("Number Parser").Read
Closing the VISA Session
Use the Close method to deallocate resources and end the VISA session. In the following event procedure, the VISA session ends when users click the Close Session command button:
'Close the session
Private Sub CloseSession_Click()
End Sub
Conclusion
NI VISA is a solution for diverse instrument control. Measurement Studio delivers property pages through which you can interactively integrate VISA instrument control into your program. For example, the CWVISA control finds all VISA resources so you only have to select from those listed. CWVISA offers a Test property page for interacting with instruments and troubleshooting communication problems. Using the Parsing property page, you can specify parsing tasks so that data is returned to your program in a usable format. Through the Measurement Studio VISA API, you can perform synchronous and asynchronous communication with serial, GPIB, and VXI instruments and use event handling and queuing to speed up the execution of your program.