Creating a TestStand Database Schema from Scratch
Overview
An important feature of TestStand is the ability to log data to a database. TestStand ships with several database schemas that define how TestStand logs results to a database. However, users may also modify these schemas or create a schema from scratch. There are several reasons why this may be used:
- To include additional data that may need to be logged to the database, especially from custom step types
- To reduce the amount of data stored to the database
- To integrate with an existing database
In general, it is easier to take an existing schema and modify it as needed. However, if the desired schema is considerably different than the existing schemas you may wish to start from scratch and create a new Schema. This document assumes you have basic understanding of database concepts, SQL, and your Database Management System (DMBS) client software. For more information on basic database concepts, consult TestStand Database Fundamentals in the TestStand Help or documentation provided with your Database Management System.
Contents
- Database Design
- Creating a Schema
- Creating Statements
- Configuring Columns/Parameters
- Adding Extra Columns
- Adding Extra Statements
- Creating the Database
- Testing the Schema
- Related Resources
Database Design
This tutorial will walk you through creating a simple database with three tables, described in detail below:
UUT_RESULT Table
The UUT_RESULT table will store the results of an individual UUT. In this example, we will have three columns- a unique identifier, the UUT’s serial number, and the status of the UUT.
| UUT_RESULT table | ||
| ID | SERIAL_NUM | STATUS |
|---|---|---|
| 1 | ABC | Passed |
| 2 | DEF | Failed |
STEP_RESULT Table
The STEP_RESULT table will store the results of each step executed in the test. Notice that the UUT column is a foreign key that is tied to the UUT_RESULT table. For example, the first three entries in the STEP_RESULT table refer to steps that were executed when the first UUT was tested, and the last three entries refer to steps that were executed when the second UUT was tested. There are four columns in this table- a unique identifier, a foreign key referencing the UUT Result associated with the step, the step’s name, and the step’s status.
| STEP_RESULT table | |||
| ID | UUT | NAME | STATUS |
|---|---|---|---|
| 1 | 1 | Step 1 | Passed |
| 2 | 1 | Step 2 | Passed |
| 3 | 1 | Step 3 | Passed |
| 4 | 2 | Step 1 | Failed |
| 5 | 2 | Step 2 | Failed |
| 6 | 2 | Step 3 | Passed |
MEAS_NUMERICLIMIT
The MEAS_NUMERICLIMIT table will store the results of each step. Notice that the STEP column refers to the STEP_RESULT table. In this example, one of the steps had a single measurement, one of the steps had two measurements associated with it, and the third step in the example sequence is not a numeric limit measurement, so its data is not recorded in this table. There are seven columns associated with this table- a unique identifier, a foreign key referencing the STEP_RESULT table, the type of comparison used to determine the limit, the low and high limits, the data, and the measurement status. Note that the single numeric limit tests do not include status information since the status is already included in the STEP_RESULT field.
| MEAS_NUMERICLIMIT table | ||||||
| ID | STEP | TYPE | LOW | HIGH | DATA | STATUS |
|---|---|---|---|---|---|---|
| 1 | 1 | GE | 5 | 7.5 | ||
| 2 | 2 | GTLT | 5 | 6 | 5.9 | Passed |
| 3 | 2 | GELE | 2 | 3 | 2 | Passed |
| 4 | 4 | GE | 5 | 4 | ||
| 5 | 5 | GTLT | 5 | 6 | 5 | Failed |
| 6 | 5 | GELE | 2 | 3 | 2.5 | Passed |
When combined together, the data in the three tables refers to two executions with the following results:
Serial Number “ABC”: Passed
Step 1: Passed
Limits: Value >= 5, Measurement: 7.5 - PassedStep 2: Passed
Limits: 5 < Value < 6, Measurement: 5.9 – Passed
Limits: 2<= Value <= 3, Measurement: 2 – Passed
Step 3: Passed
Serial Number “DEF”: Failed
Step 1: Failed
Limits: Value >= 5, Measurement: 4 -FailedStep 2: Failed
Limits: 5 < Value < 6, Measurement: 5 – Failed
Limits: 2<= Value <= 3, Measurement: 2.5 – Passed
Step 3: Passed
Creating a Schema
A schema defines how TestStand logs results to a database. A schema consists of a list of statements and each statement consists of a list of columns.
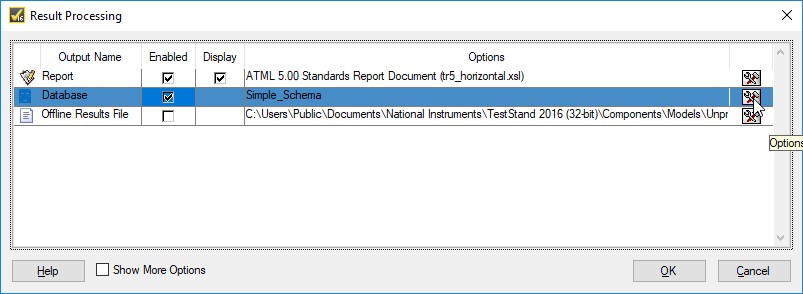
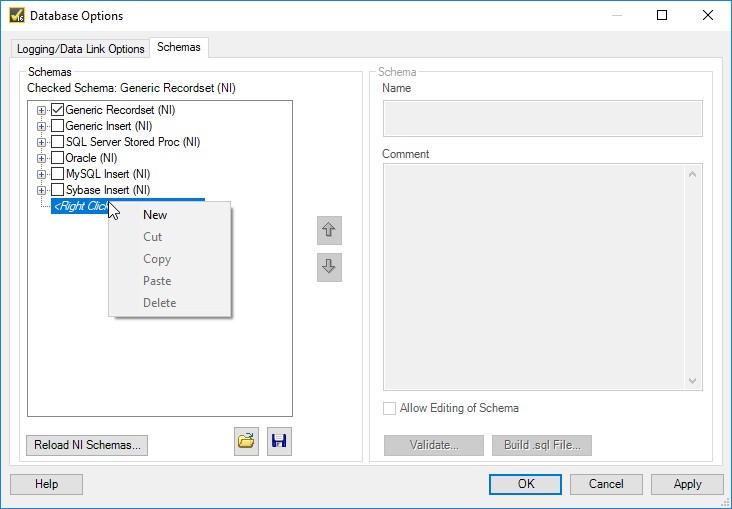
To begin, open the Database Options Dialog Box by going to Configure»Result Processing»Database»Options. Click on the Schemas tab to view the list of schemas. To create a new schema, right-click on <Right Click To Insert Schema> and select New. Give the schema a name of “Simple Schema”. Be sure that the Allow Editing of Schema checkbox is enabled.
Creating Statements
Statements define the type of results the schema operates on and the conditions that must be true before TestStand logs the results. Statements also define the database action to perform. In addition, statements specify what database columns or parameters to log and what TestStand expressions to evaluate in order to determine the column or parameter values.
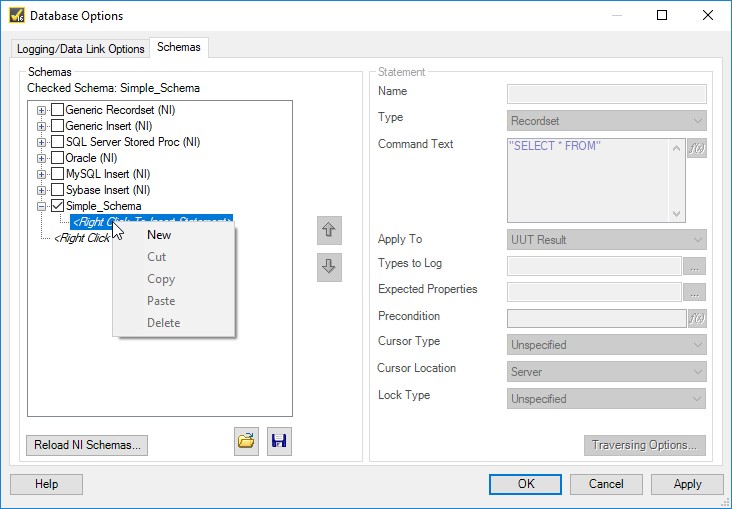
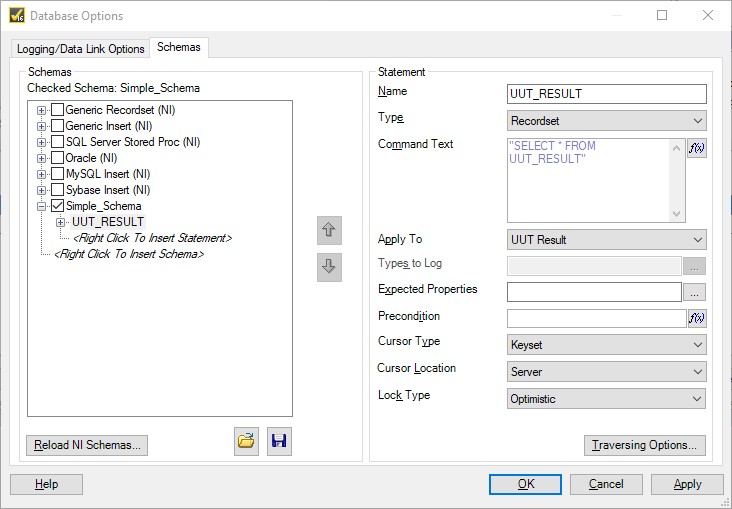
To create a statement, expand the tree under your newly created schema and right-click <Right Click To Insert Statement> and select New. Each statement has several parameters that define how the database actions are performed. The first statement we create will be used for storing information describing the UUT being tested and its results. We will create additional statements for storing the results of individual steps later in the example. Create a new statement, then configure the properties of your statement to match the sections below.
Name
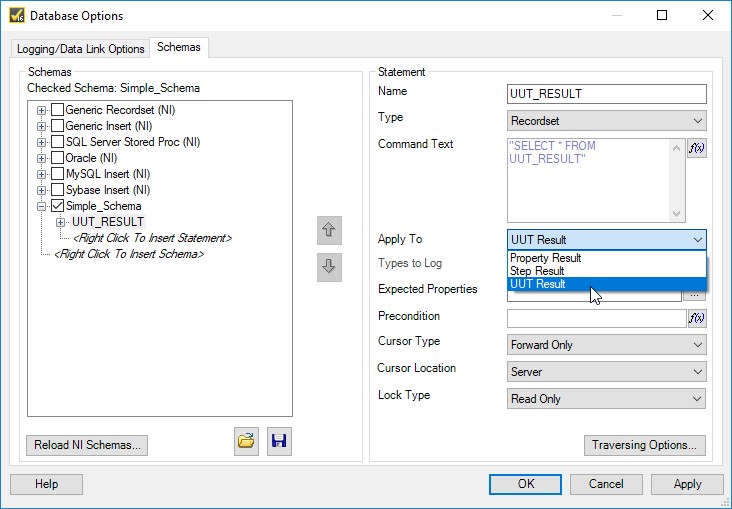
The Name property allows you give your statements a custom name. In this example, name the statement “UUT_RESULT”. We will use this statement to log data referring to a UUT’s result.
Type
The Type property specifies how the database will execute the command. For this example, choose Recordset.
Command Text
The Command Text property specifies the text of a command that the statement issues against the data link. This command can be any valid SQL statement. Typically, it is an SQL SELECT statement, SQL INSERT statement, or Stored Procedure call. For this example, type “SELECT * FROM UUT_RESULT” (quotes included). This will access all of the records within the UUT_RESULT table on the database. We are using a SELECT statement in this example for simplicity. The database will open a recordset and keep it open until logging completes. If we were to use an INSERT statement, performance would be better, although we would have no way of getting back the primary key when inserting records. TestStand uses GUIDs for the primary key, but this makes the data less human readable.
Apply To
The Apply To property specifies the class of results on which the statement operates. TestStand will apply each statement based on the Apply To property. For example, if you have a statement that you wish to execute once for each UUT, you would choose UUT Result. This is useful for storing information that has one value for the entire UUT. The sample schemas store properties such as Serial Number, Pass/Fail Status, Time of Execution, and Operator based on UUT Results.
If you have a statement that you wish to execute once for each Step, you can set the Apply To property to Step Result. This is useful for collecting individual step results, such as Pass/Fail Status, and Step Name.
If you have a statement that you wish to execute any time a certain step property is present, you can set the Appy To property to Property Result. For example, any time you have an NI_LimitMeasurement data type in a step, you may wish to log it to a table. This how TestStand logs data from the Multiple Numeric Limit Test step type. A Multiple Numeric Limit Test step type has several measurements that you wish to log for each step. Properties logged include limits, comparison type, and measurement value. For this statement, choose UUT Result in the Apply To property. We will use the other types for other statements in this example.
Types to Log
The Types to Log property specifies the step or data types of results are logged. When the Apply To property is a Step Result, this field must be the name(s) of a step type. When the Apply To property is a Property Result, this field must be the name(s) of a data type. This field is not needed when the Apply To property is UUT Result. This field is disabled when UUT Result is selected for the Apply To field.
Expected Properties
The Expected Properties property specifies the properties that must exist before TestStand applies the statement to a particular result. This is useful if you are trying to log data that may or may not be available. Leave this field blank for this example.
Precondition
The Precondition property specifies an expression that must evaluate to True before TestStand applies the statement to a particular result. For example, you may wish to only record measurements if the Include Measurements Logging Option is selected. Leave this field blank for this example.
Cursor Type
The Cursor Type property specifies the type of server or client cursor for the statement. This option affects performance and how the data is allowed to be affected by changes being made at the same time by other users. For this example, choose Keyset. This allows changes and deletions made by other users to be visible, but not additions.
Cursor Location
The Cursor Location property specifies where the data source maintains cursors for a connection. For this example, choose Server.
Lock Type
The Lock Type property specifies when the data source locks a record. For this example, choose Optimistic. This instructs the database provider to lock the records only when they are sent back to the database.
Your UUT_RESULT statement should now look like the image below:
Configuring Columns/Parameters
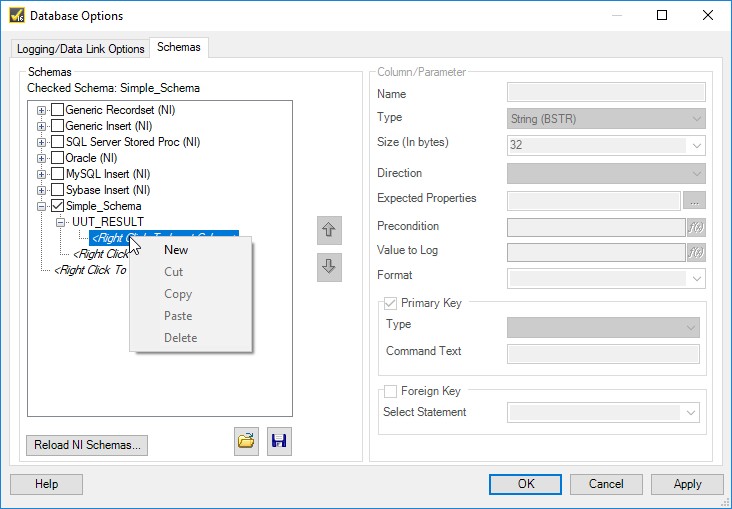
After you have created a statement, you must configure the columns or parameters for the statement. This process is similar to the previous task of configuring a statement. After you have the UUT_RESULT statement expanded in the Schemas tab, right-click <Right Click To Insert Column>and select New to create a new column.
Name
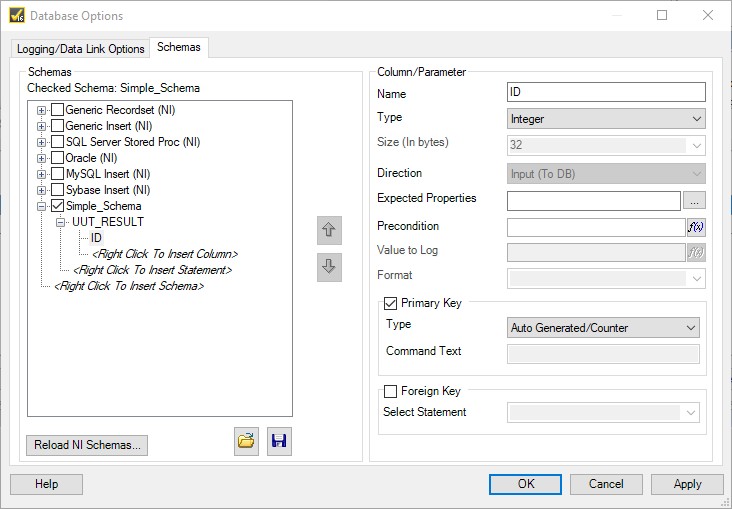
The Name property labels the column. It also must match the database column name if you are using a recordset. Type ID in the Name field.
Type
The Type property specifies the data type of the column or parameter value. Choose Integer from the Type Ring Control.
Size
The Size property specifies the maximum number of bytes that TestStand writes or reads from a column or parameter. This property is ignored if it is set to 0. In this case, the Size property is grayed out.
Direction
The Direction property specifies whether a column or parameter is an input or output value. Since we are not using a stored procedure, only the Input option is allowed.
Expected Properties and Precondition
A column's Expected Properties and Precondition parameters are used the same as a statement’s Expected Properties and Preconditions. Setting these fields will control whether or not a column is populated with data or left blank. Leave these fields blank since we always want to log the ID.
Value to Log
The Value to Log property specifies an expression that the column or parameter evaluates to obtain the input value to log or the variable property location to store the retrieved output value. Typically, you will use the Logging property to access data about the UUT, the Step Results, or the Step Properties. It is automatically populated by TestStand with the correct data for each statement that is executed. Leave these fields blank since we will automatically populate this field.
Format
The Format property specifies how to format a Date/Time string when assigning the column value. This field is disabled unless the Type parameter is Date/Time.
Primary Key
The Primary Key property allows the database column to be a primary key. All values in a primary key column must be unique. Enable the Primary Key checkbox.
The Primary Key Type property specifies how TestStand obtains a unique primary key value to assign to a new record. Choose Auto Generated/Counter. The database will automatically create a unique value for the primary key when this is selected.
The Primary Key Command Text specifies the text of a command that the statement issues against the data link to obtain the primary key value. This property is only needed when you select Get Value from Recordset or Get Value from Output Parameter in the Type ring. This field is disabled in our example.
Foreign Key
The Foreign Key property specifies that the database column is a foreign key. A foreign key is a column that references a primary key in a table. Leave the Foreign Key checkbox unchecked.
The Foreign Key Select Statement property contains the primary key column of the table that the foreign key references. TestStand automatically assigns the primary key value to the column or parameter. This field is disabled if the Foreign Key property is disabled.
When you finish with this step, the Columns/Parameters tab should look like the following:
Adding Extra Columns
You will need to add a column for each additional field you wish to log. For simplicity, all columns not mentioned are assumed to be blank or disabled. To add a column to log the serial number, add another column in the UUT Results statement with the following values:
Name: SERIAL_NUM
Type: String (BSTR)
Size: 255
Value to Log: Logging.UUT.SerialNumber
Primary Key: disabled
Foreign Key: disabled
To add a column to log the UUT status, add another column in the UUT Results statement with the following values:
Name: UUT_STATUS
Type: String (BSTR)
Size: 30
Value to Log: Logging.UUTResult.Status
Primary Key: disabled
Foreign Key: disabled
Now that we have three columns defined in this statement, we can create additional statements to populate step results into a separate table.
Adding Extra Statements
Creating the STEP_RESULT Statement
Now that we have created a statement that will insert the UUT Result information into the database, we will need to create a statement that logs the Step Result information to the database.
Under Simple_Schema, create a statement with the following properties:
Name: STEP_RESULT
Type: Recordset
Command Text: “SELECT * FROM STEP_RESULT”
Apply To: Step Result
Precondition:!PropertyExists(“Logging.StepResult.TS.SequenceCall”)
Cursor Type: Keyset
Cursor Location: Server
Lock Type: Optimistic
The Precondition exists to skip logging of Sequence Call steps. If you wish to log sequence call steps, omit this precondition. However, with the limited database we are creating, it will be unclear which steps are a part of the sequence call.
After selecting the STEP_RESULT statement, go to the Columns/Parameters tab and create a New column. This column will be used to hold the unique identifier for the STEP_RESULT table. Create a new column with the following properties:
Name: ID
Type: Integer
Primary Key: enabled
Primary Key Type: Auto Generated/Counter
Foreign Key: disabled
You will need to create a column that references the UUT_RESULT table so that each step is linked to the UUT Result that it is a part of. Create a New column with the following properties:
Name: UUT
Type: Integer
Primary Key: disabled
Foreign Key: enabled
Foreign Key Statement: UUT_RESULT
Create a New column that will contain the step’s name. Use the following properties:
Name: NAME
Type: String (BSTR)
Size: 255
Value to Log: Logging.StepResult.TS.StepName
Primary Key: disabled
Foreign Key: disabled
Create a New column that will contain the status information for each step. Use the following properties:
Name: STATUS
Type: String (BSTR)
Size: 30
Value to Log: Logging.StepResult.Status
Primary Key: disabled
Foreign Key: disabled
Creating the STEP_NUMERIC_LIMIT Statement
You will now need to create a statement that logs the Numeric Limit Test’s Measurement Value and Limits. This statement will get executed for every numeric limit test that has run. Right click under your schema and create a new statement with the following properties:
Name: STEP_NUMERIC_LIMIT
Type: Recordset
Command Text: "SELECT * FROM MEAS_NUMERICLIMIT"
Apply To: Step Result
Types to Log: NumericLimitTest
Cursor Type: Keyset
Cursor Location: Server
Lock Type: Optimistic
After expanding the STEP_NUMERIC_LIMIT statement, create a new column underneath it by right clicking <Right Click To Insert Column> and selecting New. This column will be used to hold the unique identifier for the MEAS_NUMERICLIMIT table. Create a new column with the following properties:
Name: ID
Type: Integer
Primary Key: enabled
Primary Key Type: Auto Generated/Counter
Foreign Key: disabled
You will need to create a column that references the STEP_RESULT table so that each measurement is linked to the Step Result that it is a part of. Create a new column with the following properties:
Name: STEP
Type: Integer
Primary Key: disabled
Foreign Key: enabled
Foreign Key Statement: STEP_RESULT
Create new columns that will store the comparison type, low and high limits, and measurement with the following values:
Name: TYPE
Type: String (BSTR)
Size: 30
Expected Properties: Logging.StepResult.Comp
Precondition: Logging.DatabaseOptions.IncludeLimits
Value to Log: Logging.StepResult.Comp
Primary Key: disabled
Foreign Key: disabled
Note: You will have to enter Logging.StepResult.Comp into the Expected Properties and the Value to Log fields manually. Logging.StepResult.Comp does not exist at edit-time for all step types, so it is not populated in the Select Required Properties For Statement window, which you can launch by clicking on the ... to the right of the Expected Properties parameter. For the same reason, the Expression Browser window will throw a warning if you try to check the Value to Log expression.
Name: LOW
Type: Double Precision
Expected Properties: Logging.StepResult.Limits.Low
Precondition: Logging.DatabaseOptions.IncludeLimits
Value to Log: Logging.StepResult.Limits.Low
Primary Key: disabled
Foreign Key: disabled
Name: HIGH
Type: Double Precision
Expected Properties: Logging.StepResult.Limits.High
Precondition: Logging.DatabaseOptions.IncludeLimits
Value to Log: Logging.StepResult.Limits.High
Primary Key: disabled
Foreign Key: disabled
Name: DATA
Type: Double Precision
Precondition: Logging.DatabaseOptions.IncludeOutputValues
Value to Log: Logging.StepResult.Numeric
Primary Key: disabled
Foreign Key: disabled
Creating the MEAS_NUMERIC_LIMIT Statement
All that remains for the schema is logging the individual measurement results on a Multiple Numeric Limit Test step type. Since these step types may result in several measurements for each step type, we must create an additional statement. Fortunately all limit information is stored in a special data type called “NI_LimitMeasurement”. We will configure the statement to execute any time it finds a step property of that type. Under your new custom schema, create a new statement with the following properties:
Name: MEAS_NUMERIC_LIMIT
Type: Recordset
Command Text: “SELECT * FROM MEAS_NUMERICLIMIT”
Apply To: Property Result
Types to Log: NI_LimitMeasurement
Cursor Type: Keyset
Cursor Location: Server
Lock Type: Optimistic
You will need to add the following columns to the MEAS_NUMERIC_LIMIT statement. Under MEAS_NUMERIC_LIMIT, right click and create the following column:
Name: ID
Type: Integer
Primary Key: enabled
Primary Key Type: Auto Generated/Counter
Foreign Key: disabled
You will need to create a column that references the STEP_RESULT table so that each measurement is linked to the Step Result that it is a part of. Create a new column with the following properties:
Name: STEP
Type: Integer
Primary Key: disabled
Foreign Key: enabled
Foreign Key Statement: STEP_RESULT
Create new columns that will store the comparison type, low and high limits, measurement, and status with the following values:
Name: TYPE
Type: String (BSTR)
Size: 30
Expected Properties: Logging.PropertyResult.Comp
Precondition: Logging.DatabaseOptions.IncludeLimits
Value to Log: Logging.PropertyResult.Comp
Primary Key: disabled
Foreign Key: disabled
Name: LOW
Type: Double Precision
Expected Properties: Logging.PropertyResult.Limits.Low
Precondition: Logging.DatabaseOptions.IncludeLimits
Value to Log: Logging.PropertyResult.Limits.Low
Primary Key: disabled
Foreign Key: disabled
Name: HIGH
Type: Double Precision
Expected Properties: Logging.PropertyResult.Limits.High
Precondition: Logging.DatabaseOptions.IncludeLimits
Value to Log: Logging.PropertyResult.Limits.High
Primary Key: disabled
Foreign Key: disabled
Name: DATA
Type: Double Precision
Precondition: Logging.DatabaseOptions.IncludeOutputValues
Value to Log: Logging.PropertyResult.Data
Primary Key: disabled
Foreign Key: disabled
Name: STATUS
Type: String (BSTR)
Size: 255
Value to Log: Logging.PropertyResult.Status
Primary Key: disabled
Foreign Key: disabled
All of the statements have been created. The only step that remains is to create the database and configure the tables and columns within it.
Creating the Database
You now need to create the database. In this example, we will be using a Microsoft Access database. Even if you do not have Microsoft Access installed, you can use the attached file to get started.
First, download the attached SampleSchema.mdb file (see bottom of the page) and save it in an easily accessible directory, such as a new folder on your Desktop. For this example, we will be using <Desktop>/TestStand/DatabaseTutorial
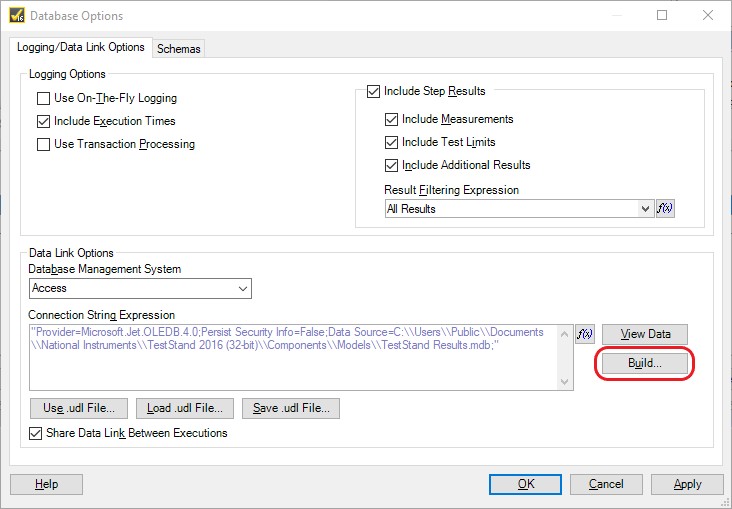
Next, you need to configure the Data Link by selecting the Logging/Data Link Options tab and clicking the Build button to build a connection string.
Under the Provider tab choose Microsoft Jet 4.0 OLE DB Provider. Under the Connection tab browse to the SampleSchema.mdb file provided in this example. Click OK to close the dialog.
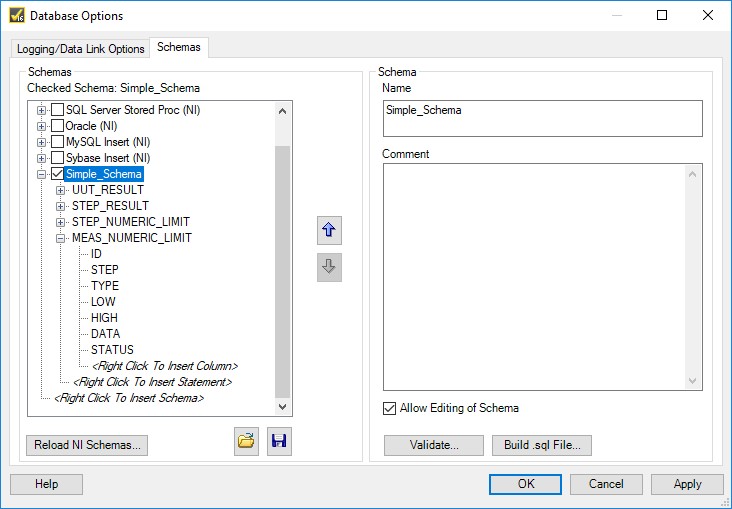
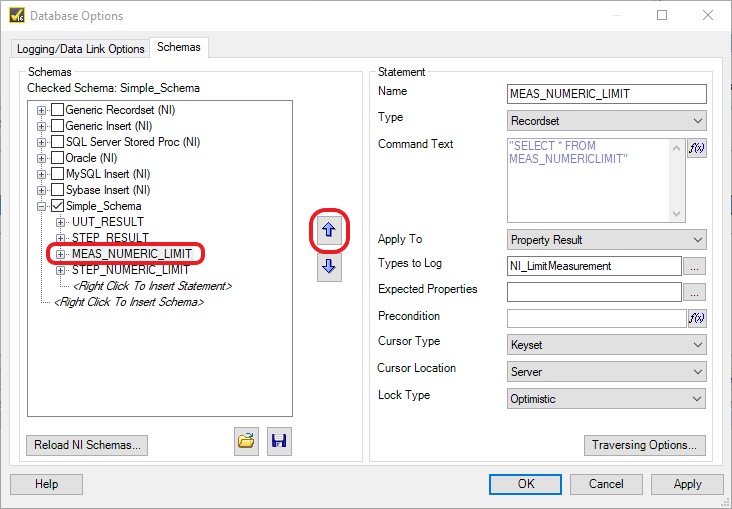
Before building an SQL file that will create the tables needed for your database, one more modification needs to be made. The main difference between the STEP_NUMERIC_LIMIT statement and the MEAS_NUMERIC_LIMIT statement is that the STEP_NUMERIC_LIMIT statement does not have a STATUS column (its status is already recorded in the STEP_RESULT table). Because the Build .sql File button builds an SQL file that creates tables for each statement in order, the MEAS_NUMERIC_LIMIT statement needs to be moved up to be above the STEP_NUMERIC_LIMIT statement by clicking the 
By making this change, when you click the Build .sql File button, it will create an SQL file that creates a MEAS_NUMERICLIMIT table that has all seven columns and thus it will work for both Multiple Numeric Limit Test step types as well as Numeric Limit Test step types.
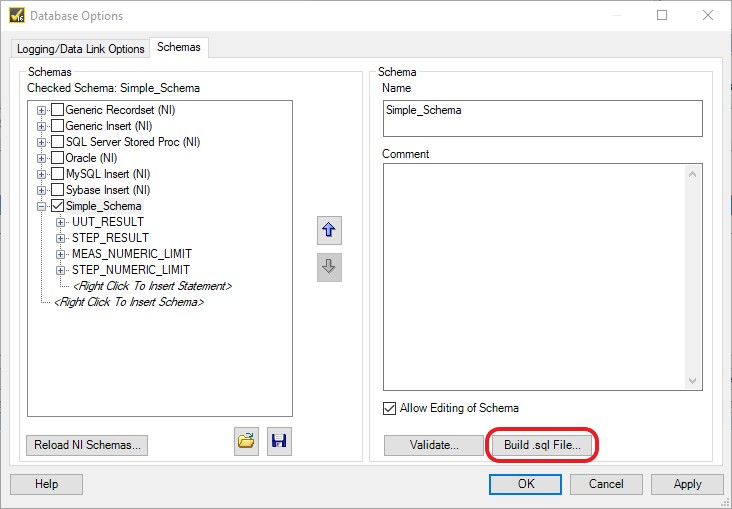
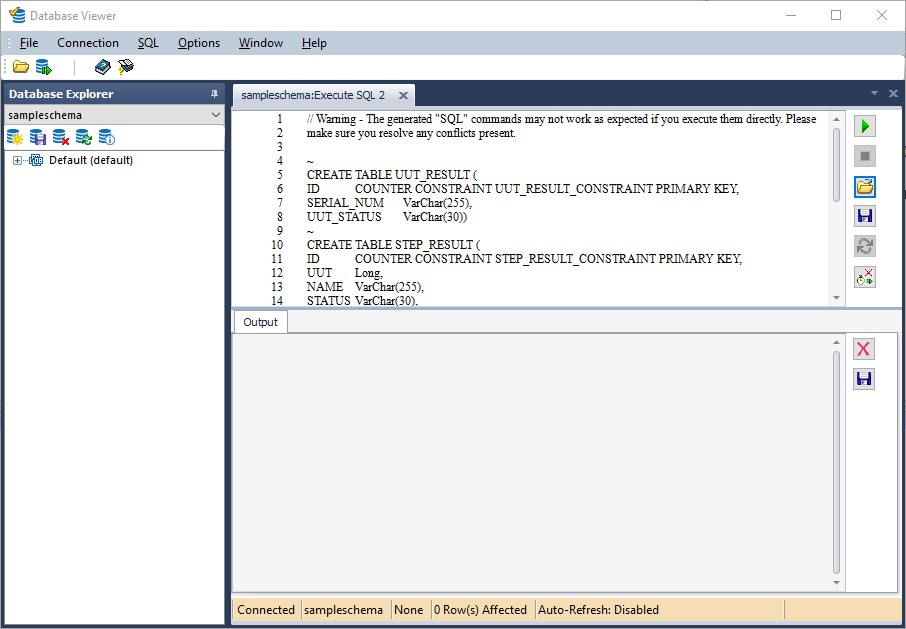
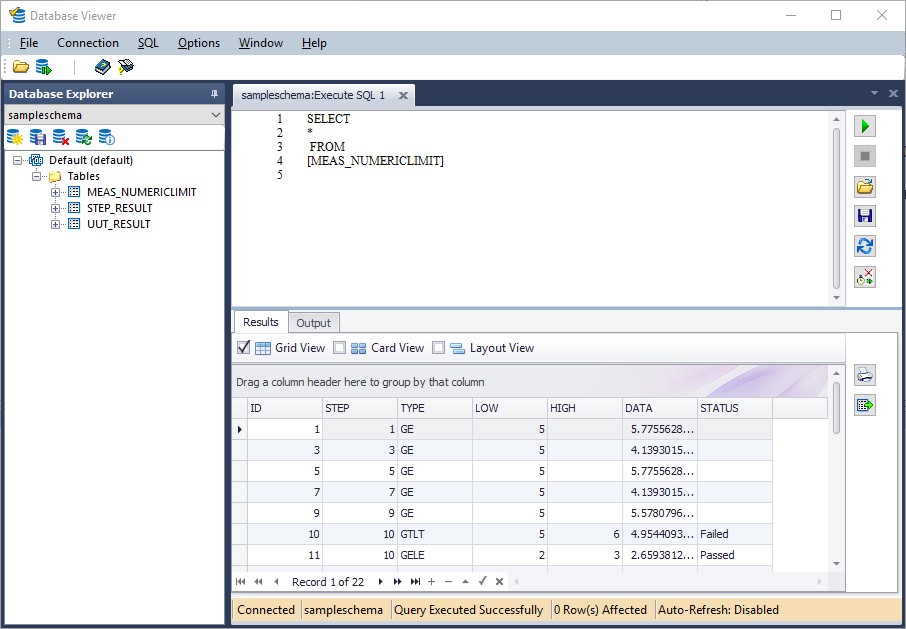
Finally, go to the Schemas tab, click on the newly created Simple_Schema and then click the Build .sql File button. Name the file simpleschema.sql and select OK. This will create a .sql file containing the SQL commands needed for creating the tables in the database. You will then need to use the Database Viewer under Tools»Database Viewer. In the Database Viewer utility, select File»Open and select the SampleSchema.mdb file downloaded previously. Click OK to create the data link. Next, select File»New SQL Query, or click the New SQL Query 


If you are using your own database, you will have to create a database depending on the provider you use. The database provided is only a basic database file with no tables created. You will also need to create your own connection string, but you will be able to execute the .sql file created previously in the Database Viewer.
Testing the Schema
Make sure you have the Simple Schema selected in the Database Options. Download the attached SimpleDatabaseTest.seq. Navigate to Execute»Test UUTs to begin a new execution. After testing a few UUTs, go to Tools»Database Viewer to view the data. Go to File»Open and select the SimpleSchema.mdb you created earlier. Right-click on the UUT_RESULT table, and select View Data. You will see all of the UUT result data including the serial number and UUT status. Close this table and examine the STEP_RESULT table. You will notice a row exists for every step that executes. Close this table and examine the MEAS_NUMERICLIMIT table. You will notice that there is one entry for every measurement.
