Transition from Traditional NI-DAQ (Legacy) to NI-DAQmx using Microsoft Visual Basic .NET: Part Two
Overview
Configuring Your Measurement
Configuring the measurement operation varies greatly based on how the driver API is organized. Traditional NI-DAQ (Legacy) is organized based on the type of operation that needs to occur. For example, if you make a temperature measurement (which is a relatively slow operation), you need to use the CWAIPoint control. This control is not aware that the measurement being made is a temperature measurement. Scaling is applied to the data returned by the control using the functions available in the DAQTools component. If you require any custom scaling, you must create your own scaling operation.
NI-DAQmx is organized based on the type of measurement that needs to be made. There is explicit support for creating channels for measuring temperature, strain, position, etc. All parameters required for a measurement are grouped together, thus the NI-DAQmx API is an intuitive, easy to learn API. The following sections explain how to configure the various types of measurements using the two drivers.
Contents
- Accessing Help in NI-DAQmx
- Programmatic
- Interactive
- Pre-Configured
- Timing
- Triggering
- Links to Other Topics in this Series
- Reference
Accessing Help in NI-DAQmx
This series references two main types of reference manuals that ship with NI-DAQmx.
- NI-DAQmx Core Help--references the language agnostic manual for NI-DAQmx. The NI-DAQmx Core Help explains NI-DAQmx concepts and provides a background about the various features and capabilities of the driver. Refer to Start » Programs » National Instruments » NI-DAQ » NI-DAQmx Help to access this manual.
- NI-DAQmx .NET Help--references the manual for the .NET DAQmx API. This reference is specific to the .NET API and provides documentation for NI-DAQmx classes, methods, and properties. There are also concept topics in this manual which are specific to using the NI-DAQmx .NET API. This help is integrated into the Visual Studio .NET documentation. In Visual Studio .NET, select Help»Contents. To view the NI-DAQmx .NET Library help, select NI Measurement Studio Help»NI Measurement Studio .NET Class Library»Reference»National Instruments.DAQmx. For tasks and concepts, select NI Measurement Studio Class .NET Library»Using the Measurement Studio .NET Class Libraries»Using the Measurement Studio NI-DAQmx .NET Library.
Programmatic
Our goal is to create a data acquisition application that performs a finite analog input operation using the internal sample clock of the data acquisition device.
Configuring Your Measurement in Traditional NI-DAQ (Legacy)
You can configure the CWAI control programmatically with the following code.
[VB 6.0]
CWAI1.Device = 1 'use device 1
'Use channel 0, with a range of +/- 10 volts in differential mode
CWAI1.Channels.Add "0", 10, -10, CWAIInputModes.cwaiDIFF
'Configure the sample clock
CWAI1.ScanClock.Frequency = 1000
'Configure the number of points
CWAI1.NScans = 1000
'Use the internal clock for acquisition
CWAI1.ChannelClock.ClockSourceType = cwaiInternalCS
'Specify the task to be finite
CWAI1.StopCondition.Type = cwaiNoActiveCondition
'Other code...
CWAI1.Configure
This configuration code sets up the finite analog input operation, which meets the requirements of the example application we are trying to create. But, notice that this configuration does not take into account the type of measurement being made. For example, if you are reading thermocouple voltages, to have meaningful data, you need to perform scaling on the data returned. You could do this either by using the thermocouple scaling functions provided in the DAQTools component or write the scaling algorithm yourself.
Configuring Your Measurement in NI-DAQmx
There are no components for NI-DAQmx. You configure every operation by creating a task and then creating the appropriate channel. The following code shows how you configure the same operation using the NI-DAQmx .NET API.
[VB.NET]
Dim aiTask As Task
'Create a new Task
aiTask = New Task("Analog Input Task")
'Create an Analog Input Channel object for Device 1, channel 0 in ‘Differential mode. The measurement range is from -10.0 to +10.0 Volts.
aiTask.AIChannels.CreateVoltageChannel("Dev1/ai0", "", AITerminalConfiguration.Differential, _
-10.0, 10.0, AIVoltageUnits.Volts)
'Configure the sample clock to be the internal clock, sampling at 1000 Hz on the
'rising edge of the sample clock. The acquisition mode is finite and we will return 1000 samples per channel.
aiTask.Timing.ConfigureSampleClock("", 1000, _
SampleClockActiveEdge.Rising, SampleQuantityMode. FiniteSamples, 1000)
The functions are organized in a way to group related parameters together to make using the API more intuitive. Another point of interest is the fact that the API is targeted towards the particular type of measurement.
Configuring and Scaling Your Measurement in Traditional NI-DAQ (Legacy)
In the previous Traditional NI-DAQ (Legacy) samples, you configure the data, but do not scale it. The following code shows configuring and scaling your measurement with the CWAI control.
[VB 6.0]
'use device 1
CWAI1.Device = 1
'Use channel 0, with a range of +/- 10 volts in differential mode
CWAI1.Channels.Add "0", 10, -10, CWAIInputModes.cwaiDIFF
'Configure the sample clock
CWAI1.ScanClock.Frequency = 1000
'Configure the number of points
CWAI1.NScans = 1000
'Use the internal clock for acquisition
CWAI1.ChannelClock.ClockSourceType = cwaiInternalCS
'Specify the task to be finite
CWAI1.StopCondition.Type = cwaiNoActiveCondition
CWAI1.Configure
CWAI1.Start
Dim AcqData
Dim temps
'Read 1000 points from the device
CWAI1.Read 1000, AcqData
'Convert the voltages returned to temperature data
'for a B type thermocouple
CWDAQTools1.ConvertTC CWThermocouples.cwB, 30, cwCelsius, AcqData, temps
In the previous code, you need to acquire the voltage data from the thermocouple and then use the conversion functions in the DAQ Tools utility control to get the temperature data. The acquisition operation is not configured in terms of the measurement being made.
Configuring and Scaling Your Measurement in NI-DAQmx
In the previous NI-DAQmx samples, you configure the channel by using CreateVoltageChannel. If you need to configure an analog input operation that is connected to a thermocouple, you configure the channel with the following code.
[VB.NET]
'Create a task
myTask = New Task("temperature task")
'Create a thermocouple channel
myTask.AIChannels.CreateThermocoupleChannel(("Dev1/ai0", "", _
Convert.ToDouble(minimumValueNumeric.Value), Convert.ToDouble(maximumValueNumeric.Value), _
thermocoupleType, AITemperatureUnits.DegreesC)
When you use the previous configuration, the data returned are temperature measurements, since NI-DAQmx internally scales the data.
Custom Scaling
NI-DAQmx fully supports using customs scales as well. For more information about custom scaling, refer to the NI-DAQmx Core Help under NI-DAQmx Help >> Key NI-DAQmx Concepts >> Custom Scales.
Interactive
In most cases, you do not need to change the configuration for your data acquisition operation at run time. The following sections explain the options available to you for configuring your DAQ operation interactively.
Traditional NI-DAQ (Legacy)
With the Traditional NI-DAQ (Legacy) ActiveX controls, use the property pages that are associated with the controls. For example, with the CWAI control, the Channels tab lets you select the device and the channels to use in the operation. The Buffer, Clocks and Conditions tabs configure the buffer settings (number of scans to acquire), sampling clock settings (sample rate), and the start/stop/pause conditions, respectively. Although you can set up your application using the property pages, the Traditional NI-DAQ (Legacy) ActiveX controls do not allow you to test your configuration interactively.
NI-DAQmx
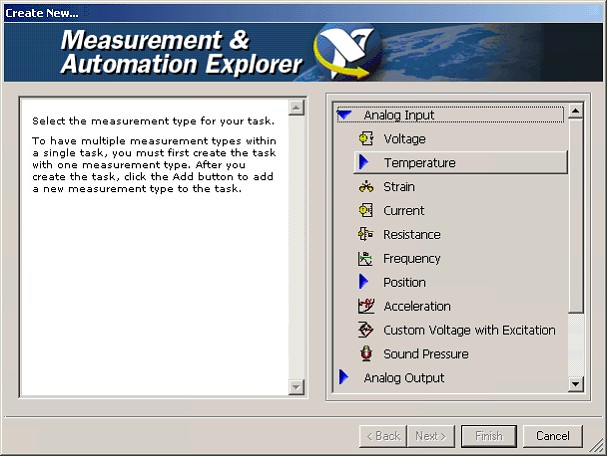
NI-DAQmx provides an interactive configuration tool, the DAQ Assistant, that allows you to experiment with the operation as you configure. The DAQ Assistant is a tool for interactively creating, editing, and running NI-DAQmx tasks. The DAQ Assistant is accessible from the Measurement & Automation Explorer (MAX). Additionally, if have Measurement Studio 7.x or higher, you can use the DAQ Assistant from Visual Studio .NET 2003. If you have Measurement Studio 8.0.1 or higher, you can use the DAQ Assistant from Visual Studio 2005. Tasks that you create and configure in MAX are accessible from any DAQmx application on your system. These tasks are not local to a project. By launching the DAQ Assistant from Visual Studio .NET 2003, you can create project tasks by auto-generating Task configuration code in Visual Basic .NET, Visual C#, and C++.
Using the DAQ Assistant in MAX
Figure 1: DAQ Assistant in MAX
The DAQ Assistant lets you set configurations that were previously not possible using the property pages in Visual Basic 6.0. You can also test out your configurations using the DAQ Assistant without having to write a single line of code. Users can also view the connection diagram for their particular tasks based on the accessory that is configured for your DAQ device.
Pre-Configured
NI-DAQmx
Once you have configured your task in MAX using the DAQ Assistant, you can load it using the DaqSystem.Local.LoadTask method. Once the Task object is loaded, you can begin using the task or make changes to the task configuration before using it.
With DAQmx 7.4 and higher, you can programmatically create a task and save it to MAX.
For more information about the DaqSystem.Local.LoadTask method, refer to the .NET DAQmx Help topic, Creating an NI-DAQmx Task from an Existing Task in MAX.
Timing
Our particular example application does not have any special timing and triggering requirements, but understanding timing and triggering support is important for creating useful data acquisition applications.
Timing in Traditional NI-DAQ (Legacy)
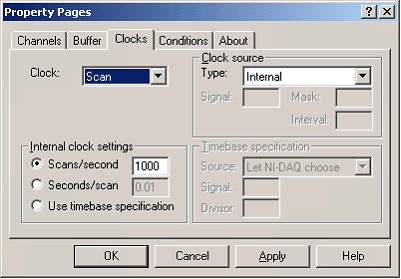
Setting up the timing parameters for the CWDAQ controls can be done either via the property pages or programmatically. In the following property page example, the sampling rate is set to 1000 samples per second using the internal clock as the sampling clock.
Figure 2
[VB 6.0]
With CWAI1.ScanClock
'Configure the scan clock to be the Internal Clock
.ClockSourceType = cwaiInternalCS
'specify the clock mode
.InternalClockMode = cwaiFrequency
'Specify the Scan Clock frequency
.Frequency = 1000
End With
CWAI1.Configure
Timing in NI-DAQmx
The NI-DAQmx Timing class configures the timing for hardware-timed data acquisition operations. You use the Timing class to specify whether the operation is continuous or finite, select the number of samples to acquire or generate for finite operations, and create a buffer, when needed.
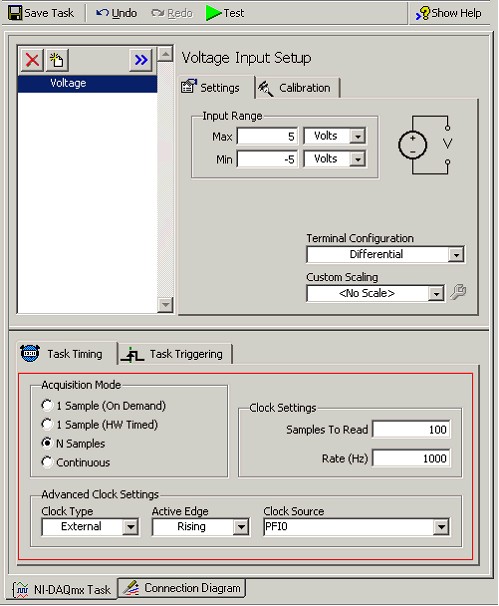
You can use the DAQ Assistant to interactively configure these parameters and test out the task.
Figure 3
A previous example used the Timing object in Visual Basic .NET. The DAQmx .NET class hierarchy simplifies complex configurations by grouping related parameters in an intuitive way, as the following code shows...
[VB.NET]
'Configure the sample clock to be the internal clock, sampling at 1000 Hz on the rising edge of the sample clock. The acquisition mode is finite and we will return 1000 samples per channel.
aiTask.Timing.ConfigureSampleClock("", 1000, _
SampleClockActiveEdge.Rising, SampleQuantityMode. FiniteSamples, 1000)
For information about the various types of timing supported by DAQmx, refer to the Timing and Triggering section in the NI-DAQmx Core Help.
For more information about the Timing class, refer to the DAQmx .NET Help.
Triggering
Triggering in Traditional NI-DAQ (Legacy)
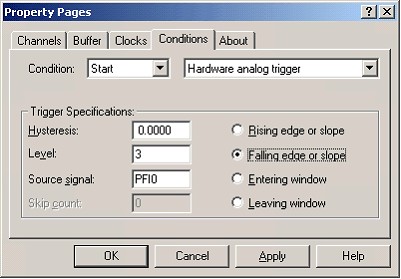
The property pages for the various Traditional NI-DAQ (Legacy) CWDAQ ActiveX controls allow users to configure various types of triggering operations. For example, using the CWAI control and the property pages in Visual Basic 6.0, you can configure an Analog Start trigger with PFI0 as the source at a 3.0 Volt level with 0 Volts hysteresis, as shown in the following image.
Figure 4
You can also set this type of triggering up programmatically, with the following code.
[VB 6.0]
With CWAI1.StartCondition
.Type = cwaiHWAnalog
.Source = "PFI0"
.Mode = cwaiFalling
.Level = 3#
End With
Triggering in NI-DAQmx
The NI-DAQmx Triggers class configures a trigger to perform a specific action. The most commonly used actions are a start trigger and a reference trigger. The Triggers class provides the following trigger configurations:
- AdvanceTrigger
- ArmStartTrigger
- HandshakeTrigger
- PauseTrigger
- ReferenceTrigger
- StartTrigger
- WatchdogExpirationTrigger
You use these classes to configure their respective types of triggers. Refer to the DAQmx .NET Help for more information about these classes.
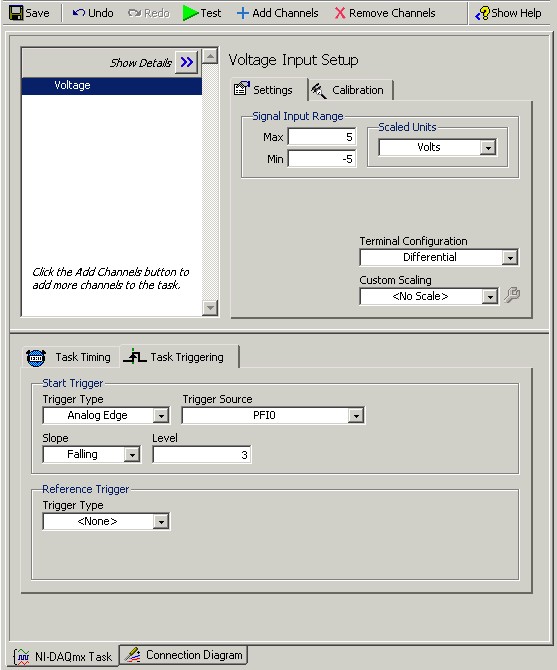
Figure 5
The following code shows how to configure the Analog Start trigger with PFI0 as the source at a 3.0 Volt level with 0 Volts hysteresis in your Visual Basic .NET code with NI-DAQmx.
[VB.NET]
'Configure PFI0 to be the analog trigger, setup the trigger to be
'asserted on the Falling slope at 3.0 volts
aiTask.Triggers.StartTrigger.ConfigureAnalogEdgeTrigger("PFI0", AnalogEdgeStartTriggerSlope.Falling, 3.0)
The triggering options are fully supported in the DAQ Assistant, so you have the option of loading an existing task with these options configured or setting the trigger options programmatically.
For information about the various types of timing supported by DAQmx, refer to the Timing and Triggering section in the NI-DAQmx Core Help.
Links to Other Topics in this Series
This section lists other topics in this series:
See Also:
Transition from Traditional NI-DAQ (Legacy) to NI-DAQmx using Microsoft Visual Basic .NET
Transition from Traditional NI-DAQ (Legacy) to NI-DAQmx using Microsoft Visual Basic .NET: Part Three
Transition from Traditional NI-DAQ (Legacy) to NI-DAQmx using Microsoft Visual Basic .NET: Part Four
Reference
How is the Convert (Channel) Clock Rate Determined in NI-DAQmx and Traditional NI-DAQ?
Answers to Frequently Asked Questions about NI-DAQmx and Traditional NI-DAQ (Legacy)
Transition from Traditional NI-DAQ to NI-DAQmx in LabVIEW
Using NI-DAQmx in LabWindows/CVI
What are the Terminology Changes in NI-DAQmx?
