Parallel Test Architectures for Reducing the Cost to Test
Overview
In the past, parallel systems have required a large development effort. Not only did you need to understand the device you were testing, you had to understand how the computer's OS worked with parallel operations, such as Windows Critical Sections, and how they could share instruments amongst many DUTs without creating conflicts, or deadlocks, where the instruments may hang. With TestStand, the development of parallel systems is far easier, eliminating most of this effort, and making parallel system very cost effective.
Contents
- Parallel Technologies
- Implementing Parallel Test Systems
- Resource Locking
- Conclusion
- Additional Resources
Parallel Technologies
There are three methods for implementing parallel systems. First, "traditional" systems have many computers operating in parallel, synchronizing and sharing common data across the network. Second, systems that use multiple processes carrying out parallel tasks. The third type of parallel system uses a single process that creates and destroys separate instances of threads as it moves through its execution. We discuss all three methods.
Multiple Computer Systems
The major benefit of the "traditional" test architecture is that each machine operates effectively independently, simplifying the programming. The system only needs to operate on one DUT at a time, and it only operates with one test, or instruction, at a time. The limitation of this system occurs when you need significant synchronization across the network, because you need to understand the network topology and the OS architecture to communicate between computers. This solution is also physically the most expensive because you multiply all of the hardware needs for each tester, including computers, instruments, network routers, and expected maintenance and upgrades.
Multiple Processes
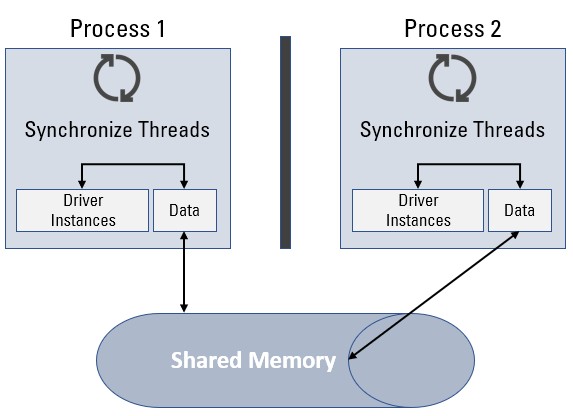
In this scenario, you use a single computer so many processes occur in parallel, in which a process may be an instance of an executable program. The OS isolates the memory of each process, which prevents any program that malfunctions from crashing the whole system. However, because the memory is isolated, sharing data and driver instances is difficult and often inefficient. To communicate between processes, you must use mechanisms such as shared memory, pipes, and out-of-process ActiveX servers. (See Figure 1.) If you use software components that do not come with source code, you might not have these options.
Figure 1. Processes exist in separate memory spaces and communicate through shared memory.
Multiple Threads
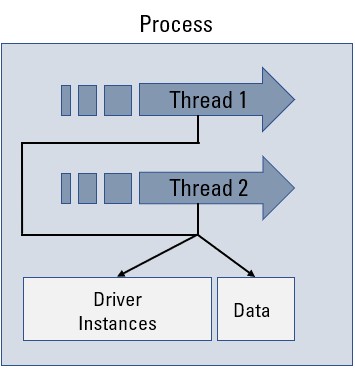
In this scenario, the application operates as a single process and thus operates in a single memory location. Normally this process starts operation with a single Main thread that executes all the steps, or sub-sequences, as it progresses through the sequence. However, you can configure this type of process to create and destroy separate threads at any time. Threads have a major benefit over processes -- because they exist within a single process, they can share data and other resources far better. (See Figure 2.)
Figure 2. Multiple threads exist in the same process and can share data and resources far easier.
TestStand can implement all three of these parallel systems, however the one that offers you the most benefit, in terms of both flexibility and resource usage, is the multiple thread-based system.
Implementing Parallel Test Systems
There are two approaches to implementing parallel test systems inside TestStand. You can create your own parallel mechanism and call sub-sequences in new threads. Alternatively, you can use the two new TestStand "models" that abstract all of this work into pre-built sequences.
Do It Yourself
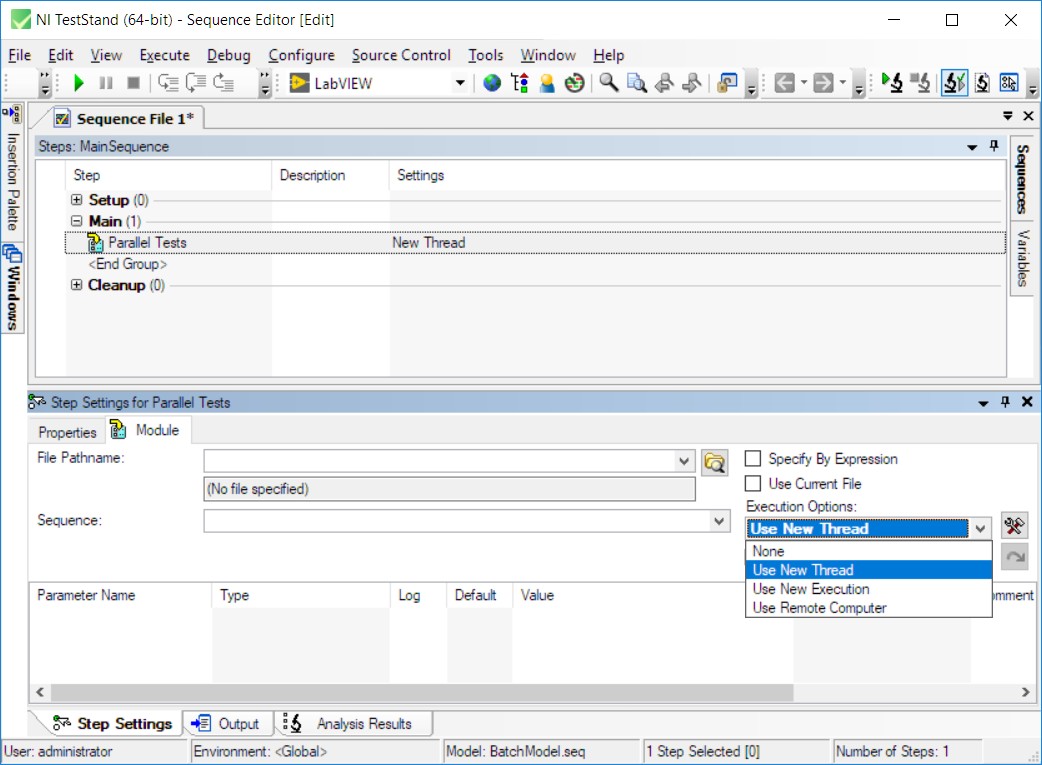
To launch a test sequence in parallel is, in itself, very simple. First, you have to define the sequence you need to run in parallel, and then you configure its options to run in a separate thread. (See Figure 3.) However, running the sequence in parallel is only a part of the problem. If you need to resynchronize the application after you have launched the threads, you need much more development time. For example, you may have to wait for threads to complete before you can launch the next set of steps. In TestStand, synchronization step types provide this low level control. We will discuss this further on in the article, however, a better approach that involves less development time is the new TestStand models.
Figure 3. Configuring a sequence to be called in a new thread using step settings.
Use TestStand Models
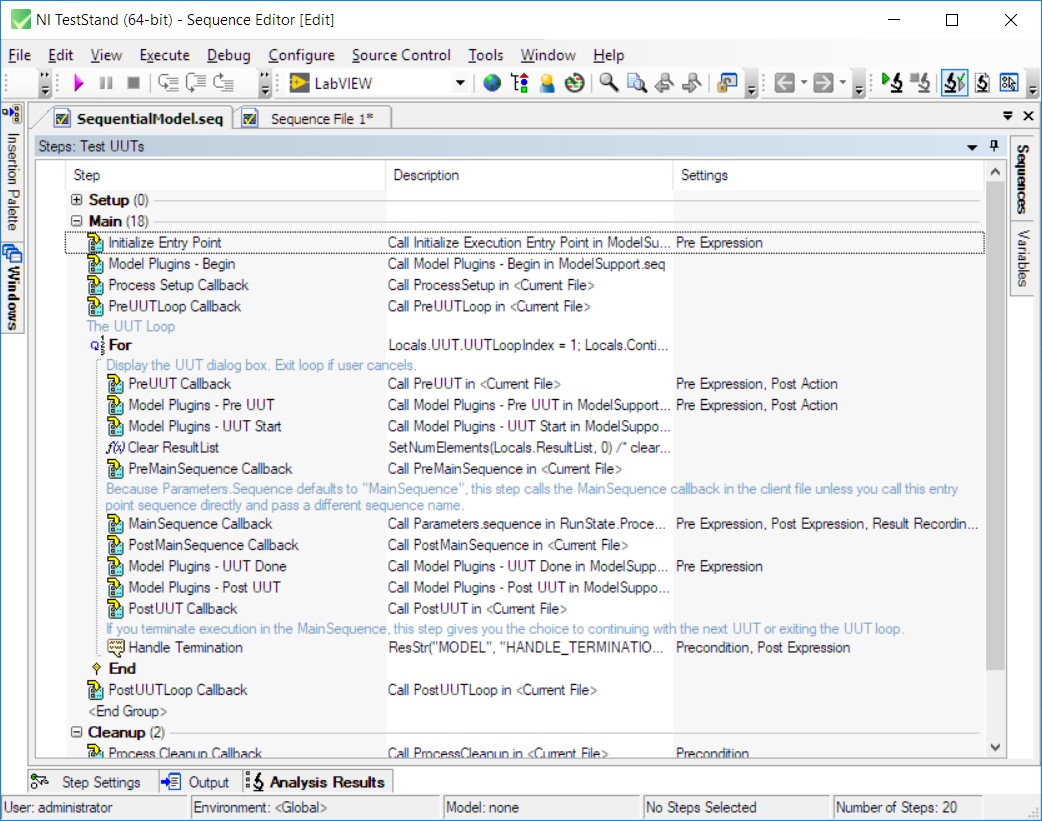
The two new models introduced in TestStand 2.0 are Parallel and Batch. We use these models, just like the original Sequential model, to produce a framework in which our tests run. The models define the order, or flow, of the test system, defining and controlling common tasks such as reporting, database reporting, logging in and out, and serial number information. They also provide placeholders for custom tasks such as pre and post-UUT tasks. For example, you can control the fixture to load and unload the device before and after testing. The models are themselves sequences, so you have free access to define custom sequence structures. (See Figure 4.)
Figure 4. TestStand Process Model
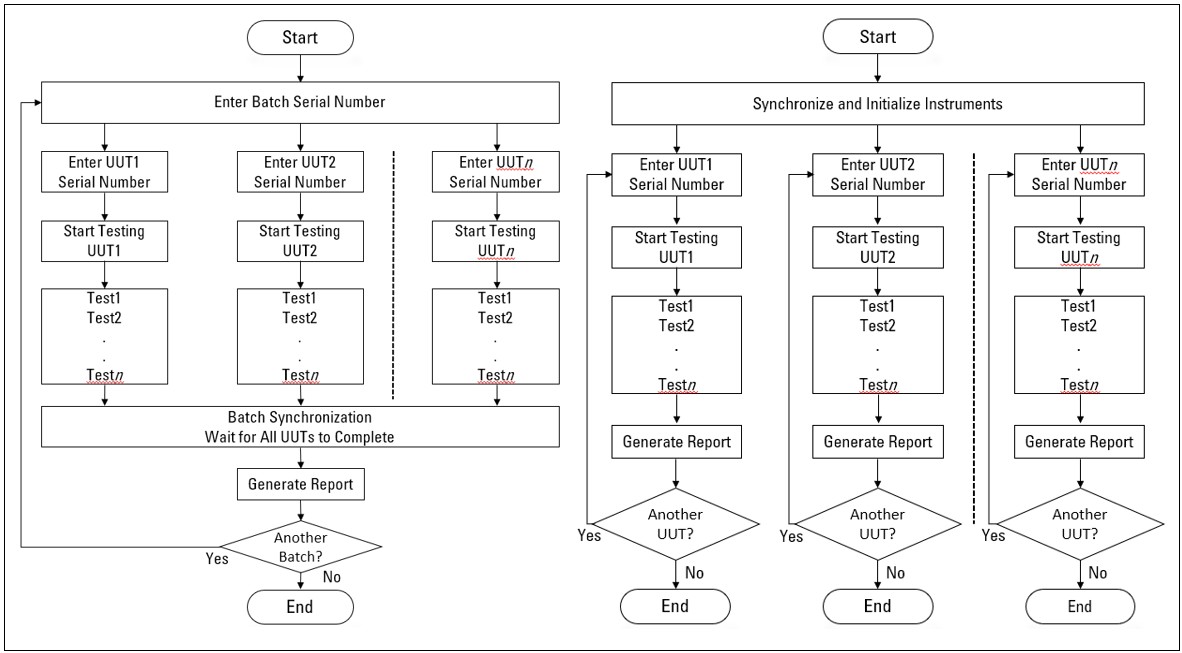
The parallel and batch models differ in the way they handle multiple boards. The batch model defines that the boards are synchronized at the start and end of the test sequence, and also potentially between. This is a natural model for testing a batch of products undergoing environmental screening, where sets of units are tested together inside a temperature chamber or a vibration rig. The parallel model, by comparison, tends to act on the units completely independently. This behavior is much more applicable to end-of-line functional test, where a number of units may arrive at different times, providing there is a test fixture to hold the DUT then the test system starts to cycle through it. We show a flow diagram for these models below. (See Figure 5.)
Figure 5. Flow Diagram of Batch Model and Parallel Model
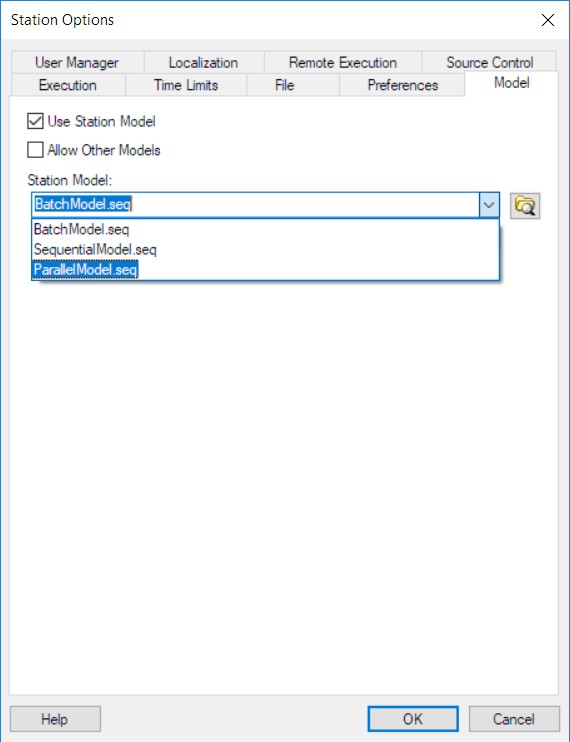
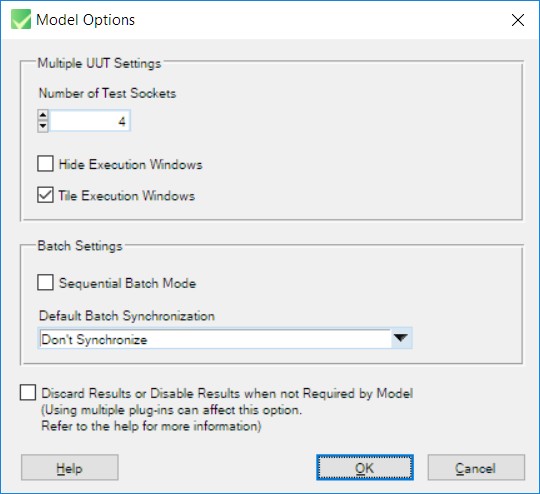
Using these models to define a test system now becomes a relatively simple proposition. For example, if we have defined a set of tests inside TestStand that we wish to run on a batch of DUTs we simply need to configure our model to be BatchModel, by choosing Configure... Station Options... and then selecting the Models tab. (See Figure 6.) We then select our type of model from the ring control. Having told the system that we are running a batch process, we now need to define now many DUTs we are testing at the same time. Again for this we select the Configure... menu and then Model Options... that appear as we moved to a multi-UUT capable model. Now we can select the number of Test Sockets that we will provide for the UUT. (See Figure 7.)
Figure 6. Use the Station Options Configuration Panel to select your target model.
Figure 7. Use the Model Options Configuration Panel to set the number of test sockets.
With these options now configured, the test sequences, or steps, which you have developed in the sequence editor now run in parallel with an initial dialogue for entering the four serial numbers. The four instances of the tests are each run on a separate thread, all of which are created automatically by the batch model. These threads are synchronized at the start of the execution, and then, they are resynchronized before generating the reports and being destroyed by the model. (See Figure 8.)
Figure 8. Simplified View of Sequence Execution in the Batch Process Model
This sequence execution scenario is obviously very simplistic and assumes that all tests need to be run in parallel. However, this is not the case for most test systems where, potentially, you want only one of the threads to execute the test step. For example when controlling an environmental chamber, you may want to serialize a set of steps, i.e. each thread waits until the previous thread has completed before testing a step. Using TestStand, this is again simply a matter of configuration.
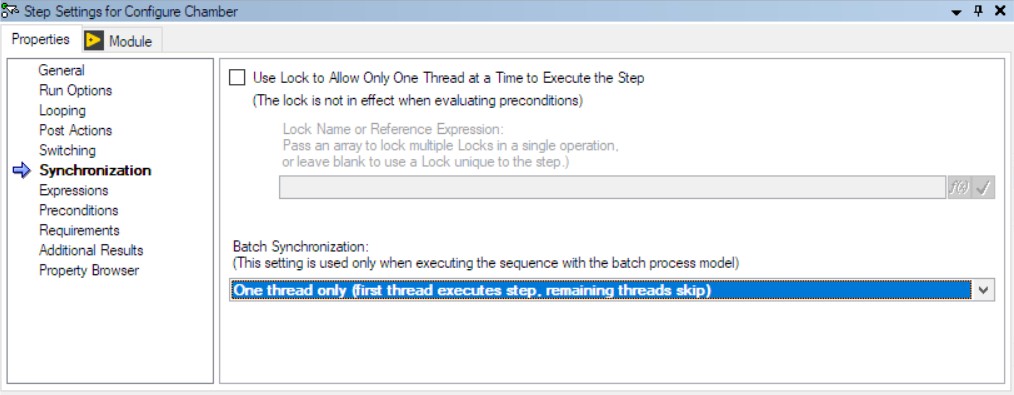
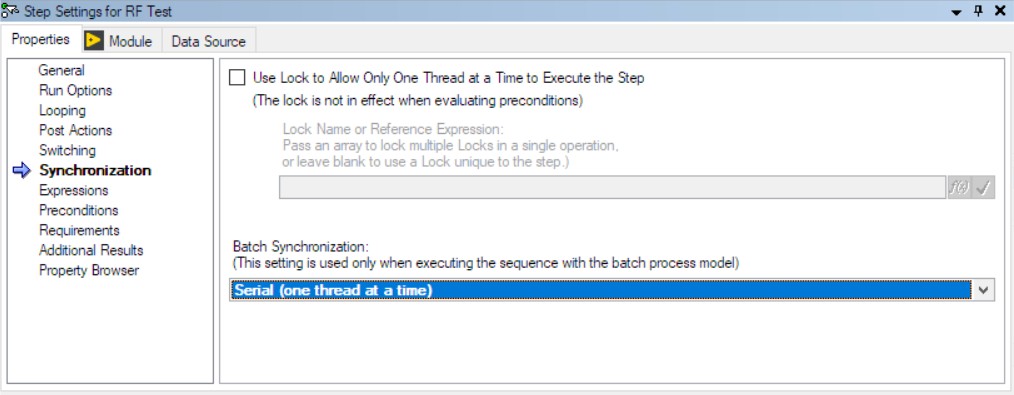
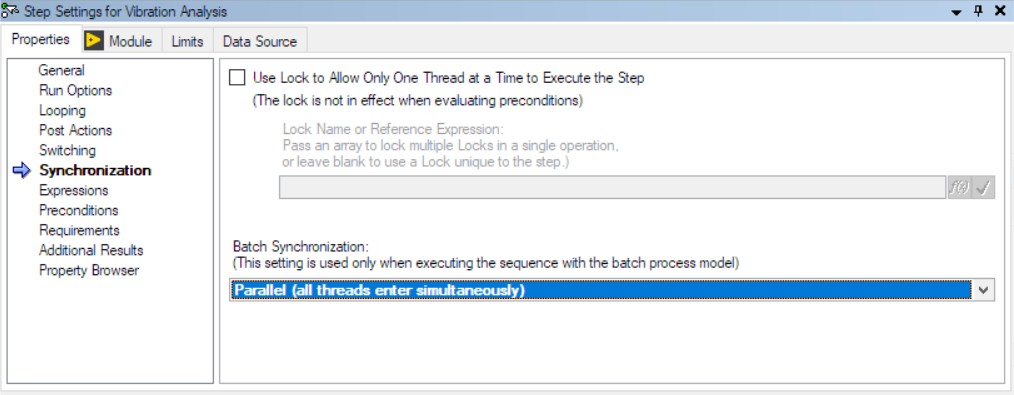
For example, let us assume that we have a simple set of three tests to be run on a batch of DUTs, Configure Chamber, RF Test, and Vibration Analysis. (See Figure 9.) The Configure Chamber test, we may want only one thread to execute, as it is talking to a PLC, and if all four threads spoke it may confuse the chamber controller. For the RF Test, we may have limited instrumentation and so we need to complete the tests on our DUTs one at a time, thread0, thread1, etc. where the test running on thread1 only executes when thread0 completes. For the final test, Vibration Analysis, we may need all of the DUTs to be measured in parallel to reduce test time. You can configure this with TestStand by selecting the properties of each of the steps, highlighting and right-clicking the step, and then selecting their synchronization properties. (See Figure 10a, b, c.)
Figure 9. Simple Three-Step Sequence in TestStand
Figure 10a. Use the Batch Synchronization to set the Configure Chamber step to only execute one thread. "One Thread Only (First Thread Execute Step, Remaining Threads Skip)"
Figure 10b. Use the Batch Synchronization to set the RF Test step to only execute one thread at a time. "Serial (One Thread at a Time)"
Figure 10c. Use the Batch Synchronization to set the Vibration Analysis step to execute all threads in parallel. "Parallel (All Threads Enter Simultaneously)"
By implementing the batch properties on each of the steps, you have massive flexibility on how you want your system to operate. You can create complex parallel systems in a very short time.
Resource Locking
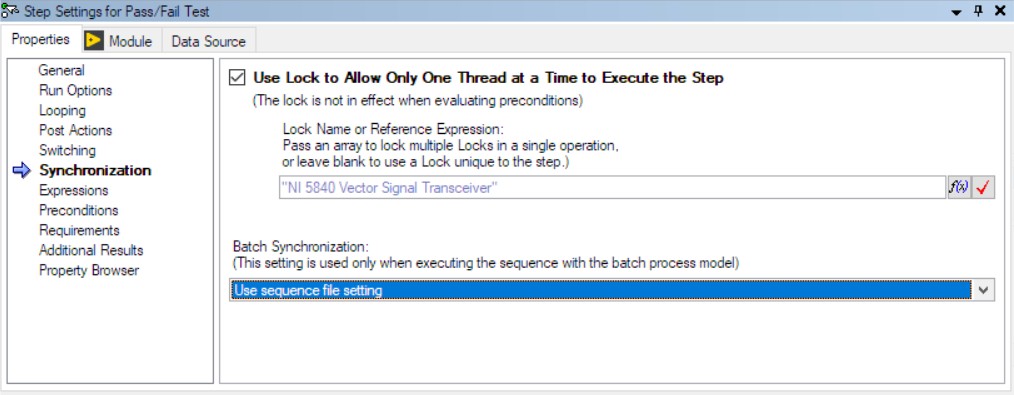
The largest issue with fully asynchronous parallel testing is that because there is no implicit synchronization around steps, it is more likely that two threads may try to use the same resource. For example, two DUTs steps may try to attain control of an instrument. This conflict is not limited to steps though, it can also appear anywhere in the sequence where two separate operations try to acquire a common resource. To eliminate this issue, when using TestStand, you can place "Locks" on resources from anywhere in the sequence. You can lock a step, so one thread can operate on it, similar in operation to the batch models "Serial" mode, or alternatively you can lock any named resource, such as a common instrument. When this lock is in place, any other thread which tries to operate on the step, or attain the resource, pauses until the previous step completes and releases the resource. Use the locking mechanism to make the best use of your instruments. When you define a lock, your instrument is always busy. When it completes the test on the first DUT, it is immediately refocused on to the next DUT. We show the locking mechanism below. (See Figure 11.)
Figure 11. Use locking to protect an instrument resource while this test operates.
Conclusion
Parallel test systems have become far easier to create and maintain using the new synchronization features of TestStand. This document only briefly covers the surface of what we can do with parallel systems using the standard TestStand models. More information is available about the Synchronization Step Types, the building blocks of the parallel models, and how you can create custom models. Visit ni.com/teststand and explore Charters 11 and 14 of the TestStand User Manual for further information on parallel system implementation.
Parallel test systems deliver significantly better throughput and far higher instrument usage for the organization, and with TestStand developing this type of system is within the reach of any test developer.
