Creating a Large SCXI Switch Matrix
Overview
A matrix is the most versatile switch topology. It is made up of M rows by N columns (M x N) that can connect any input to any output. With a matrix switching system, you can connect several instruments to various test points on a unit under test (UUT). This capability can eliminate your need to duplicate instruments and thus reduce your cost to test.
To view the complete line of NI matrix switches, visit ni.com/switches.
Matrix modules can also serve as building blocks for creating larger configurations that are well beyond the size of a single module. To expand the number of rows in a matrix, you must connect the columns of the modules. To expand the number of columns in a matrix, you must connect the rows of the modules. Let's take a look at how we can expand a switching system to create a 16x128 matrix.
Contents
Matrix Expansion Example
Our challenge was to create a 16x128 matrix with several SCXI-1129 high-density switch modules. When you want to expand a matrix, you need to determine the numbers of modules you need. To determine this number, follow these four simple steps:
1. Determine the matrix size of a single switch module. We are going to use the SCXI-1334 terminal block, which has a 4x64 matrix configuration.
2. Divide the number of rows you want by the number of rows in a single module, and round up the answer. (16/4 = 4 modules)
3. Divide the number of columns you want by the number of columns in a single module, and round up the answer. (128/64 = 2 modules)
4. Multiple the values found in steps 2 and 3 to determine the number of modules required by your matrix.
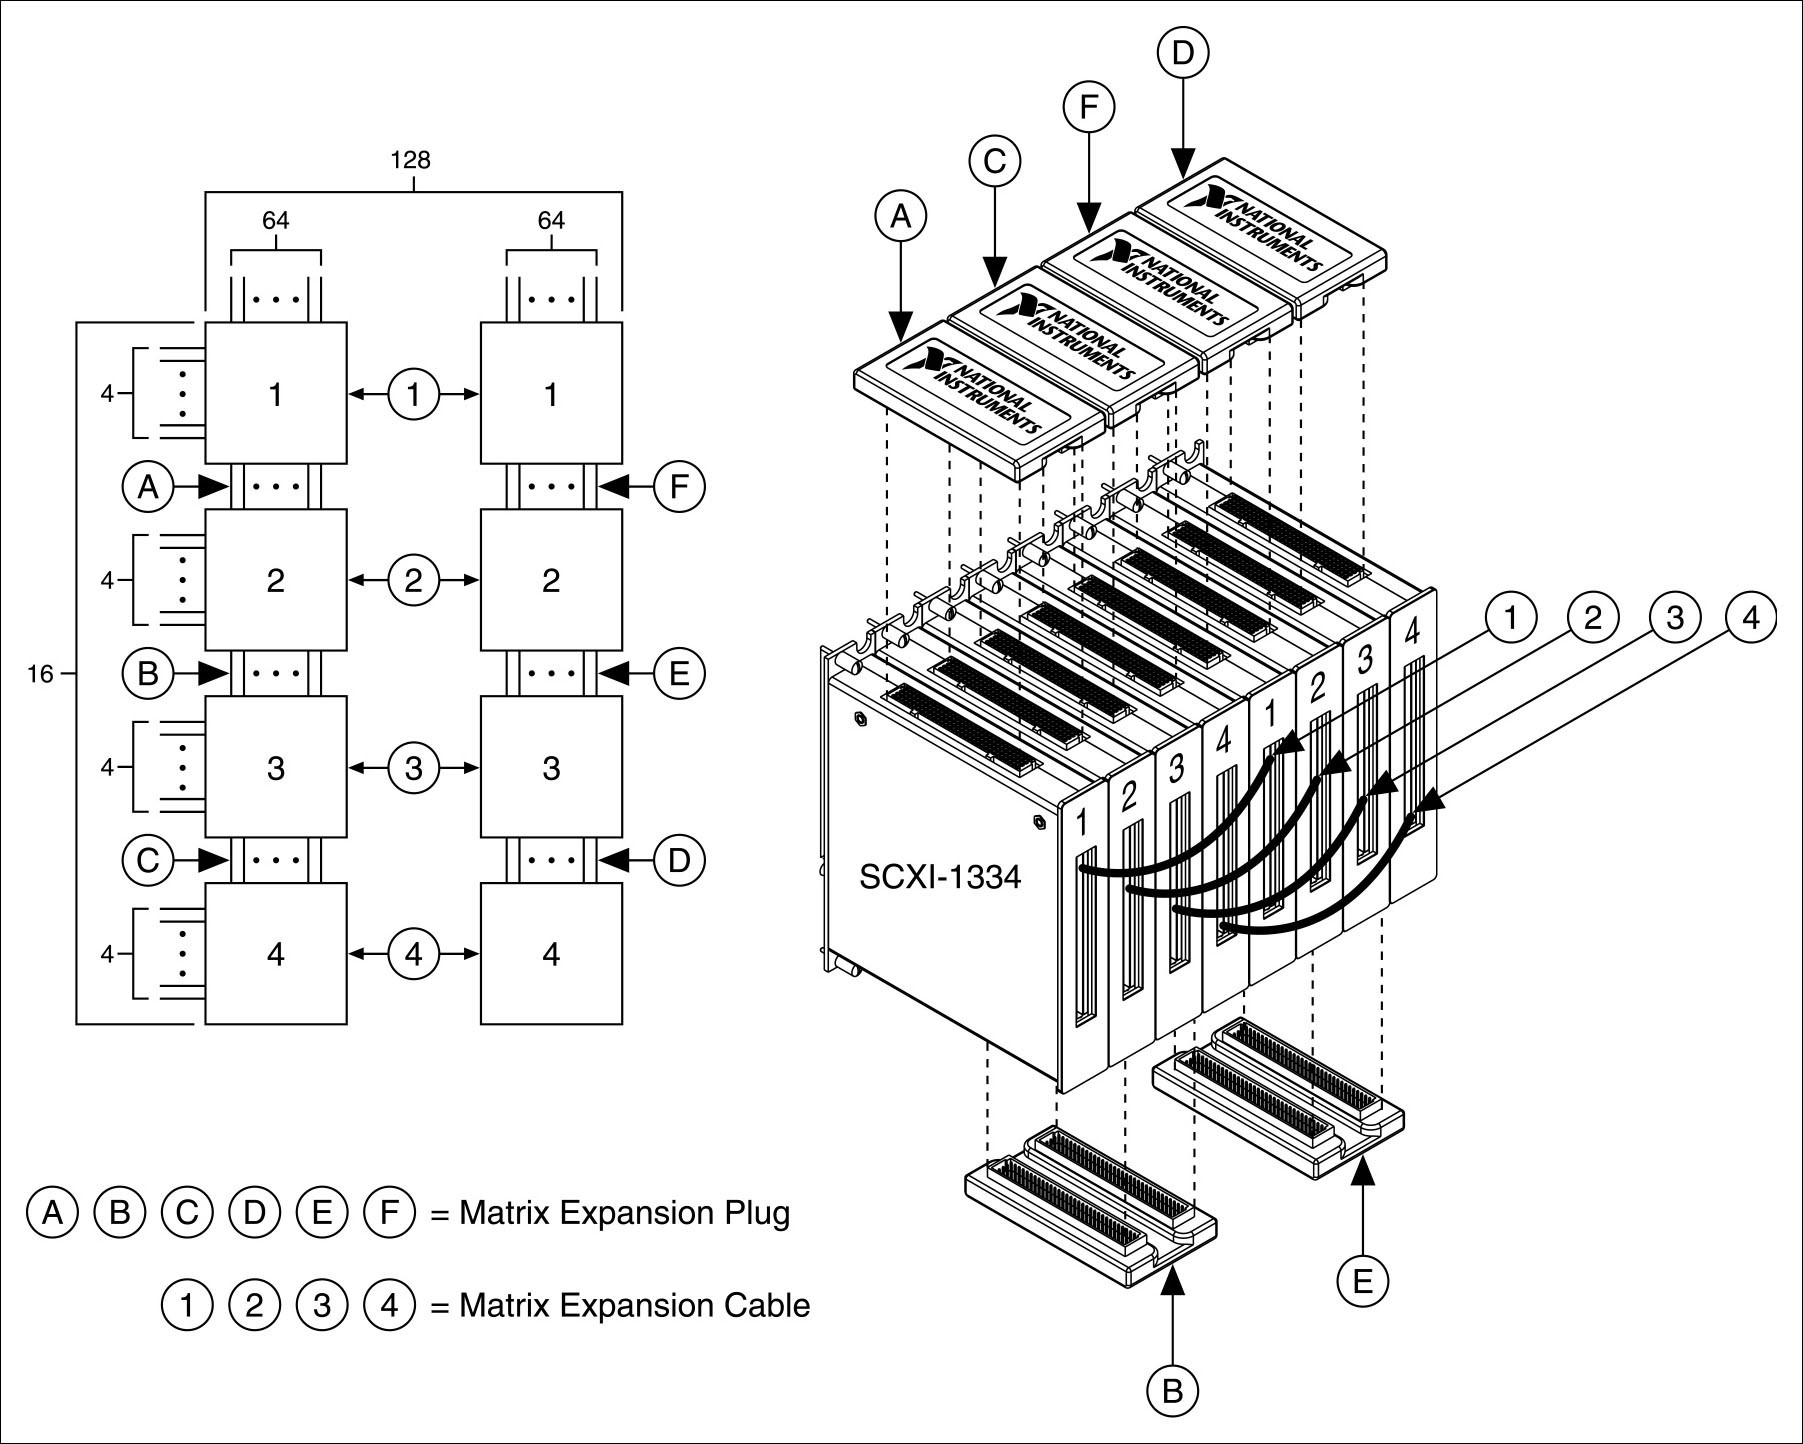
In our example, 4(2) = 8, so we need eight SCXI-1129 modules to build the desired matrix architecture, in addition to eight SCXI-1334 terminal blocks. For matrix expansion, you also need matrix expansion plugs and matrix expansion cables. To determine this, you need to calculate how many modules you need for both row and column count. In our example, we need six matrix expansion plugs and four matrix expansion cables.
Row Count Expansion
To reach row count, this matrix requires the connection of four modules. Because we are expanding rows, we need to connect the columns. On the SCXI-1129, we expand the rows with the matrix expansion plugs. Each matrix expansion plug connects two terminal blocks at either the top or the bottom. As shown is Figure 1, we create a 16x64 matrix configuration by connecting four modules in the following manner:
1. Connect the columns of modules 1 and 2 with matrix expansion plug A
2. Connect the columns of modules 2 and 3 with matrix expansion plug B
3. Connect the columns of modules 3 and 4 with matrix expansion plug C

Figure 1. Matrix Expansion Strategy
Column Count Expansion
Next, consider the number of modules necessary to reach the desired column count. Previously, we determined that this matrix requires two modules. However, because we have also expanded the rows, two does not represent the number of modules, but rather the number of sets of modules. That is, in attaining row count, we used four modules to create a 16x64 configuration. To achieve the desired 16x128 configuration, we need to connect the rows of two 16x64 matrices. As also shown is Figure 1 above, we create the second 16x64 matrix by connecting four modules as follows:
1. Connect the columns of modules 1 and 2 with matrix expansion plug D
2. Connect the columns of modules 2 and 3 with matrix expansion plug E
3. Connect the columns of modules 3 and 4 with matrix expansion plug F
Row connection on the SCXI-1129 is accomplished using matrix expansion cables. As shown in Figure 1, we create the 16x128 matrix configuration by connecting two sets of four modules in the following manner:
- Connect the rows of modules 1 with cable 1
- Connect the rows of modules 2 with cable 2
- Connect the rows of modules 3 with cable 3
- Connect the rows of modules 4 with cable 4