Calibration Services Guard Band Implementation
Contents
Introduction
In an ideal metrological setting, measurement devices—and the standards used to calibrate them—would possess infinitely small measurement uncertainties. This optimal scenario results in high confidence that a measurement of a measurand (quantity intended to be measured) has a high likelihood (probability) that it is within a measurement device’s specification and applicable conformance zones. Conformance zone, commonly referred to as acceptance limits, is the range of acceptable measurement outcomes associated with a process, device, or other physical phenomena. Measurement uncertainty essentially reduces the specification and conformance zones within which a measurement result could reside.
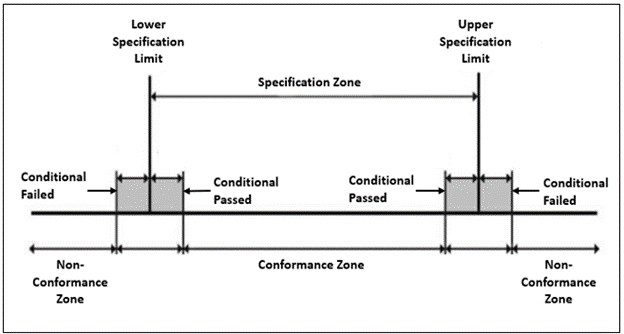
When measurement results lie within measurement uncertainties located inside specification limits, they are commonly flagged as Conditional Passed. That is, passed is indeterminate; measurement uncertainty may produce measurement results outside specifications. When measurement results lie within measurement uncertainties located outside specification limits, they are commonly tagged as Conditional Failed. That is, failed is indeterminate; measurement uncertainty may produce measurement results within specifications (see Figure 1). These flagged measurement results provide for easy identification of test points with additional risk associated with measurement uncertainty to determine if these additional risks are acceptable or not for a particular application.
Figure 1 Measurement Uncertainty Impact
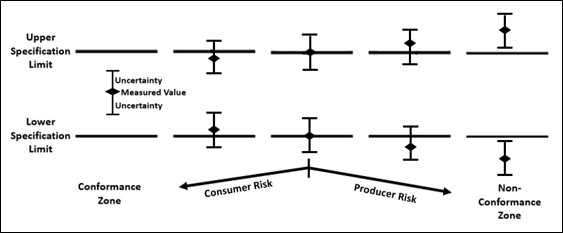
Measurements uncertainties that overlap specification limits are traditionally classified as either consumer or producer risk. Consumer risk is the risk of accepting a defective product (bad measurement accepted as in tolerance). Producer risk is the risk of rejecting a good product (good measurement accepted as out of tolerance). Figure 2 depicts these risks relative to specification limits.
Figure 2 Consumer and Producer Risk
Equipment manufacturers characteristically create measurement device specifications to reflect an approximate 2 percent probability of false accept (PFA) corresponding to a consumer risk of ≈ 2 percent. In metrology, this risk equates to a test uncertainty ratio (TUR) of ≥ 4:1. TUR is defined as tolerance required/measurement uncertainty at 95 percent confidence interval. Confidence interval within a metrological context is an interval that represents the probability (likelihood) that a value (mean of measurement results) will fall between a pair of limits (tolerance).
Guard Banding
Guard banding creates new criteria for assessing whether a measurement result is in conformance. A guard band is the offset from specification limits to conformance limits (in tolerance) or non-conformance limits (out of tolerance). If a measurement has a low TUR, guard banding can be used to reduce PFA risk for the consumer. The criteria used for determining conformance is detailed in a statement of conformity in terms of decision rules. For test points expressed in linear units (like volts or amps), the guard band conformance limits are usually symmetrical around the test limit. For test points expressed in logarithmic units (like dB or dBV), the guard band conformance limits are usually asymmetrical around the test limit.
Decision Rules
A decision rule is a rule that describes how measurement uncertainty is accounted for when stating conformity with a specified requirement. A decision rule relates how measurement uncertainty is applied or not applied to determine whether a measurement result is in conformance (in tolerance).
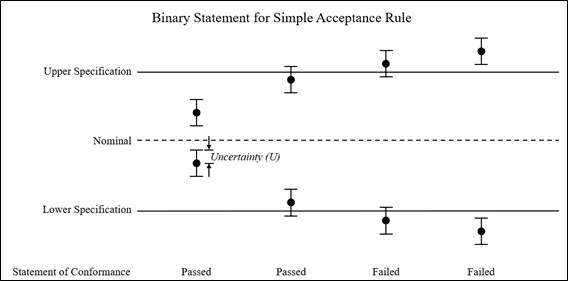
A common decision rule is the Binary Statement for Simple Acceptance Rule. This decision rule uses only specification limits (tolerances) to determine if a measurement result is in conformance without accounting for measurement uncertainty (see Figure 3).
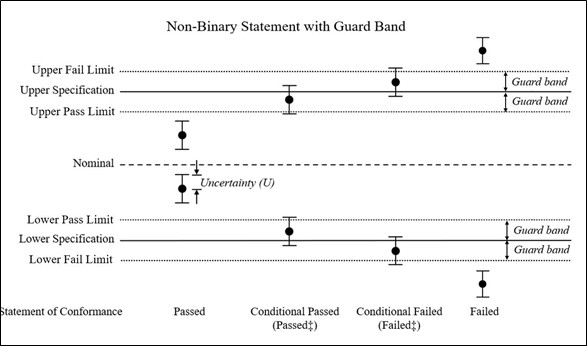
One decision rule that takes measurement uncertainty into consideration is the Non-Binary Statement with Guard Banding.2 This decision rule:
- Reduces the conformance upper limit below that of the upper specification limit to create a new upper acceptance level
- Increases the conformance lower limit above that of the lower specification limit to create a new lower acceptance level
The uncertainty is used to determine the amount subtracted from specification limits. These adjustments restore TURs to ≥ 4:1; that is, ≈ 2 percent consumer risk (see Figure 4).
NI Guard Banding Implementation
When a statement of conformity to a specification is provided, NI utilizes decision rules and takes level of risk into account to determine conformance with the agreed specification for accredited and compliant calibrations.
By default, for test points the decision rule is the Binary Statement for Simple Acceptance Rule (see Figure 3). For test points with double-sided limits, a guard band is applied if the TUR is less than 4:1. For test points with a single-sided limit, a guard band is always applied. For test points where a guard band is applied (as noted in the status column on the calibration certificate), the decision rule is Non-Binary Statement with Guard Band2 (see Figure 4).
NI reports when guard banding is applied by displaying (1) in the status column of a calibration certificate for the applicable test point. NI reports conditional pass and conditional fail test points per the following:
- Measurement results determined to be conditional pass are denoted as Passedǂ in the status column of a calibration certificate.
- Measurement results determined to be conditional fail are denoted as Failedǂ in the status column of a calibration certificate.
Figure 3 Binary Statement for Simple Acceptance
Figure 4 Non-Binary Statement with Guard Band
Guard banding is only available with Accredited level calibration, and NI will automatically apply guard banding to the As Found calibration data for models that are enabled for guard banding. If conditional pass or fail results are found, customers should perform an impact assessment to determine if the conditional failed test data adversely impacts their products/processes.
___________________________
1 Per ISO/IEC 17025:2017
2 As denoted in ILAC-G8:09/2019
3 Per ILAC-G8:09/2019 section 4.2.1


