Using LabVIEW for NI Linux Real-Time CompactRIO Systems
Overview
This white paper is part of a series that describes software architectures for targeting NI Linux Real-Time hardware. Consider reading Choosing a Software Architecture for Programming NI Linux Real-Time Applications to learn about real-time concepts and design patterns. Continue reading to learn about the steps necessary to get started with the LabVIEW Real-Time Module; integrate C/C++ libraries and applications; and optionally use the LabVIEW FPGA Module for higher-performance timing, control, and signal processing on an NI Linux Real-Time target.
Contents
- Introduction to LabVIEW RIO Architecture
- Introduction to NI Linux Real-Time
- Getting Started Using LabVIEW Real-Time
- Calling C/C++ Libraries From LabVIEW Real-Time
- Interfacing With C/C++ Applications From LabVIEW Real-Time
- Extending Performance and Reliability With LabVIEW FPGA
- Next Steps
Introduction to LabVIEW RIO Architecture
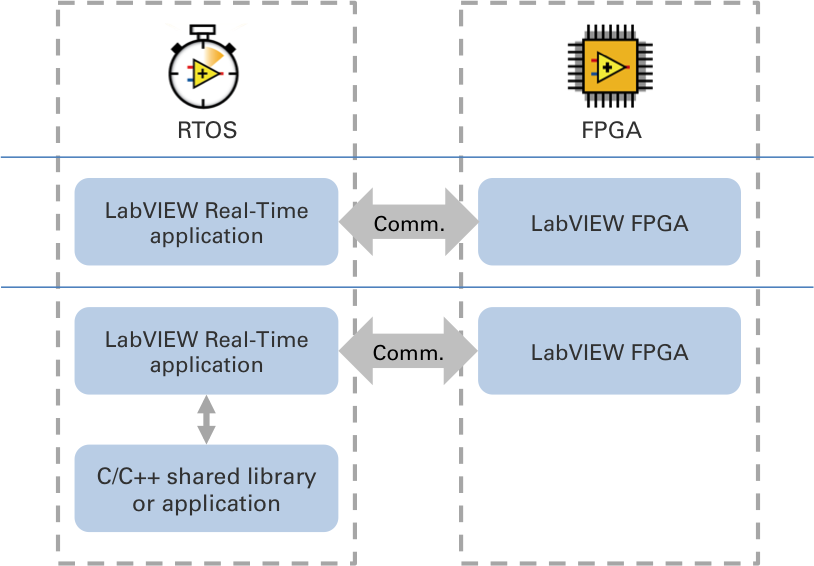
The LabVIEW reconfigurable I/O (RIO) architecture—the combination of a processor, a reconfigurable FPGA, measurement I/O hardware, and LabVIEW—simplifies development because you have all the tools necessary for real-time programming in one environment. Specifically, the LabVIEW Real-Time Module bundles a full suite of compiler, linker, and debugging tools with hundreds of math, control, and signal processing algorithms that run deterministically in NI Linux Real-Time. In addition, you can reuse existing C/C++ code within your LabVIEW application, enabling the design architectures in Figure 1.

Figure 1. Use LabVIEW system design software to develop a complete NI Linux Real-Time application, and optionally integrate existing C/C++ code.
Introduction to NI Linux Real-Time
Over the last decade, NI has supported several real-time OSs (RTOSs) in LabVIEW Real-Time. However, none of them received the level of in-house R&D investment, external collaboration, and market reception that NI Linux Real-Time represents. Before getting started with your real-time software development, it is valuable to understand the background, benefits, and performance considerations behind NI Linux Real-Time.
Because of its open-source and community-developed nature, Linux has developed a strong presence in the embedded system design field. Its ubiquity is based off the diverse IP and applications available both within proprietary repositories and on the web. Historically, most embedded Linux solutions lacked the reliability and determinism that an RTOS offers; this meant that they were unsuitable for executing event response, closed-loop control, and embedded monitoring applications. NI Linux Real-Time brings together the real-time and Linux worlds, giving you the ability to take advantage of the vast ecosystem of in-house and public Linux IP in your real-time embedded systems. To gain further insight about this unique convergence between real-time and Linux, see the Introduction to NI Linux Real-Time.
If you are already proficient in Linux and interested in learning how to use functionality like Linux shell commands, file transfer over FTP, or command line execution on NI targets, consider reading Under the Hood of NI Linux Real-Time. NI also maintains an active Community page where NI Linux Real-Time developers exchange example code, upload tutorials, and ask questions about a variety of topics.
Getting Started Using LabVIEW Real-Time
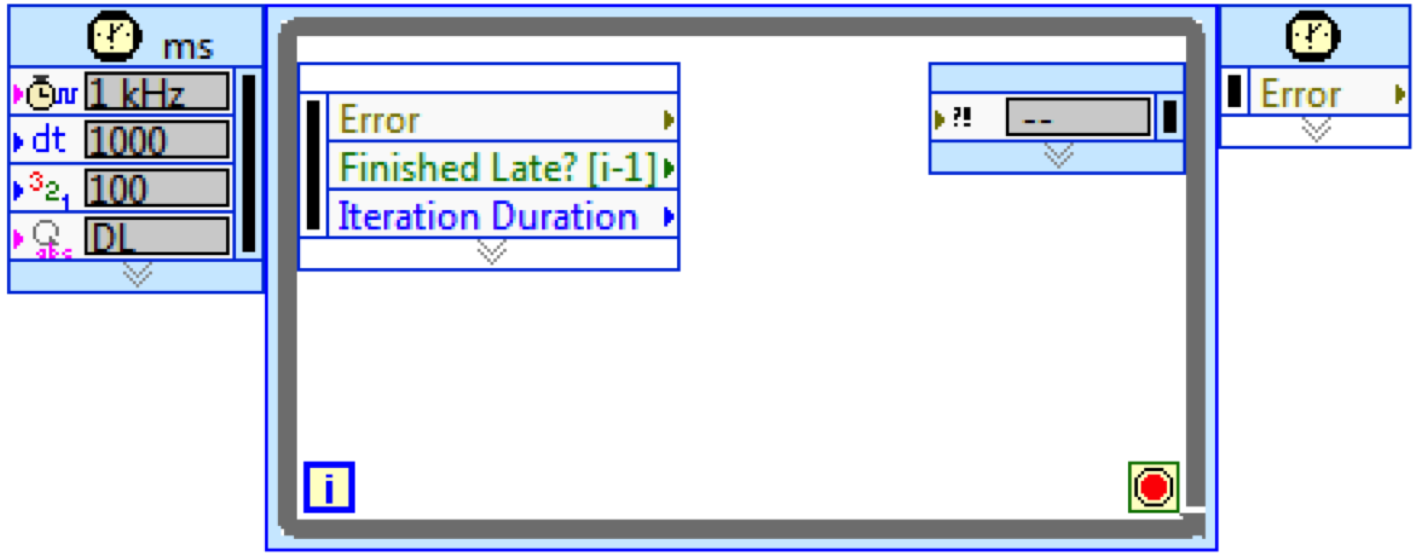
Because LabVIEW is an integrated, hardware-aware development environment, the steps for programming an NI Linux Real-Time target are the same as other LabVIEW Real-Time targets. At a high level, those steps include interactive connection and configuration using Measurement & Automation Explorer (MAX), software development in LabVIEW, and one-click deployment to the target. During the debug phase, use the Real-Time Trace Viewer to identify sources of jitter such as processor affinity, memory allocations, priority inheritance, or race conditions.

Figure 2. LabVIEW Real-Time includes structures such as the Timed Loop, which give you control over priority, CPU affinity, and timing constraints.
Over the past decade, NI has developed numerous resources for new LabVIEW Real-Time users. These include getting started instructions for initial setup, as well as tutorials that explain the different hardware and software combinations. The LabVIEW Evaluation Series also contains tutorials for acquiring data and monitoring conditions for users who are considering LabVIEW Real-Time. For a complete LabVIEW Real-Time curriculum, consider training courses at ni.com/training.
Note: Please ensure that you have installed the correct NI-RIO device drivers for your target. You can download the drivers for your target at ni.com/drivers.
Calling C/C++ Libraries From LabVIEW Real-Time
The first step toward integrating external code is to compile it for your NI Linux Real-Time target. NI provides extensive documentation based on a modern toolchain for C/C++ development. It also illustrates the steps for choosing your own toolchain. For more information, visit Getting Started with C/C++ Development for NI Linux Real-Time.
After you have created your C/C++ library, you can integrate it with LabVIEW on a NI Linux Real-Time Target using the LabVIEW Call Library Function Node. Use this function to call a C/C++ Linux shared library function directly from LabVIEW. Configure the Call Library Function Node to specify the library, function, parameters, return value for the node, calling conventions, and function callback. LabVIEW data types can be passed as inputs and returned as outputs to the C/C++ library function.
Interfacing With C/C++ Applications From LabVIEW Real-Time
One feature that is distinct to NI Linux Real-Time makes available is the ability to execute separate applications in parallel with the main real-time application without sacrificing determinism. This functionality gives you the ability to integrate external, open-source tools in your embedded solution; that way, you can fall back on the expertise of the community if you don’t have it in-house. This could mean integrating a highly specialized third-party sensor or executing a robust database manager that runs in parallel to your top-level real-time code. This functionality is enabled by opkg, the built-in package manager for NI Linux Real-Time. To learn more about opkg, visit the NI Linux Real-Time Community or the OPKG Package Manager website.
The process for preparing applications to run on your NI Linux Real-Time target is similar to the one described above for C/C++ libraries: you must compile the source code for your target, then move the executable onto the target’s local disk. For more information, read Getting Started with C/C++ Development for NI Linux Real-Time.
Once your executable is compiled and located on your target, you have two options for interacting with it from your LabVIEW Real-Time application:
- System Exec VI—Use this function to execute or launch another command-line application or Linux script file from your LabVIEW code. You can include any parameters with your command string that the executing command supports. For a tutorial on using the System Exec VI in NI Linux Real-Time, please visit the NI Linux Real-Time Community.
- Localhost Communication—Parallel programs can also communicate with each other using localhost TCP/IP functions to pass data back and forth. For more information on interprocess communication using localhost TCP/IP, please reference the LabVIEW Help files.
Extending Performance and Reliability With LabVIEW FPGA
With the upfront choices of real-time software architecture and development tools resolved, many developers choose to start designing their embedded system at the I/O level. For NI embedded hardware, I/O ports are routed through field-programmable gate arrays (FPGAs), or silicon chips whose gates can be reconfigured in software. Because the chip’s configuration is a physical manifestation of your software design, it requires no OS to execute; this means the FPGA delivers the highest degree of reliability and fastest response time in your system.

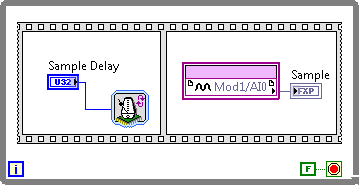
Figure 3. Describe FPGA functionality graphically with LabVIEW FPGA.
Depending on your application needs, you may want to route I/O straight through the FPGA to the real-time processor or incorporate custom timing, control, and signal processing algorithms at the FPGA level. To access I/O in a default configuration without the need for LabVIEW FPGA programming, LabVIEW Real-Time offers the RIO Scan Mode. To learn more about this feature, visit Using NI CompactRIO Scan Mode With NI LabVIEW Software.
Alternatively, use LabVIEW FPGA to design a custom, high-performance configuration for your FPGA. Unlike traditional hardware description languages like VHDL or Verilog, LabVIEW FPGA gives you the ability to describe the FPGA functionality graphically; this complements the parallel nature of FPGA processors. Furthermore, because the FPGA design is in LabVIEW, you have built-in communication mechanisms between the real-time application and FPGA at your disposal. Get started by reading a LabVIEW FPGA tutorial or consider training courses at ni.com/training.
Next Steps
- Community: NI Linux Real-Time
- Discussion Forums: Real-Time Measurement and Control
- Learn more about the LabVIEW Real-Time Module
The registered trademark Linux® is used pursuant to a sublicense from LMI, the exclusive licensee of Linus Torvalds, owner of the mark on a worldwide basis.