Tips and Tricks to Make the Switch to a Modular SMU
Contents
- Overview
- Installing the Instrument Driver Software
- Installing SMU Instruments Into a PXI System
- Connecting the Front Panel Connectors
- Configuring the SMU
- Performing Basic Measurements With the SMU
- Programming the SMU
- Configuring Triggers or Events
- Synchronizing Multiple Instruments or Channels
- Building and Deploying a System
- Configure a System Today
- Take the Next Step
Overview
Users of traditional source measure units (SMUs) are making the switch from box to modular instruments to meet evolving test requirements. Because new technology allows modular SMUs to have a measurement quality that rivals that of high-precision box instruments, many users are considering the change. Modular SMUs also offer a compact size and an integrated platform that supports modern technology with inherent flexibility to meet changing needs. Although this switch may require taking an alternative approach, you can reuse your technical knowledge and in some cases existing connectivity.
Here are a few tips and tricks, ranging from software installation to deployment, to help you make the switch to a modular SMU.
Installing the Instrument Driver Software
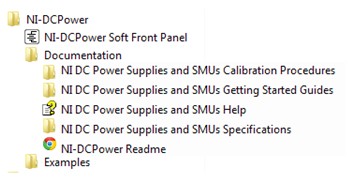
Prior to installing the instrument driver, install your desired application development environment (ADE). Next, install the free NI-DCPower driver, which features a set of functions and attributes that you can use to programmatically configure and control the National Instruments power supply or SMU. In addition, you gain access to an extensive portfolio of help documents to ensure your success.
Figure 1: Explore the extensive getting started documentation provided through the free NI-DCPower instrument driver.
Installing SMU Instruments Into a PXI System
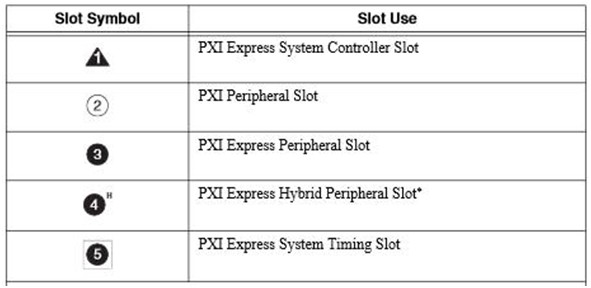
Identify a supported slot in the PXI/PXI Express chassis. Refer to the table below to determine what slots your PXI module should use.
Table 1: Ensure you place the module into a compatible slot by aligning the type of module to the slot in the chassis.
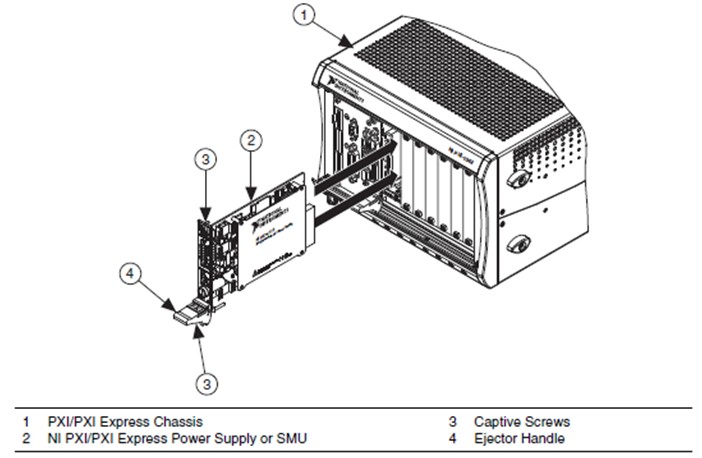
You can install an SMU module into a chassis slot by first placing the module card edges into the front module guides (top and bottom). Slide the module to the rear of the chassis, making sure that the injector/ejector handle is pushed down.
When you begin to feel resistance, push up on the injector/ejector handle to fully inject the module into the chassis frame. Secure the module front panel to the chassis using the module front-panel mounting screws.
Figure 2: Installing an SMU Module Into a PXI System
Connecting the Front Panel Connectors
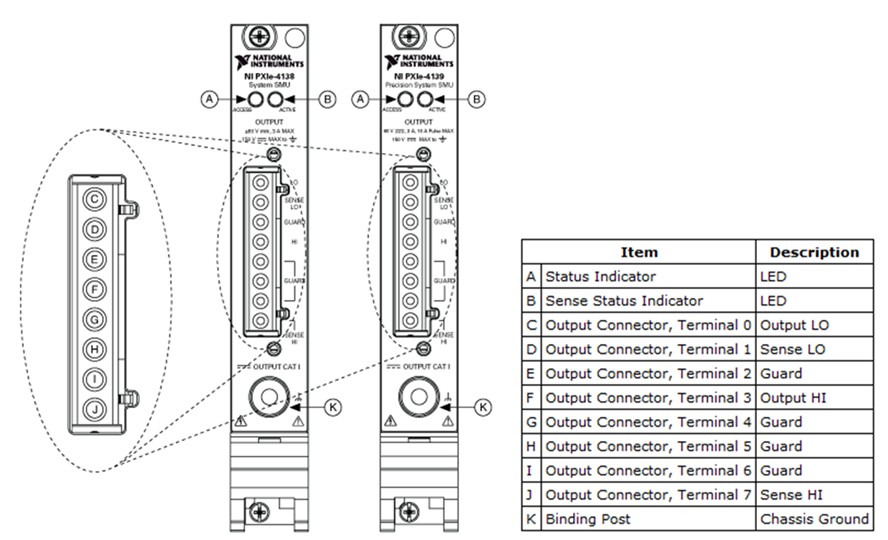
Certain modular SMUs make use of industry-standard connectivity to provide a consistent experience and allow for reuse when developing cables and other mechanical interfaces to the SMU. For example, the NI PXIe-4139 precision system SMU uses the same 8-pin connector and is pin compatible with the Keithley 2600 series. Other modular SMUs are designed for high-channel-count applications and use higher density connectors compared to traditional SMUs. Regardless of the connector type, you can typically find the pinout on the front of the module and on the connector housing.
Figure 3: NI PXIe-4138 and the NI PXIe-4139 Front Panels and Connector Details
Evaluate the connectors and connect the appropriate signals for your application. Using the NI PXIe-4139 as an example, connect the guard terminals to provide a buffered voltage that is equivalent to the voltage of the HI terminal. This could be used to minimize the effects of leakage currents when you measure very small currents.
Configuring the SMU
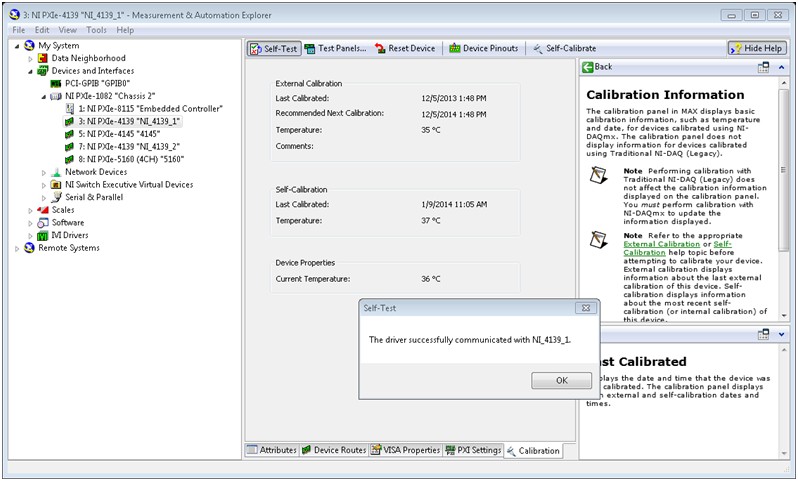
Configure and test the NI power supply or SMU in Measurement & Automation Explorer (MAX). Within this environment you can locate the instrument, name the device, perform a self-test, run calibration, and more. MAX is a single tool that you can use to see all the instruments in a system and perform basic tests.
Figure 4: Using MAX, ensure the SMU is installed properly and use the self-test function to confirm software communication.
Performing Basic Measurements With the SMU
NI-DCPower is an IVI-compliant instrument driver that is included with your NI power supply or SMU. You can use it to program the SMU within your desired ADE. It communicates with all NI programmable power supplies and SMUs. Because the driver is IVI-compliant, if you were previously using an IVI driver, you can reuse this knowledge and apply it to programming NI modular SMUs. For example, SMU settings such as voltage level, current limit, source delay, and aperture time remain constant when transitioning to a modular SMU.
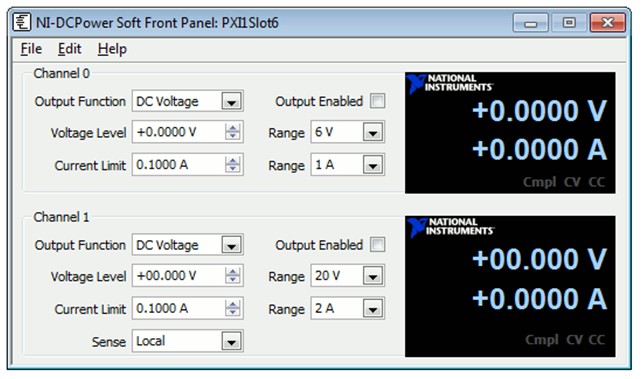
NI-DCPower also includes an interactive soft front panel for quickly sourcing voltage or current and measuring back the voltage and current.
Figure 5: After setting the parameters, once power is supplied, the NI-DCPower soft front panel displays voltage and current measurements.
Programming the SMU
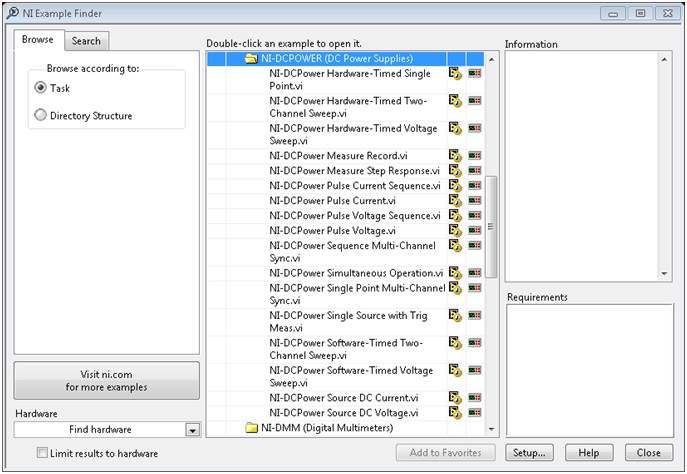
To get started with the instrument, run the NI-DCPower examples to demonstrate the functionality of the power supply or SMU. These serve as programming models and building blocks for your own applications. The NI Example Finder, a utility available for some software applications, organizes examples into categories and gives you the ability to easily browse and search installed examples. You can see descriptions and compatible hardware models for each example or see all the examples compatible with one particular hardware model.
Figure 6: Choose from a variety of example programs to quickly get started creating your application.
NI SMUs all use the NI-DCPower instrument driver. With this commonality, you can reuse the knowledge of the API from one modular SMU to another, which improves your productivity. When upgrading an SMU, easily integrate a new instrument into your application by reusing a majority of the existing code or, in cases where you are adding an SMU into your system, reuse your knowledge to quickly adapt your application.
Configuring Triggers or Events
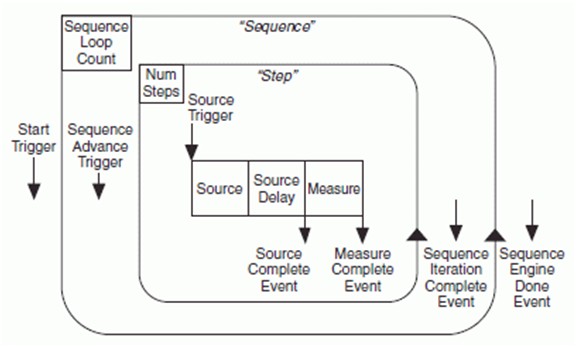
Modular SMUs simplify the setup and programming experience of synchronization. Timing and synchronization is handled within the PXI chassis, so PXI-based SMUs eliminate the need for external cabling to share triggers and sample clocks. With the internal triggering capabilities of PXI, you can use triggers and events to synchronize operations within a single NI power supply or SMU and operations with other PXI-based instruments such as oscilloscopes, switches, and RF analyzers or generators.
Figure 7: Sequence Engine Diagram for Triggering and Synchronization
Additionally, certain NI SMUs use a hardware-timed sequencing engine that executes lengthy sequences with hardware-timed output and tight measurement synchronization between multiple SMUs.
Synchronizing Multiple Instruments or Channels
Synchronizing channels between multiple SMUs is difficult if each instrument has its own timing and synchronization engine. Even when box SMUs support multi-instrument synchronization, routing trigger lines and sample clocks between box instruments becomes progressively more cumbersome as channel count increases.
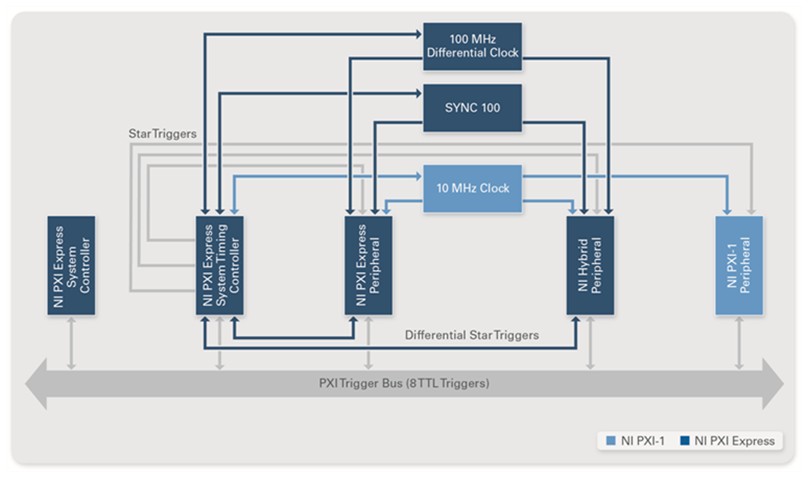
PXI overcomes many traditional synchronization challenges by using an integrated timing and synchronization architecture to route synchronization clocks and triggers internally. A PXI chassis incorporates a dedicated 10 MHz system reference clock, PXI trigger bus, star trigger bus, and slot-to-slot local bus, while a PXI Express chassis adds a 100 MHz differential system clock, differential signaling, and differential star triggers to address advanced timing and synchronization needs.
Figure 8: Take advantage of integrated timing and synchronization to route clocks and triggers internally.
Building and Deploying a System
When deploying your application, choose the appropriate combination of instruments to accomplish your application needs. Take advantage of flexibility by choosing from an extensive portfolio of over 600 NI modular instruments or combining multiple SMU instruments to create a system containing up to 68 SMU channels in a 4U, 19-inch rack space.
Calibrating
Every power supply or SMU performs within its specifications over some finite temperature range and time period. If the temperature changes or time exceeds those specifications, and your application requires tight specifications, calibration is required.
With NI SMUs, to reduce errors caused by time and temperature drift, NI-DCPower provides a self-calibration function for some devices. Self-calibration recalculates certain internal reference values, gains, and offsets to significantly improve accuracy over the full operating temperature range of the device. Because self-calibration performs offset corrections, some devices without auto-zero functionality can correct for offset-error drift by using self-calibration.
In addition, NI offers calibration service programs to help minimize your maintenance costs and ensure you get the level of service you require. These programs help you protect your investment in NI products for longer by covering all calibration and repair costs for extended durations.
Additional Resources for Deploying a Test System
NI provides a practical guide that covers key steps in assembling a test system and offers templates that document the complete process. The guide also gives guidance on developing effective strategies to ensure reliability during software deployment.
Configure a System Today
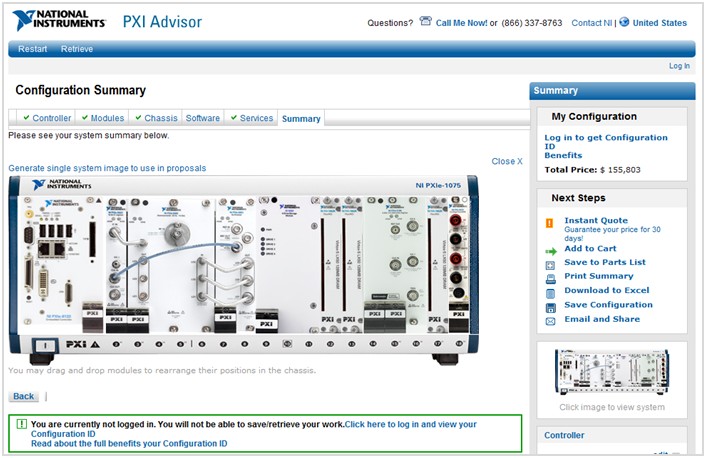
When configuring your test system, use advanced online system configuration advisors to guide you through the options. With this free online tool, select the components that meet your application requirements or speak to an expert.
Figure 9: Use the PXI advisor to configure systems to meet your needs.
