TestStand Custom Step Type Development Best Practices
Overview
TestStand includes numerous built-in step types that act as building blocks for test sequences. In addition to built-in step types, TestStand allows users to create custom step types to implement additional functionality.
Custom step types allow users to extend existing steps in the following ways:
- Configure values for step properties, and determine which properties can be modified by step users
- Add new step properties to store custom data, which can optionally be logged to the test results
- Define code to be called before or after execution of the main module
- Create an interface to allow users to configure custom step properties at edit-time
A well-designed step type can make sequence development faster, can reduce debugging efforts, can allow developers to share standardized code, and can achieve consistency among multiple test stations and separate groups. However, custom step types can require a significant amount of time to plan, program, debug, deploy, and maintain.
Prior to reading this article ensure that you are familiar with the process of creating a custom step type. Refer to the Creating a Waveform Custom Step Type tutorial for details on this process.
Contents
- Choosing When to Use a Custom Step Type
- Defining the Requirements for a Custom Step Type
- Managing Step Type Data
- Configuring Custom Step Type Functionality using Substeps
- View Additional Sections of the TestStand Advanced Architecture Series
Choosing When to Use a Custom Step Type
Before starting to design a custom step type, you should consider other approaches that may be a better fit for new functionality.
Creating or modifying a custom step type is not recommended for the following cases:
- The new functionality affects all or many types of steps. In this case, consider using an Engine callback, which executes before or after each step.
- You want to provide a base configuration of an existing step, but no new functionality or properties are required. In this case, create a step template containing the changes to the step.
- You want to provide a tool or utility for use at edit-time. In this case, use a custom tool menu item to call your custom code.
Create or modify a step type in the following situations:
- The functionality cannot be implemented in built-in step types.
- The functionality requires modifying properties that cannot be modified in instances of existing step types,
- The functionality requires that actions must occur before or after calling test code, such as setting up the step or analyzing the results.
- You want to simplify the user experience for configuring steps with the help of a user interface.
- You are sharing the functionality with other groups, companies, or customers.
Step Templates Versus Custom Step Types
You can create step templates by developing and configuring steps in a sequence and then dragging and dropping those steps into the Templates List of the Insertion Palette. TestStand stores a copy of the step instance as a template you can reuse to quickly create new sequences by dragging and dropping the step template into a new sequence.
The difference between a step template and a custom step type is that you can create a template only from existing step types and the template includes only the same capabilities of the original step type. You cannot modify or redesign the step template to the extent you can a custom step type. For steps you add to the Templates List, you can configure only the settings enabled by the developer of the original step type. In contrast, you can use a new custom step type to create a completely new step with entirely new behavior. Also, changes to a step template affect only future instances of the step and do not change existing instances of that step.
One benefit of using a step template is to avoid customizing step settings more than once if you reuse the same step in the same way. For example, if you set an IVI Power Supply to 5V and then to 3.3V and plan to do that many times throughout the entire sequence, creating two step templates after you initially use and configure the steps can save time. However, if you need a step which first configures the power supply before running the test code, creating a custom step type is a better approach.
Step Templates | Custom Step Types |
|
|
Defining the Requirements for a Custom Step Type
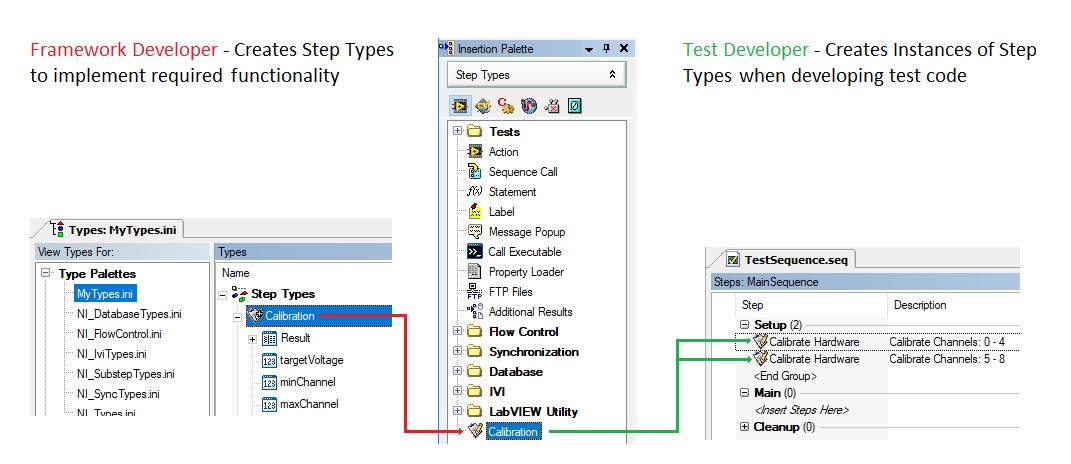
When designing custom step types, consider the separate roles of the framework developer and the test developer. The framework developer’s role is to develop tools and building blocks, while the test developer’s role is to use these tools to implement the actual test code.
When designing a custom step type, you are taking on the role of a framework developer, and it is important to consider the functionality of the step type you develop in terms of the end users, the test developers.
Use these guidelines when determining the requirements for the custom step type
- Define the scope of the custom step type. Consider what tasks a test developer will use the custom step type to implement. The scope should be large enough to handle these use cases, but not too large where the purpose of the step type is not clear.
- Based on the scope of the step type, define the data that the step type will require, and how the data should be stored.
- Define any functionality that should be implemented for all instances of the step type. Ensure that any data required for this functionality is defined in step properties.
- Define which data should be editable by users, and which should be logged to the report or database.
- Consider what functionality or configurations may be requested in the future, and ensure that these items will be implemented in a way where updates to the step type propagate to all instances.
Managing Step Type Data
Custom step types store data in several properties and settings that you can use to configure the behavior of instances of the step type and manage data required for the step type functionality. These include:
- Built-in type properties that are present for all step types and cannot be modified in instances of the type.
- Default Value properties that define the state of new step instances but can be modified in instances of the type.
- Custom properties that you define for a step type.
Built-in Type Properties
Built-in step type properties exist for all step types, and the user cannot make changes to these settings in instances of the step type. In addition, any changes you make to the values of these properties will propagate to any instances of the step type.
Example: All step types define a description expression which is displayed in the Steps pane next to instances of the step. This property is present for all step types, but the value is set for each step type. The value cannot be modified in instances of the step type.
To access the built-in properties of a step type:
- Navigate to the types view using the View » Types menu, or the shortcut key Ctrl + T
- Right click the step type, then select Properties… to launch the properties window
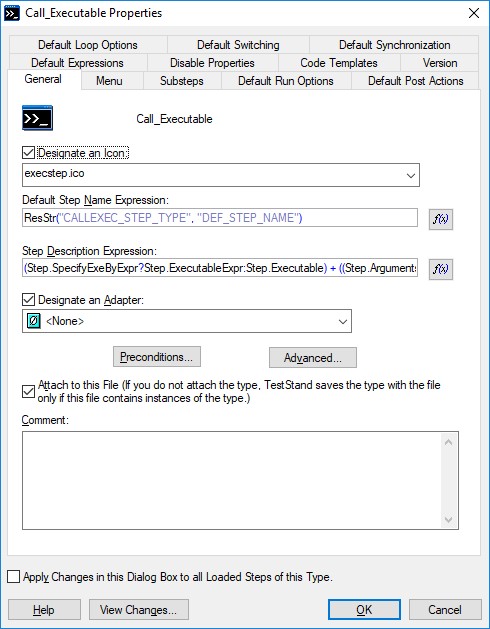
Step Type Properties Dialog Box
Most of the settings in this dialog are default values, which are described in the next section. The built-in properties include:
- Icon – the icon for the step, located in the <TestStand Public>/Components/Icons folder
- Step Description Expression – the step description which appears in the steps pane for instance of the step type
- Version Settings – used to resolve type conflicts
- Item Name Expression (Menu Tab) – defines the name of the step in the insertion palette
Creating Self-Documenting Descriptions
Since the description is not configurable in step instances, you can define it as a step type developer to help users create self-documenting steps. The description field is specified by an expression which allows you to create dynamic descriptions that display important step properties. When the user makes changes to these property values in instances of the step type, the description will update and allow the user to quickly see the state of the step without navigating into the step setting pane.
Example: The Step Description in the second step in the image below is more descriptive and provides better documentation. This description uses the following expression to define the description:
"Calibrate Channels: " + Str(Step.minChannel) + " - " +Str(Step.maxChannel)
This expression configures the description to dynamically update if the user configures the minChannel and maxChannel step properties.
Step Description Examples
Step Property Default Values
When developing a step type, you can configure default values for all user configurable step settings. In addition, you can configure these properties to be disabled in step instances so that the default values you set cannot be modified. Like built-in properties, default values are defined in the step properties window. However, all default value settings contain the word “default”, either in the setting name or in the settings tab where they are configured.
Example: The status expression property is used to determine the step result. This property is present for all step types, and the default value is set for each step type. In some step types, such as the Numeric Limit Test, the status expression is disabled in the step type so that it cannot be edited in individual numeric limit test steps
When designing a custom step type, you can disable any properties that will not vary between instances of the step type. This will provide you with more control over how users of the step type can modify the behavior. However, preventing users from editing step settings can limit flexibility, so you should only disable settings that you are confident that a user will never need to modify.
Keep in mind that any future changes you make to step property default values, even if you disable editing them in step instances, will not propagate to instances of the step type. Refer to Updating and Maintaining Step Types for more information on mitigating this issue.
Considerations when Updating Default Values
You should not use the values of these properties to define any functionality of the step type that may need to be updated by the step type developer. For example, do not use the Post expression of the step to implement step type specific functionality. If you need to update this functionality in a future version of the step type, there will be no way to ensure that all instances of the step are updated. Instead, implement the functionality in a pre- or post- step substep.
Custom Properties
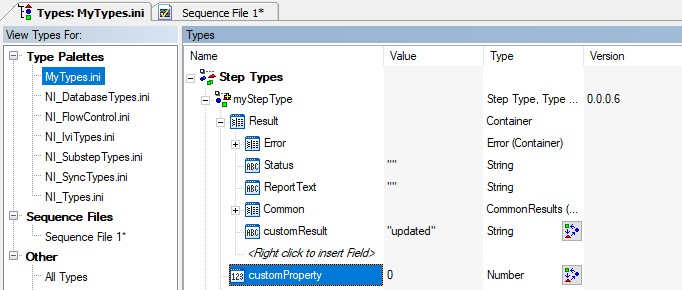
In addition to the built-in properties, you can define custom properties specific to the step type. Use these properties to store data specifically related to the step type functionality.
Example: Numeric limit test steps contain a Limits.High property, which is unique to the Numeric Limit step type. The type defines a default value of 11 for this property, and the user can modify the value for each instance they create.
To create custom step properties:
- Navigate to the types view using the View » Types menu, or the shortcut key Ctrl + T
- Expand the step type item.
- Right click the Parent property or the “<Right click to insert field>” entry to add a new property
If you define a property in the results container of the step type, the property will be included in result collection. You can then use the IncludeInReport or IncludeInDatabase flags to log the data to a report or database.
By default, users can change step property values for each step instance. However, if you set the shared flag for a step property in the step type, the value will be locked to the value in the step type. Unlike step default values, updates to the value will propagate to instances of the step type.
Determining the Scope of a Custom Step Type
The data types you choose for step properties should be determined by the scope of the step type. For example, consider the numeric limit test and the multiple numeric limit test steps. While the multiple numeric limit test can accommodate additional limits and has more capability, it also introduces complexity in the edit-time user interface and result logging. The more basic numeric limit test has a smaller scope and has a much simpler interface. In addition to requiring less development work, steps with a smaller scope are also easier to use by test sequence developers.
When developing your own custom step types, it is important to define the scope of the step before defining custom properties, since the properties you choose have a significant impact on the complexity of the step type.
Configuring Custom Step Type Functionality using Substeps
The following sections describe how you can use substeps to implement the following step type behaviors:
- Runtime functionality which should execute for all instances of the step type before or after the main code module
- User Interfaces to view and edit step data while editing test sequences
- Functionality to execute when the test developer creates new instances of the step
Implementing Substeps
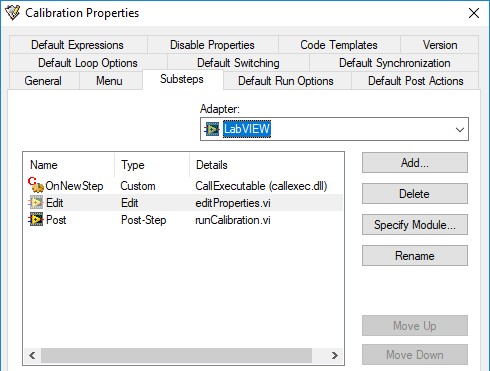
Substeps call code modules using one of the provided TestStand Adapters. Substeps cannot be modified in instances of the step, and all changes to substep settings will propagate to instances of the step type.
To add substeps to a custom step type:
- Navigate to the types view using the View » Types menu, or the shortcut key Ctrl + T
- Right click the step type, then select Properties…
- Select the Substeps tab. Choose the adapter which matches the desired code module
- Click Add, then select a substep type. A new entry appears in the substeps list
- Select the entry and click Specify Module to configure the code module for the substep in the same way as you would configure the code module for a step
Post and Edit substeps of the Multiple Numeric Limit Test Step Type
Defining Runtime Functionality for the Step Type
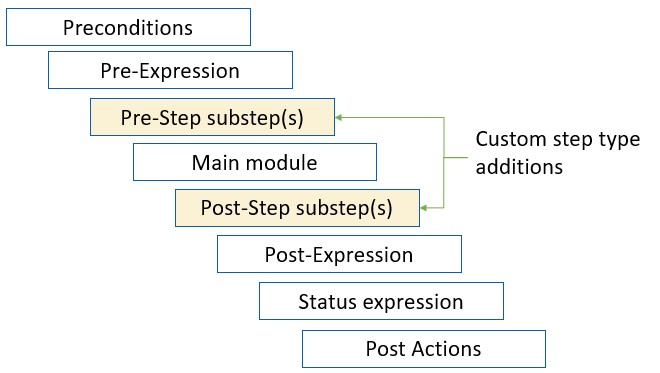
You can define runtime functionality for the step type using pre-step and post-step substeps. These substeps execute before or after the main code module when the step is executed.
Example: The message popup step type uses a C code module to create and display the message box at runtime. This module is called in a post-step substep,
Step Execution Order: Substeps
Use these substeps to define functionality that applies to all instances of the step. Often, substeps will require specific data related to the behavior of the step type. Define this data in custom step properties to ensure that it is available in all instances of the step.
If more than one Pre-Step or Post-Step substep exists, they execute in the order they appear on the Substep tab of the Step Type Property dialog box.
By default, test developers can specify a code module for each instance of the step type. If the step type does not require a code module, you should disable the “Specify Module” option in the Disable Properties tab for the step type configuration. Many built in step types are designed in this way, such as the statement and message popup steps.
Provide Visual Feedback for Long Operations
TestStand waits for code in Pre-Step or Post-Step substeps to execute before continuing. If code modules for those steps operate slowly or silently, TestStand might seem unresponsive. To address this, you can change the cursor or use UI messages, such as UIMsg_ProgressPercent, to update the progress bar in the status bar.
Refer to the Updating the Status Bar using UI Messages for more information on this approach
Use the Termination Monitor
Code modules you develop should include and periodically poll a termination monitor to gracefully handle when users terminate or abort sequence execution using the built-in options in TestStand or in the TestStand API. By using the termination monitor, you can quickly terminate the substep if the user terminates the sequence execution.
Refer to the Termination Monitor example for more information on implementing the termination monitor in your code
Use Pre-Step or Post-Step Substeps Instead of Default Module
Implement the code module for the basic operations inherent to the step type as a Pre-Step or Post-Step substep instead of as a default module. Use the default module setting only when each instance of a step can call a different code module. The default module setting exists separately on every instance of the step, and TestStand does not update existing step instances by default when you change the setting on the step type. However, changes to substeps automatically affect all existing instances of the step type.
Creating Edit Interfaces for Step Types
Edit substeps provide a graphical user interface (GUI), implemented in a code module, in which the user can modify the variables or settings of that step instance at edit-time. Typically, the Edit substep is used to configure custom step properties that you define for the step type.
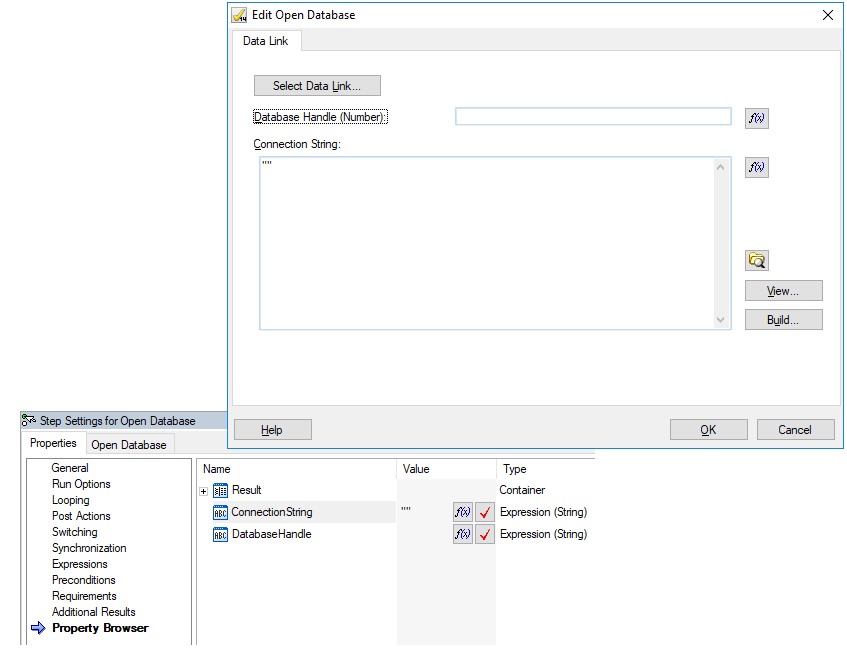
Example: The Open Database step type provides a dialog via an edit substep to allow users to configure the ConnectionString and DatabaseHandle step properties, which are custom properties for the database step type.
The edit substep provides a user interface for configuring step settings
When the user creates an instance of a custom step type, they can access the edit substep user interface using a button in the step settings pane, which launches the edit substep UI in a new window. However, you can also embed the edit substep user interface directly in the tab, like many built-in step types. This approach requires additional development effort and must be developed in a .NET language, but provides a more seamless editing interface for user of the step type. Refer to Creating Custom Step Type Edit Tabs in the Sequence Editor for more information on how to implement embedded edit substep interfaces.
Comparison between an embedded editing interface (top) versus an edit substep, which launches in a separate window (bottom)
Single Versus Multiple Edit Substeps
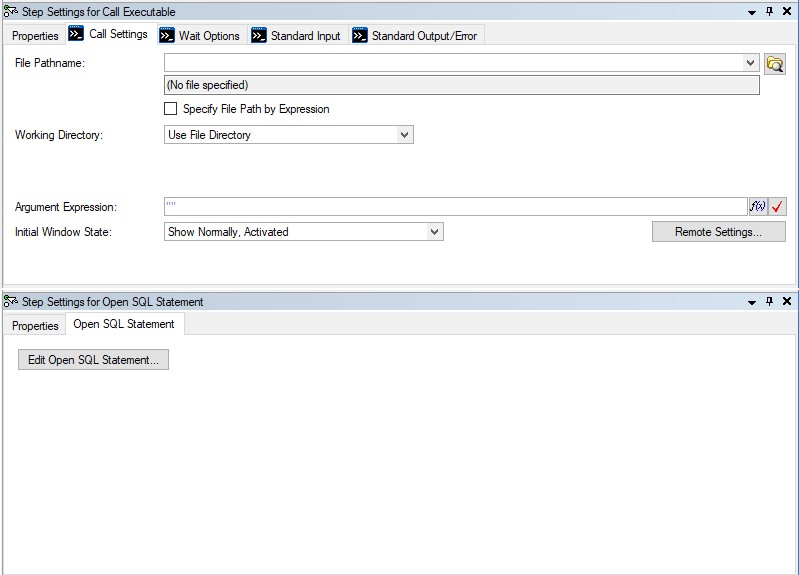
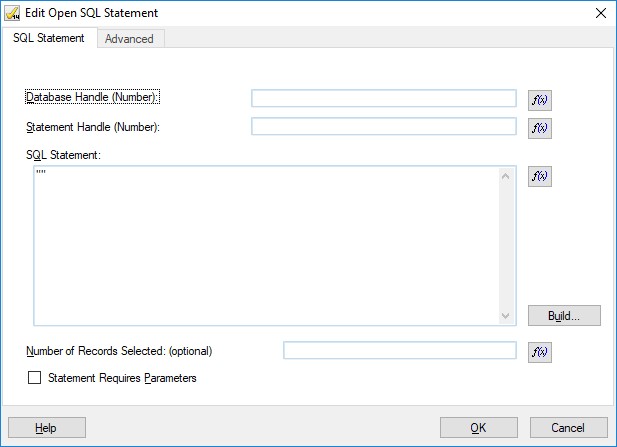
A custom step type can define many properties which can be confusing if displayed to the user all at one time. When using the typical approach of edit substeps which launch in a separate window, use organizational methods within a single edit substep, such as introducing tabs, to organize the data into manageable sections. Using multiple edit substeps is not recommended because each interface must be launched independently. For example, the Open SQL Statement step implements a single edit substep with multiple tabs.
The Edit substep for the Open SQL Statement step contains two tabs to categorize the settings
If you are using the embedded step panel approach for complex step types, it is advantageous to use multiple edit panels, since the data will be easily visible on the step tabs. For example, the Multiple Numeric Limit Test step includes two tabs for editing the source of the numeric data and the limit conditions for each data source.
The Limit and Data source tabs are each implemented in a separate edit panel
Make Edit Substeps Modal to TestStand
Always make Edit substeps and other user interface code modules modal to TestStand because when TestStand calls Edit substeps, it disables the sequence editor. If code modules are not modal, the TestStand window can hide the code modules. Users might think the sequence editor is hung and might try to terminate TestStand.
Refer to the Making Dialog Boxes Modal to TestStand example for more details on how to implement modality in a substep module.
Use Expressions to Maximize Flexibility
Using expression fields in an edit substep UI is a flexible way for users to interact with data and allows users to use variables and logic in the property values. However, working with the Expression control can require a larger investment than working with string or numeric controls, and requires additional checking to ensure that the expression evaluates to a valid value for the property.
Expressions are More Flexible than Fixed Values for Specifying Settings
Defining Behavior when Developers Create Step Instances
In many cases, you may want to define functionality which occurs when a test developer creates a new instance of a step. For example, the built-in If step type uses an OnNewStep substep to insert a matching End step.
To implement this type of functionality, create an edit substep, and rename the substep to “OnNewStep”. These substeps typically use the TestStand API to manipulate the step instance or create additional step instances.
General Recommendations for Substeps
Using Parameters versus the TestStand API to Access Data in Substeps
Like with a standard code module, there are two methods for providing TestStand data to a substep. You can pass data through the parameters of the code module. Alternatively, you can call the TestStand API from within the code module to directly access and change properties. Pre-step and Post-step substeps typically only need to read step properties to determine their behavior. For example, the temperature value for setting up a heated chamber. Edit substeps, however, need the current state of the properties to display in the initial UI, but also need a way to update any values that the user modifies.
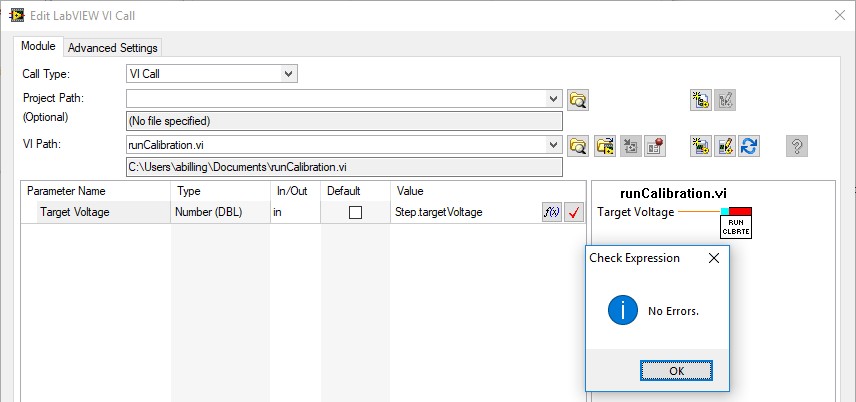
In most cases, it is a better idea to use parameters to pass data rather than the TestStand API to access them directly. Using parameters is less error prone: any errors in the property names or data types will be easy to find since the properties are defined in the step type settings in TestStand, not directly in the code module. Additionally, having all the properties defined in the step configuration makes the step type more maintainable. Any changes to step properties can be accounted for without any modifications to the code module.
However, using the API to directly access properties can be useful in cases where the code module is accessing a variety of data dynamically, based on the state of the step. Using step parameters in this case can lead to a long list of parameters where only some are used in various conditions.
The Module Adapter Reads or Write Step Variables to the Inputs and Outputs of Code Modules and Checks for Errors
Accessing step properties from within LabVIEW using the TestStand API does not provide parameter error checking at edit-time
Unloading Modules while Editing
When you are developing and testing code modules for substeps of a custom step type, be aware that TestStand loads and reserves the code module into memory when the substep is executed. This improves performance since the module remains loaded for subsequent executions, but you cannot edit the code module until TestStand unloads it. You can unload the code module in one of two ways:
- Select the File » Unload All Modules to unload any modules currently reserved in memory.
- In the sub-step configuration pane, select the edit button to unload the module and open it in the corresponding development environment
Best Practices for Maintaining Custom Step Types
Storing and Distributing Custom Step Types
It is important to consider how to store and distribute the custom steps you create. NI recommends creating all step types in a type palette file, not within a sequence file, because TestStand searches the type palette files for step type updates when you load a sequence file. TestStand also helps you manage the reuse of steps by keeping a copy of each step type used inside a sequence file. If you deploy the sequence file without the type palette file, the sequence file still contains a copy of the step type.
As a framework developer, it is common that your step types will be used by multiple test developers. This can be a challenge, since step types have many associated files. To help manage the step type files, use the following directories to store the files for your step type
- Type palette file containing the type definition <TestStand Public>/Components/TypePalettes/
- Substep code module files <TestStand Public>/Components/StepTypes/[typeName]
- Custom icon <TestStand Public>/Components/Icons/[typeName]
By using these directories, you can distribute the necessary files to the TestStand Public directory on any test developer systems. If you defined your type in a new type palette file, you can configure TestStand to automatically import the type palette by adding an “Install_” prefix to the type palette file name. Refer to the Type Palette Files help topic for details on this method.
Avoid Renaming or Changing the Data Type of Step Properties
If you need to change the type of a custom property, you can do this by creating another property with the new type and retaining the property with the previous type. If you change the name or data type of a property, TestStand replaces the value of the property in step instances with the default value of the property. In addition to creating a new property with the new type, you can add logic to the step type to handle cases where a step uses the old property and the new one. For example, when TestStand implemented limit values as expressions, two new Boolean properties were added to specify to use the old numeric limit property. The UseLowExpr and UseHighExpr properties determine if the step evaluates the old numeric limits or the new expression limits.
