Measuring Current
Overview
Electric current is the flow of electric charge and is measured with an ammeter. The SI unit for measuring electric current is the ampere (A), which is equal to a flow of one coulomb of charge per second.
While there are several methods of measuring current, the most common method is to perform an indirect measurement of the voltage across a precision resistor and using Ohm’s law to measure the current across the resistor.
Contents
- Current Fundamentals
- How to Make a Current Measurement
- Recommended Hardware and Software
- Current Webcasts, Tutorials, and Other How-To Resources
Current Fundamentals
In solid conductive metal, a large population of electrons is either mobile or free. When a metal wire is connected across the two terminals of a DC voltage source such as a battery, the source places an electric field across the conductor. The moment contact is made, the free electrons of the conductor are forced to drift toward the positive terminal under the influence of this field.
The free electron is therefore the current carrier in a typical solid conductor. For an electric current of 1 ampere rate, 1 coulomb of electric charge (which consists of about 6.242 × 10¹⁸ electrons) drifts every second through the imaginary plane through which the conductor passes.
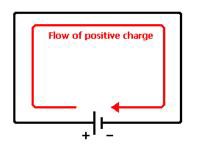
Figure 1. Illustration of Current Flow
Conventional current was defined early in the history of electrical science as a flow of positive charge. In solid metals, like wires, the positive charge carriers are immobile, and only the negatively charged electrons flow. Because the electron carries a negative charge, the electron current flows in the opposite direction of the conventional (or electric) current.
When solving electrical circuits, the actual direction of current through a specific circuit element is usually unknown. Consequently, each circuit element is assigned a current variable with an arbitrarily chosen reference direction. When the circuit is solved, the circuit element currents may have positive or negative values. A negative value means that the actual direction of current through that circuit element is opposite that of the chosen reference direction.
How to Make a Current Measurement
Current Measurement Methods
There are two main ways to measure current – one is based on electromagnetics and is associated with the early moving coil (d’Arsonval) meter, and the other is based on the main theory of electricity, Ohm’s law.
D’Arsonval Meter/Galvanometer
A d’Arsonval meter is a type of ammeter, which is an instrument for detecting and measuring electric current. It is an analog electromechanical transducer that produces a rotary deflection, through a limited arc, in response to electric current flowing through its coil.
The d’Arsonval form used today is constructed with a small pivoting coil of wire in the field of a permanent magnet. The coil is attached to a thin pointer that traverses a calibrated scale. A tiny torsion spring pulls the coil and pointer to the zero position.
When a direct current (DC) flows through the coil, the coil generates a magnetic field. This field acts against the permanent magnet. The coil twists, pushing against the spring, and moves the pointer. The hand points at a scale indicating the electric current. Careful design of the pole pieces ensures that the magnetic field is uniform, so that the angular deflection of the pointer is proportional to the current.
Other Ammeters
Essentially, most of today’s ammeters are based on the fundamental theory of electricity, Ohm’s law. Modern ammeters are essentially voltmeters with a precision resistor, and using Ohm’s law, an accurate yet cost-effective measurement can be made.
Ohm’s Law – Ohm’s law states that, in an electrical circuit, the current passing through a conductor between two points is directly proportional to the potential difference (in other words, voltage drop or voltage) across the two points, and inversely proportional to the resistance between them.
The mathematical equation that describes this relationship is:
I = V/R
where I is the current in amperes, V is the potential difference between two points of interest in volts, and R is a circuit parameter, measured in ohms (which is equivalent to volts per ampere), called the resistance.
Ammeter Operation – Today’s ammeters have an internal resistance to measure the current across the particular signal. However, when the internal resistance is not enough to measure larger currents, an external configuration is needed.
To measure larger currents, you can place a precision resistor called a shunt in parallel with the meter. Most of the current flows through the shunt, and only a small fraction flows through the meter. This allows the meter to measure larger currents.
Any resistor is acceptable, as long as the maximum expected current multiplied by the resistance does not exceed the input range of the ammeter or data acquisition device.
When measuring current in this fashion, you should use the smallest value resistor possible because this creates the smallest interference with the existing circuit. However, smaller resistances create smaller voltage drops, so you must make a compromise between resolution and circuit interference.
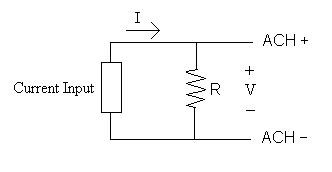
Figure 2 shows a common schematic of current measurement across a shunt resistor.
Figure 2. Connecting a Shunt Resistor to a Measurement
Using this approach, the current is not actually directed into the ammeter/data acquisition board but instead through an external shunt resistor. The largest current you can measure is theoretically limitless, provided the voltage drop across the shunt resistor does not exceed the working voltage range of the ammeter/data acquisition board.
Current Conventions
Conventional Currents
Conventional currents are the current measurements common in today’s electronics, electrical circuitry, transmission lines, and so on. They do not conform to a transmission standard, and they can range from zero to large values of amperage.
Current Loops/4-20 mA Convention
Analog current loops are used for any purpose where a device needs to be either monitored or controlled remotely over a pair of conductors. Only one current level can be present at any time.
“Four to 20 milliamp current loop,” or 4-20 mA, is an analog electrical transmission standard for industrial instrumentation and communication. The signal is a current loop where 4 mA represents the zero percent signal and 20 mA represents the 100 percent signal.[1] The “mA” stands for milliampere, or 1/1000 of an ampere.
The “live zero” at 4 mA allows the receiving instrumentation to distinguish between a zero signal and a broken wire or a dead instrument.[1] Developed in the 1950s, this standard is still widely used in industry today. Benefits of the 4-20 mA convention include wide use by manufacturers, relatively low implementation costs, and its ability to reject many forms of electrical noise. Also, with the live zero, you can directly power low-power instruments from the loop, saving the cost of extra wires.
Accuracy Considerations
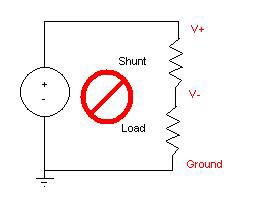
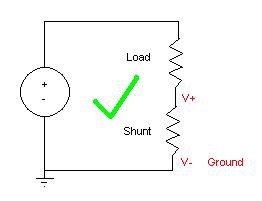
Placement of the shunt resistor in the circuit is important. If the external circuit shares a common ground with the computer containing the ammeter/data acquisition board, then you should place the shunt resistor as close to the ground leg of the circuit as possible. If not, the common-mode voltage produced by the shunt resistor might be outside the specification for the ammeter/data acquisition board, which could lead to inaccurate readings or even damage the board. Figure 3 shows the correct and incorrect placements of the shunt resistor.
Figure 3. Shunt Resistor Placement
Data Acquisition Device Measurements
There are three different methods of measuring analog inputs. Please refer to the “How to Make a Voltage Measurement” article for additional information on each configuration.
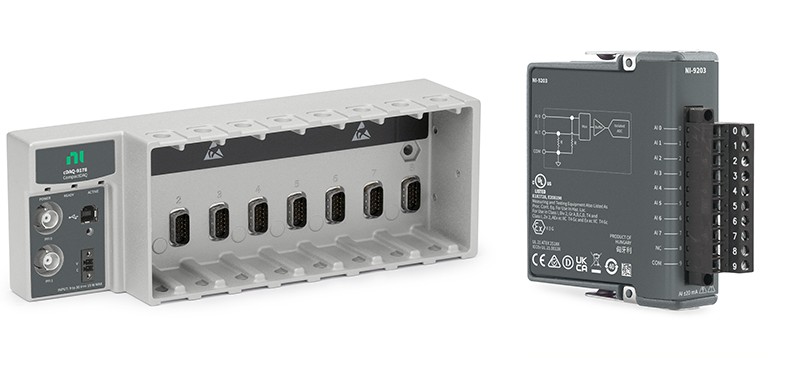
As an example, consider the NI CompactDAQ USB data acquisition system. Figure 4 shows the NI cDAQ-9178 chassis and an NI 9203 analog current input module. The NI 9203 does not require an external shunt resistor due to the presence of an internal precision resistor.
Figure 4. NI cDAQ-9178 Chassis and NI 9203 Analog Current Input Module
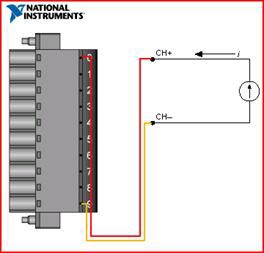
Figure 5 shows the connection diagram for Reference Single-Ended (RSE) current measurements using an NI cDAQ-9178 chassis with an NI 9203 as well as the pin-outs for the module. In the figure, Pin 0 corresponds to the “Analog Input 0” channel and Pin 9 corresponds to the common ground.
Figure 5. Current Measurement in RSE Configuration
In addition to the NI 9203, general-purpose analog input modules, such as the NI 9205, can provide current input functionality using an external shunt resistor.
Getting to See Your Measurement: NI LabVIEW
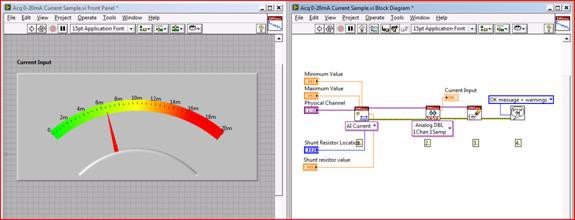
Once you have connected the sensor to the measurement instrument, you can use LabVIEW graphical programming software to visualize and analyze data as needed.
Figure 6. LabVIEW Current Measurement
References
Bolton, William (2004). Instrumentation and Control Systems. Elsevier. ISBN 0750664320.
