How to Select the Right Oscilloscope Probe for Your Application
Overview
An oscilloscope probe is a fundamental part of an analog measurement system. Without an appropriate probe the best oscilloscope is useless. For that reason it is essential to choose the right probe to connect the circuit under test to your oscilloscope. Before choosing a probe, it is important to understand how probes work and how they are specified. Attenuation ratio, bandwidth, impedance, and capacitance are specifications that all users should be familiar with before starting with an oscilloscope.
Contents
- What is an Oscilloscope Probe?
- Passive Probes
- Loading Effects
- Examples of Loading Effects
- Probe Compensation
- Active Probes
- Differential Probes
- Current Probes
- Next Steps
What is an Oscilloscope Probe?
An oscilloscope probe makes physical contact with a test point and transmits electrical signal data from the circuit under test to the oscilloscope. There are several types of oscilloscope probes that cater to different test and measurement needs, including passive, active, differential, and current probes. At a basic level, oscilloscope probes consist of a conductive probe tip, a probe head for manual adjustment, and a cable that connects to an oscilloscope.
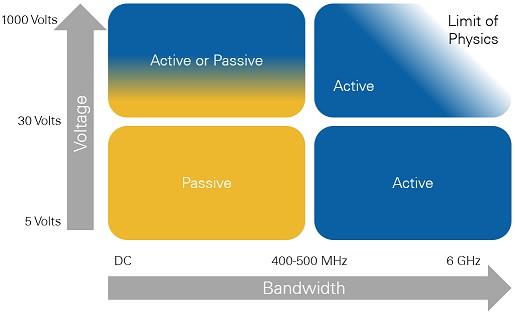
Figure 1: Active and Passive Probes serve different applications and meet different measurement criteria. Read on for more information.
Passive Probes
Passive probes have the most widespread use in application and are comprised of only passive circuit elements. These probes may provide 1:1, straight through connectivity from the point under test, to the scope input, or attenuation of a particular value using a voltage divider or other circuit. Passive probes are generally low cost, rugged, and flexible. They are used for voltage measurement and have relatively low bandwidth. Continue reading to learn more about each specification included in Table 1.
| Passive Probes | SP500X | SP500C | CP500X | CP400X |
|---|---|---|---|---|
| Bandwidth | 500 MHz | 500 MHz | 500 MHz | 400 MHz |
| Attenuation Ratio | 10:1 | 100:1 | 10:1 | 10:1 |
| Input Resistance | 10 MΩ | 100 MΩ | 10 MΩ | 10 MΩ |
| Input Capacitance | 11 pF | 4.6 pF | 10 pF | 13 pF |
| Capacitance Compensation Range | 10-25 pF | 10-25 pF | 7-25 pF | 10-40 pF |
| Rise Time | 0.9 ns | 0.9 ns | 0.7 ns | 0.9 ns |
| Maximum Input Voltage | 300 V (DC + Peak AC) | 300 V (DC + Peak AC) | 60 V (DC + Peak AC) | 60 V (DC + Peak AC) |
| Oscilloscope Input Impedance | 1 MΩ | 1 MΩ | 1 MΩ | 1 MΩ |
| Connectors | BNC to Probe Tip | BNC to Probe Tip | BNC to BNC | BNC to BNC |
| Cable Length | 1.2 meters | 1.2 meters | 1.2 meters | 2 meters |
Table 1: NI offers passive probes that have been selected to optimize the performance of NI oscilloscopes.
Passive Probe Compatibility with NI Oscilloscopes
Not all PXI Oscilloscopes can be used with all probes - a passive probe’s 1 MΩ input capacitance range may not accommodate the 1 MΩ input capacitance of a certain oscilloscope. All of NI’s oscilloscope probes have BNC connections, so PXI Oscilloscopes with SMA or SMB front panel connectors will require adapters, as noted in the table below.
| NI Oscilloscope | SP500X | SP500C | CP500X | CP400X |
|---|---|---|---|---|
| PXIe-5105 | — | — | — | — |
| PXIe-5110 | ||||
| PXIe-5111 | ||||
| PXIe-5113 | ||||
| PXIe-5114 | — | — | — | |
| PXIe-5122 | — | — | — | |
| PXI-5124 | — | — | — | |
| PXI-5142 | — | — | — | |
| PXI-5152 | ||||
| PXI-5153 | — | — | — | — |
| PXI-5154 | — | — | — | — |
| PXIe-5160 | ||||
| PXIe-5162 | ||||
| PXIe-5163 | ||||
| PXIe-5164 | ||||
| PXIe-5170 | — | — | — | — |
| PXIe-5171 | — | — | — | — |
| PXIe-5172 | 1 | 1 | 1 | 1 |
| PXI-5922 | — | — | — | — |
1 Requires SMB to BNC adapter.
Table 2: PXI Oscilloscopes range in their compatibility with passive probes.
Loading Effects
Oscilloscope probes can affect signals in a number of ways. The input resistance, capacitance, and bandwidth of a probe will all determine the changes it imposes on the signal it is transmitting to the oscilloscope. This section will discuss the physical phenomena that cause these changes. For practical applications of these effects, see the Examples of Loading Effects section.
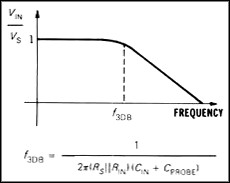
The impedance of the circuit and the input impedance of the oscilloscope together produce a low-pass filter. For very low frequencies, the capacitor acts as an open circuit and has little or no effect on the measurement. For high frequencies, the capacitor's impedance becomes significant and loads down the voltage seen by the oscilloscope. Figure 2 shows this effect in the frequency domain. If the input is a sine wave, the amplitude tends to decrease with increasing frequency and the phase is shifted.
Figure 2: The frequency response of a passive probe rolls off as the frequency of the measured signal rises.
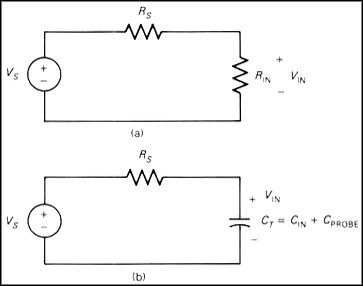
The loading also affects the oscilloscope's response to a step change in voltage. The loading due to the input impedance of the scope (and the probe capacitance) can be broken into two parts: Resistive Loading and Capacitive Loading. Figure 3 shows the probe and scope input loading broken into resistive and capacitive loading, which can be analyzed independently. The resistive loading is due entirely to the input resistance of the scope, while the capacitive loading is due to the probe capacitance combined with the scope input capacitance.
Figure 3: The loading of a circuit can be divided into (a) resistive loading and (b) capacitive loading.
The resistive loading circuit of Figure 3 is another example of the voltage divider circuit. Thus, the voltage delivered to the scope input,VIN, is a replica of Vs but with reduced amplitude. Equation 1 shows the formula for the voltage product over time given VMAX.
Equation 1: The behavior of a voltage divider circuit with resistive loading is illustrated by this formula.
The effect of capacitive loading is more complex and results in an exponential response in the voltage. VIN is a product of the VSvoltage step which goes from zero volts to VMAX volts over time, as shown in Equation 2.
Equation 2: Capacitive loading effects result in a logarithmic behavior over time.
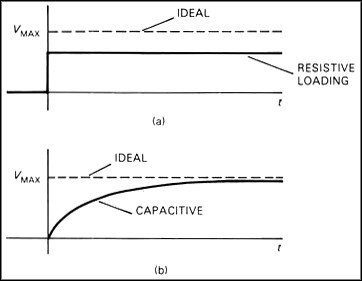
The step responses due to the two loading effects are shown in Figure 4. The resistive loading changes the size of the voltage step, but does not change the waveform shape. Capacitive loading slows down the rise time of the step but eventually settles out to the same final value as the ideal response. The bandwidth and rise time of a system are inversely related. Since the bandwidth of the instrument is effectively being decreased, the rise and fall times of pulse inputs will be increased.
The circuit model used for this analysis may not be accurate for all types of practical circuits. The output resistance (drive capability) of digital circuits may vary with the output voltage and cause the loading effect to be different. Even though this model is not 100 percent accurate for such a circuit, the basic principle of resistive and capacitive loading still applies. This means that load capacitance will slow down the rise time of the signal while resistive loading will tend to change the output amplitude. Increased rise time in a digital circuit is translated into increased delay when the signal reaches the next logic gate. This is because it will take longer for the signal to rise to the logic threshold, causing the next gate to switch later. The 1-MW input impedance of the typical oscilloscope is large enough to prevent resistive loading of most digital circuits, but the capacitive loading of a 1:1 probe will introduce significant delay into the signal.
Figure 4: Resistive loading (a) changes the voltage level of a step while capacitive loading (b) causes an exponential response.
Examples of Loading Effects
This section will illustrate two examples of loading effects caused by probing circuits. In each example the effects that occur as a result of probing the circuit would cause the device to fundamentally change behavior or cease to function entirely.
Capacitive Loading
A LC circuit, otherwise known as a tank circuit, contains an inductor and a capacitor in parallel. The end effect of this circuit is that the inductor coil emits a resonance frequency at a given value determined by the inductor and capacitor. The frequency is governed by Equation 3.
Equation 3: This equation governs the resonance frequency of a LC circuit.
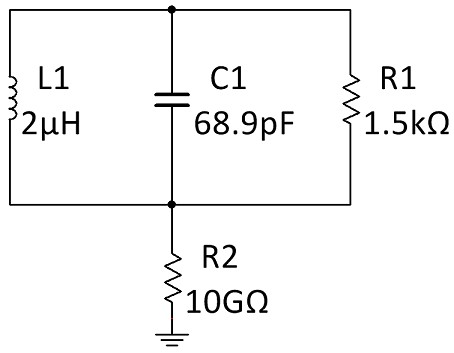
This circuit is used in commercial RFID tags, so that will be the example to show this loading affect. Figure 5 shows a very common LC circuit in an RFID chip.
Figure 5: LC circuits are used in RFID tags. This is a very common RFID LC circuit.
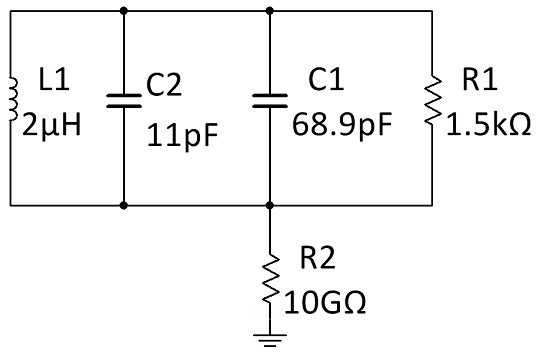
The engineer designing or testing this circuit might want to probe the line containing the capacitor. If the engineer attaches a SP500X probe at the high potential point of this circuit, the capacitance of the probe will be added in parallel with C1 between high potential and ground as shown in Figure 6.
Figure 6: The probe’s input capacitance will be added to the circuit if it is not probed in a way that prevents current flow.
The additional capacitance of the probe will cause the resonance frequency of the LC circuit to change according to Equation 4.
Equation 4: Additional capacitance introduced by the SP500X probe will change the resonance frequency of the LC circuit to 0.93 times its original frequency.
Due to this change in frequency, the RFID tag will now emit a frequency much different than the intended transmitter frequency which will not build up enough energy to be detected by the sensor or functionally characterized for correct operation.
Resistive Loading
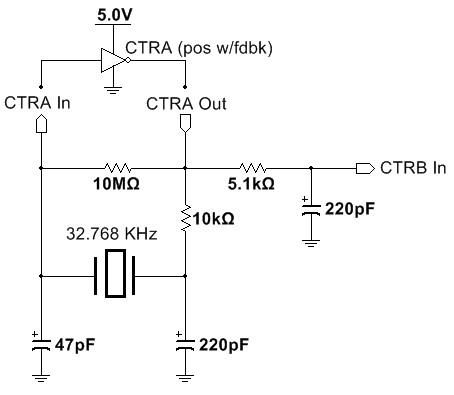
The oscillator circuit in Figure 7 contains a resistor with a 10 Megohm value in parallel with a CMOS inverter. Probes have input resistance of 10 Megohm to prevent significant current flow through the probe and to avoid affecting the circuit under test. In this case the circuit under test includes a high-resistance element.
Figure 7: A watch oscillator circuit can be functionally simplified in representation to show how resistive loading can affect its operation.
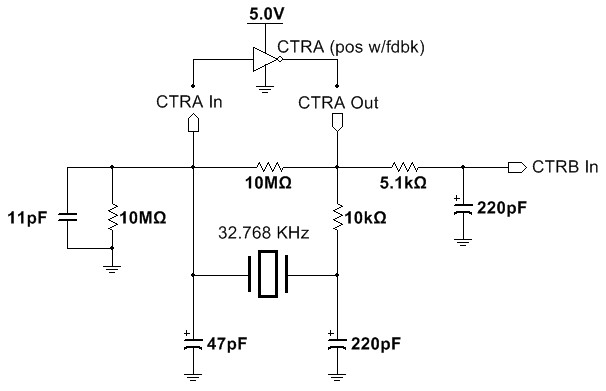
An engineer may be interested in the potential at the junction of CTRA In, the 10 Megohm resistor, and the power supply of the crystal oscillator as shown in Figure 8. This probe point would put the 10 Megohm input resistance of the probe in parallel with the 10 Megohm resistor which will create a voltage divider. The crystal oscillator in this circuit expects to operate with a given voltage. If the oscillator receives half of the voltage it expects, it could operate sporadically or not operate at all.
Figure 8: Probing in parallel with the 10 Megohm resistor in the crystal oscillator circuit will create a voltage divider that could cause it to stop functioning.
1:1 Probes
1:1 (one-to-one) probes, also known as 1x probes, connect the 1 MΩ impedance input of the oscilloscope to the circuit being measured. They are designed for minimum loss and easy connection, but otherwise they are equivalent to using a cable to connect the scope. Figure 4 shows the circuit diagram for a high-impedance scope input connected to a circuit under test. The circuit under test is modeled as a voltage source with a series resistor. The 1:1 probe (or cable) will introduce a significant amount of capacitance which appears in parallel with the input of the scope. A 1:1 probe may have around 40 to 60 pF of capacitance, which is usually larger than the oscilloscope input capacitance.
The construction of 1:1 probes does not allow for the same level of performance that you would expect in an attenuating probe as will be explained in the 10:1 Probe section.
10:1 Probes
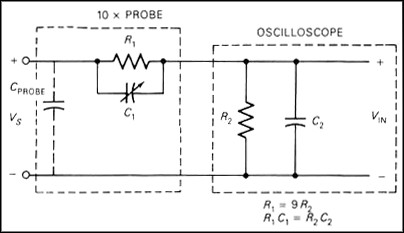
10:1 probes (also called 10x probes, divider probes, or attenuating probes) have a resistor and capacitor (in parallel) built into the probe. Figure 8 shows the circuit for the 10:1 probe connected to a high-impedance input of an oscilloscope. If R1C1 = R2C2, then this circuit has the amazing result that the effect of both capacitors exactly cancel. In practice, this condition may not be met exactly but can be approximated. The capacitor is usually made adjustable and can be tweaked for a near perfect match. Equation 5 shows the relationship of Vs to VIN under these conditions.
Equation 5: Attenuating probes like 10X probes use the voltage divider principal described in this equation.
This equation is reminiscent of the voltage divider equation. R2 is the input resistance of the scope's high input impedance (1 MW) and R1 = 9R2. Equation 6 show the result of Equation 5 using a 10X probe.
Equation 6: A 10X probe results in 1/10 the voltage at the oscilloscope input.
So the net result is a probe and scope input combination that has a much wider bandwidth than the 1:1 probe, due to the effective cancellation of the two capacitors. The penalty that is incurred is the loss of voltage. The oscilloscope now sees only one-tenth of the original voltage (hence the name 10:1 probe). Also notice that the circuit being measured sees a load impedance of R1 + R2 = 10 MW, which is much higher than with the 1:1 probe. Some probes are designed to be conveniently switched between 1:1 and 10:1 operation.
Figure 9: The effect of the capacitors in a passive probe is cancelled when C1 is adjusted properly.
With a 10:1 probe, both the resistive and capacitive loading effects are reduced (relative to a 1:1 probe). Although the input capacitance of the scope is ideally canceled, there is a remaining capacitance due to the probe, CPROBE. This capacitance, which is specified by the manufacturer, will load the circuit under test.
The factor of 10 loss in voltage is not a problem as long as the voltage that is being measured is not so small that dividing it by 10 makes it unreadable by the scope. This means that the scope's sensitivity and the signal voltage may be factors in deciding whether to use a 10:1 probe. On most oscilloscopes, the user must remember that a 10:1 probe is being used and must multiply the resulting measurements by a factor of 10. This is a nuisance so some scopes include two scale markings: one valid for a 1:1 probe and the other valid for a 10:1 probe. Other scopes have gone one step farther and automatically adjust the readings by the correct amount when an attenuating probe is used.
Note that some 10:1 probes have a resistor across the probe input so that the resistive loading is 1 Megohm. These probes do not represent an improvement in resistive loading over the 1:1 probe, but they do have less capacitive loading.
Other Attenuating Probes
Attenuating probes come in a number of values like 50: 1 and 100: 1 probes. The general principles of these probes are the same as the 10:1 divider probe: voltage level and bandwidth are traded off to obtain wider bandwidth, more loss is incurred in the probe and less voltage is supplied to the input of the scope. This may require a more sensitive scope for low-level measurements. There are also certain 50Ω impedance passive probes that have wider bandwidths but limited applications.
Probe Compensation
To maximize the bandwidth of an attenuating probe, the probe capacitor must be adjusted precisely such that the input capacitance of the scope is canceled. This is accomplished by a procedure known as compensation.
The scope probe is connected to a square wave source called the calibrator which is built into the scope. The probe is then adjusted to make the square wave as square and flat topped as possible.
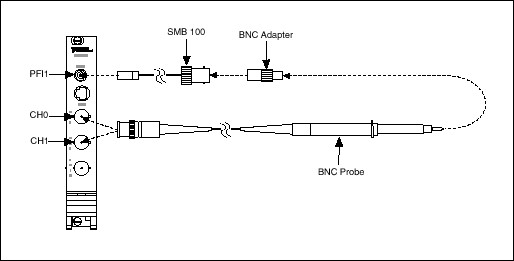
Figure 10: A reference signal is needed to perform probe compensation. The PFI lines on NI oscilloscopes can be used to generate a square wave reference.
1. Connect the BNC end of the probe to CH0 of the oscilloscope. If there are multiple attenuation settings on the probe, choose the one that allows you to compensate the capacitance.
2. Attach a connectivity adapter to the tip of the probe that allows you to interface with the calibrator.
3. Connect the probe tip to the calibrator source. In the case of NI PXI Oscilloscopes the calibrator will be PFI1.
4. If you are using a probe tip that is separate from the transmission cable, attach them together at this point to complete the measurement circuit. Probes tips that work in this fashion will usually connect with BNC or SMB connectivity.
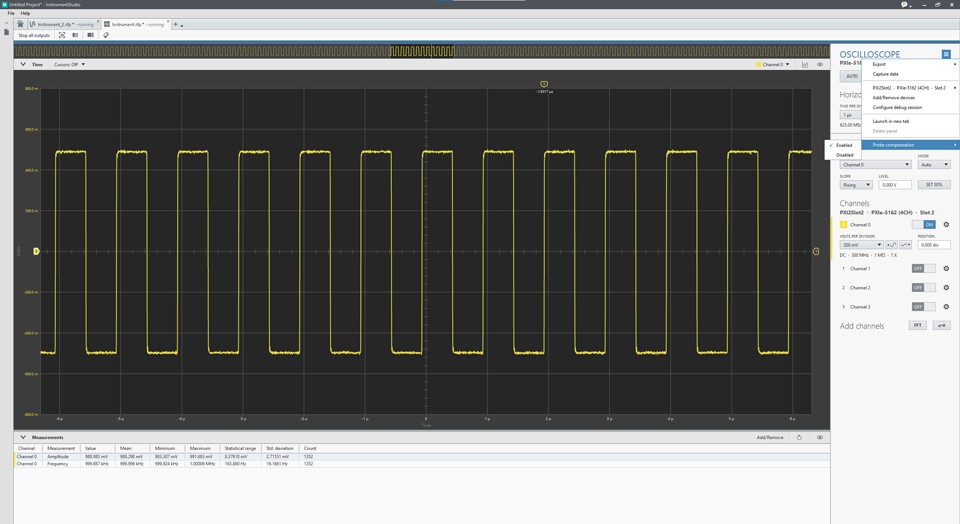
5a. Open the Scope Soft Front Panel (Start Menu->Programs->National Instruments->NI-SCOPE->NI-SCOPE Soft Front Panel). If you have multiple oscilloscopes or digitizers in the PXI system, select the appropriate oscilloscope for probe compensation. Activate the probe compensation signal from the Utility menu in the Scope Soft Front Panel toolbar. The probe compensation signal can also be activated programmatically using the NI-SCOPE instrument driver.
Figure 11: The NI-SCOPE Soft Front Panel has a built-in probe compensation utility.
5b. If you are using a traditional box or benchtop oscilloscope, the front panel of the instrument should now be showing the calibration signal.
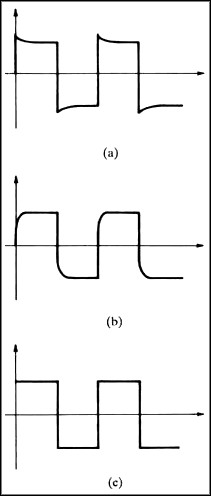
6. Adjust the tunable capacitor to make the waveform as square as possible. Figures 12a and 12b show the oscilloscope display during compensation with an overcompensated and undercompensated probe. Figure 12c shows the display when the probe is properly compensated.
Figure 12: Overcompensated (a) and Undercompensated (b) probes will represent signals poorly and lead to incorrect measurements. Properly compensated probes (c) will represent the true nature of the signal.
7. Repeat steps 1-6 for any additional channels and probes. Keep in mind that oscilloscope channels are designed to be very similar, but small changes in the components can make the input capacitance slightly different. There are also small differences in the nominal capacitance of probes. For those reasons, each oscilloscope channel and probe combination should be individually compensated.
Active Probes
So far, all the probes discussed have been simple passive circuits with no active components such as transistors and amplifiers. Active probes are ideal in cases where extremely low capacitance is required for high-frequency measurements or a measurement needs isolation from a given ground reference. An active probe uses an amplifier that is designed to have very little capacitance on its input. The output of the amplifier is usually matched to drive the 50 ohm input of the oscilloscope. This allows a length of 50 ohm cable to be used between probe and scope without any additional capacitive loading effects.
Table 3 summarizes the typical specifications of the various types of active voltage scope probes that have been discussed. Actual characteristics will vary according to manufacturer and model.
| Active Probes | SA1000X1 | SA1500X1 | SA2500X1 | DA200025X1 |
|---|---|---|---|---|
| Bandwidth | 1000 MHz | 1500 MHz | 2500 MHz | 2 GHz |
| Terminal Configuration | Single-Ended | Single-Ended | Single-Ended | Differential |
| Attenuation Ratio | 10:1 | 10:1 | 10:1 | 25:1 |
| Maximum Input Voltage | 20 V | 20 V | 20 V | ± 60 V (DC + Peak AC) |
| Common-Mode Input Voltage | ± 8 V | ± 8 V | ± 8 V | ± 60 V (DC + Peak AC) |
| Differential Input Voltage | — | — | — | ± 20 V (DC + Peak AC) |
| Input Resistance | 1 MΩ | 1 MΩ | 1 MΩ | 500 kΩ |
| Input Capacitance | 0.9 pF | 0.9 pF | 0.9 pF | 1.2 pF |
| Oscilloscope Input Impedance | 50 Ω | 50 Ω | 50 Ω | 50 Ω |
| Connectors | BNC to Probe Tip | BNC to Probe Tip | BNC to Probe Tip | BNC to Probe Tip |
1 Requires use of the included auxiliary power supply.
Table 3: NI offers active probes that extend the measurements capabilities of PXI oscilloscopes.
Active Probe Compatibility with NI Oscilloscopes
With such low loading effects, all of NI's offered active voltage probes are compatible with all PXI Oscilloscopes, with the following additional considerations:
- The use of the SA1000X, SA1500X, SA2500X, or DA200025X on adjacent BNC oscilloscope channels may require the use of a short BNC to BNC adapter due to close proximity.
- The PXIe-5105 and PXIe-5172 require an SMB to BNC adapter.
- The PXIe-5170 and PXIe-5171 require an SMA to BNC adapter.
Differential Probes
Some scopes have floating or differential inputs that allow both leads of the input to be connected away from ground. In this case, the grounding problem is avoided.
A two-channel scope with the ability to display channel 1-2 (the difference between the two channels) can be used as a one channel floating input scope. The oscilloscope is set up to display 1-2. Channel 1 is connected to the point in the circuit taken to be the more positive voltage. Channel 2 is connected to the other voltage point, and the oscilloscope ground is connected to the circuit ground. Thus, the scope displays the difference between the two voltage points with neither one required to be at ground.
A differential probe eliminates this problem by providing two scope probe inputs which can be floating relative to the scope's ground. The output voltage of the probe is the difference between the voltages on the two input terminals, allowing it to drive the ground-referenced input of an oscilloscope. The differential amplification is not perfect, and the error is specified in terms of common mode rejection ratio (CMRR). To measure CMRR, both inputs are driven with the same signal. Ideally, the output (which is the difference between the two inputs) is always zero. But in a real probe there is some small output voltage.
Equation 7. A differential probe will have error between the active and reference channels that can be measured by observing the difference in input and output voltage of the probe.
Typically, the CMRR of a differential probe is best at low frequencies and degrades at higher frequencies. CMRR is often expressed in dB.
High-Voltage Probes
High-voltage active probes are used for measurements that include high DC offsets or common modes, or large voltage ranges. Some high voltage probes are used to observe small changes in signals that have very high common modes. An example of this would be measuring small variations in signals on power transmission lines. The other use case for high voltage active probes is to achieve a very large voltage range. Some active probes can transmit signals up to multiple kilovolts.
Current Probes
Current probes generally use one of two technologies. The simplest uses the principle of a transformer, with one winding of the transformer being the measured wire. Since transformers work with only AC voltages and currents, current probes of this type do not measure direct current.
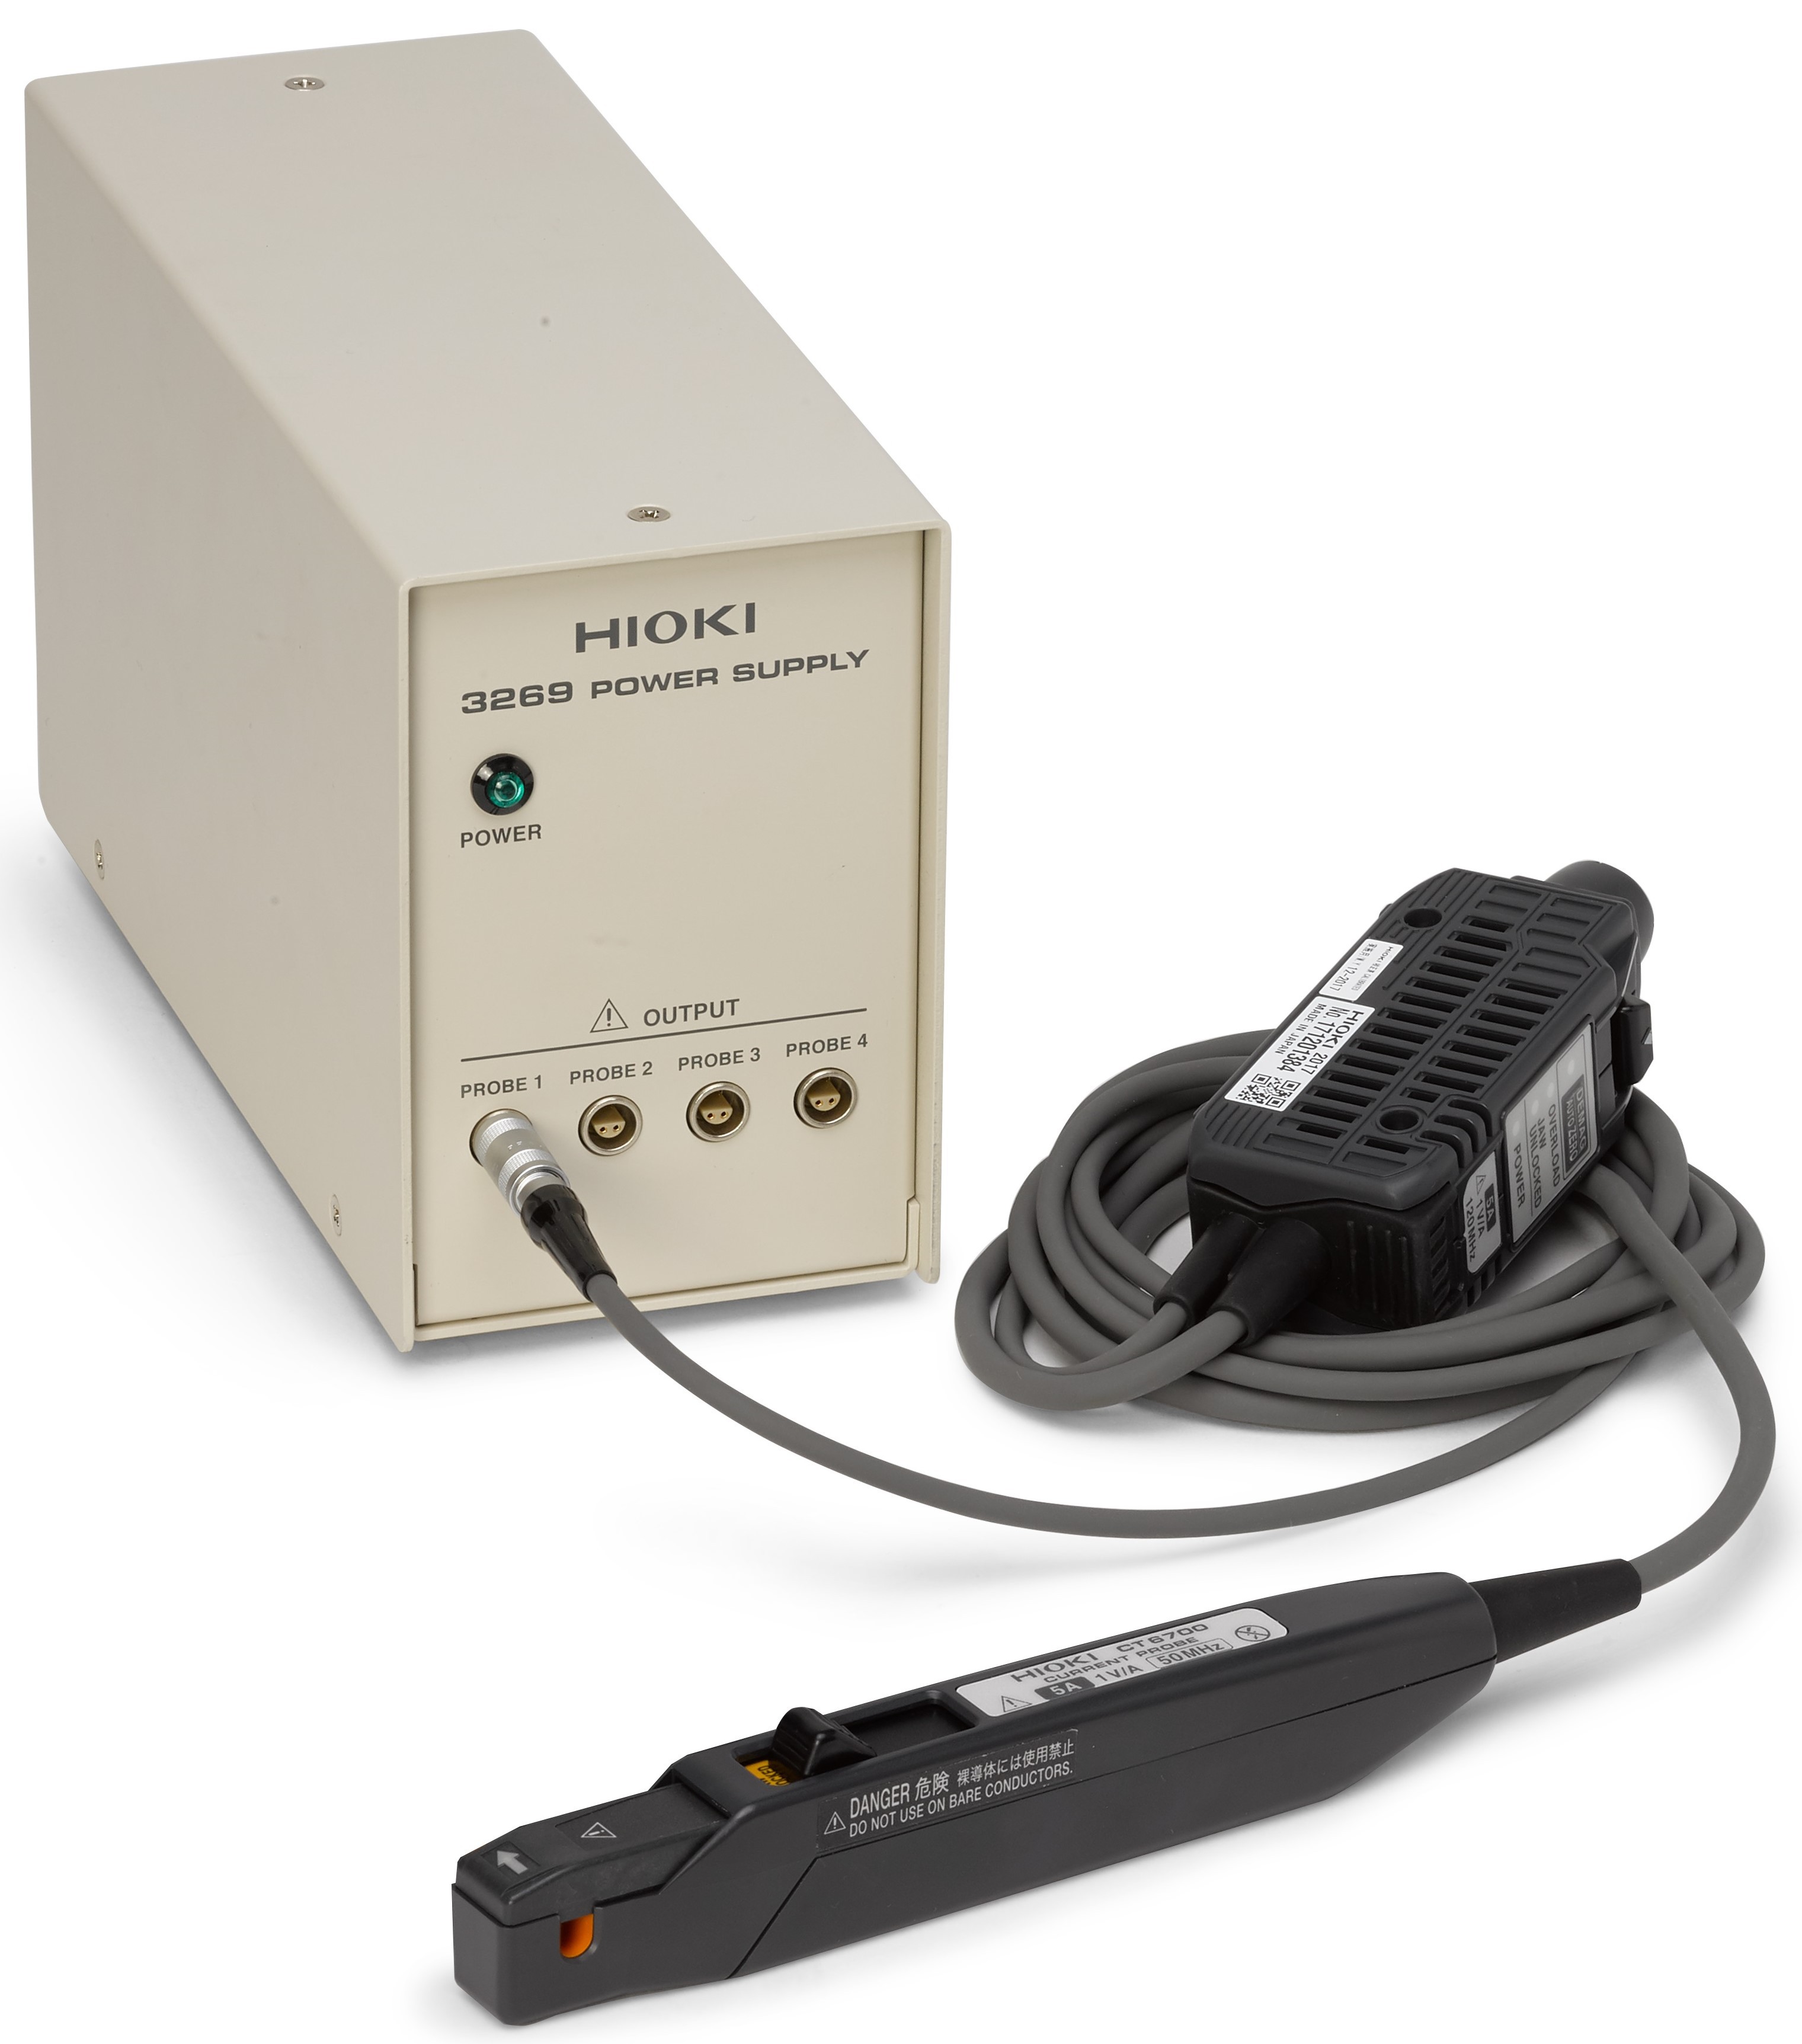
The other type of current probe (the type that NI sells) uses the principle of the Hall Effect. The Hall effect produces an electric field in response to a current present in an applied magnetic field. This technique requires the use of an external power supply, but does measure both alternating and direct current (AC and DC).
Since current probes measure the current enclosed by their jaws, several techniques can be used that are unique to the current probe. If the sensitivity of the probe and oscilloscope combination is too low for a particular measurement to be made, several turns of the current carrying wire can be inserted into the jaws. The probe will effectively have a larger current to measure (the original current times the number of turns). In a similar manner, the difference between two currents can be measured if the two wires in question are inserted, but with the currents flowing in opposite direction (the sum will be measured if the currents are flowing in the same direction). Of course, the physical size of the wires and the current probe will be a factor in determining how many wires can be inserted. Although the current does not require a direct electrical connection, it still removes energy from the circuit under test. Normally, this small amount of energy loss will not disturb the circuit, but can be a factor in some cases.
| Current Probes1 | CC0550X | CC05120X | CC3050X | CC30100X | CC15010X | CC5002X |
|---|---|---|---|---|---|---|
| Maximum Continuous Current | 5 ARMS | 5 ARMS | 30 ARMS | 30 ARMS | 150 A | 500 A |
| Output Voltage Rate (Volts per Amp) | 1 V/A | 1 V/A | 0.1 V/A | 0.1 V/A | 0.01 V/A | 0.01 V/A |
| Bandwidth | 50 MHz | 120 MHz | 50 MHz | 100 MHz | 10 MHz | 2 MHz |
| Rise Time | 7 ns | 2.9 ns | 7 ns | 3.5 ns | 35 ns | 175 ns |
| Oscilloscope Input Impedance | 1 MΩ | 1 MΩ | 1 MΩ | 1 MΩ | 1 MΩ | 1 MΩ |
| Connectors | BNC to Probe Tip | BNC to Probe Tip | BNC to Probe Tip | BNC to Probe Tip | BNC to Probe Tip | BNC to Probe Tip |
1 Require use of the two-channel PS-OP01 power supply or four-channel PS-OP02 power supply.
Table 4: NI resells several Hioki current probes, each of which requires a Hioki power supply to function.
Figure 13. Hioki current probe connected to a four-channel power supply.
Current Probe Compatibility with NI Oscilloscopes
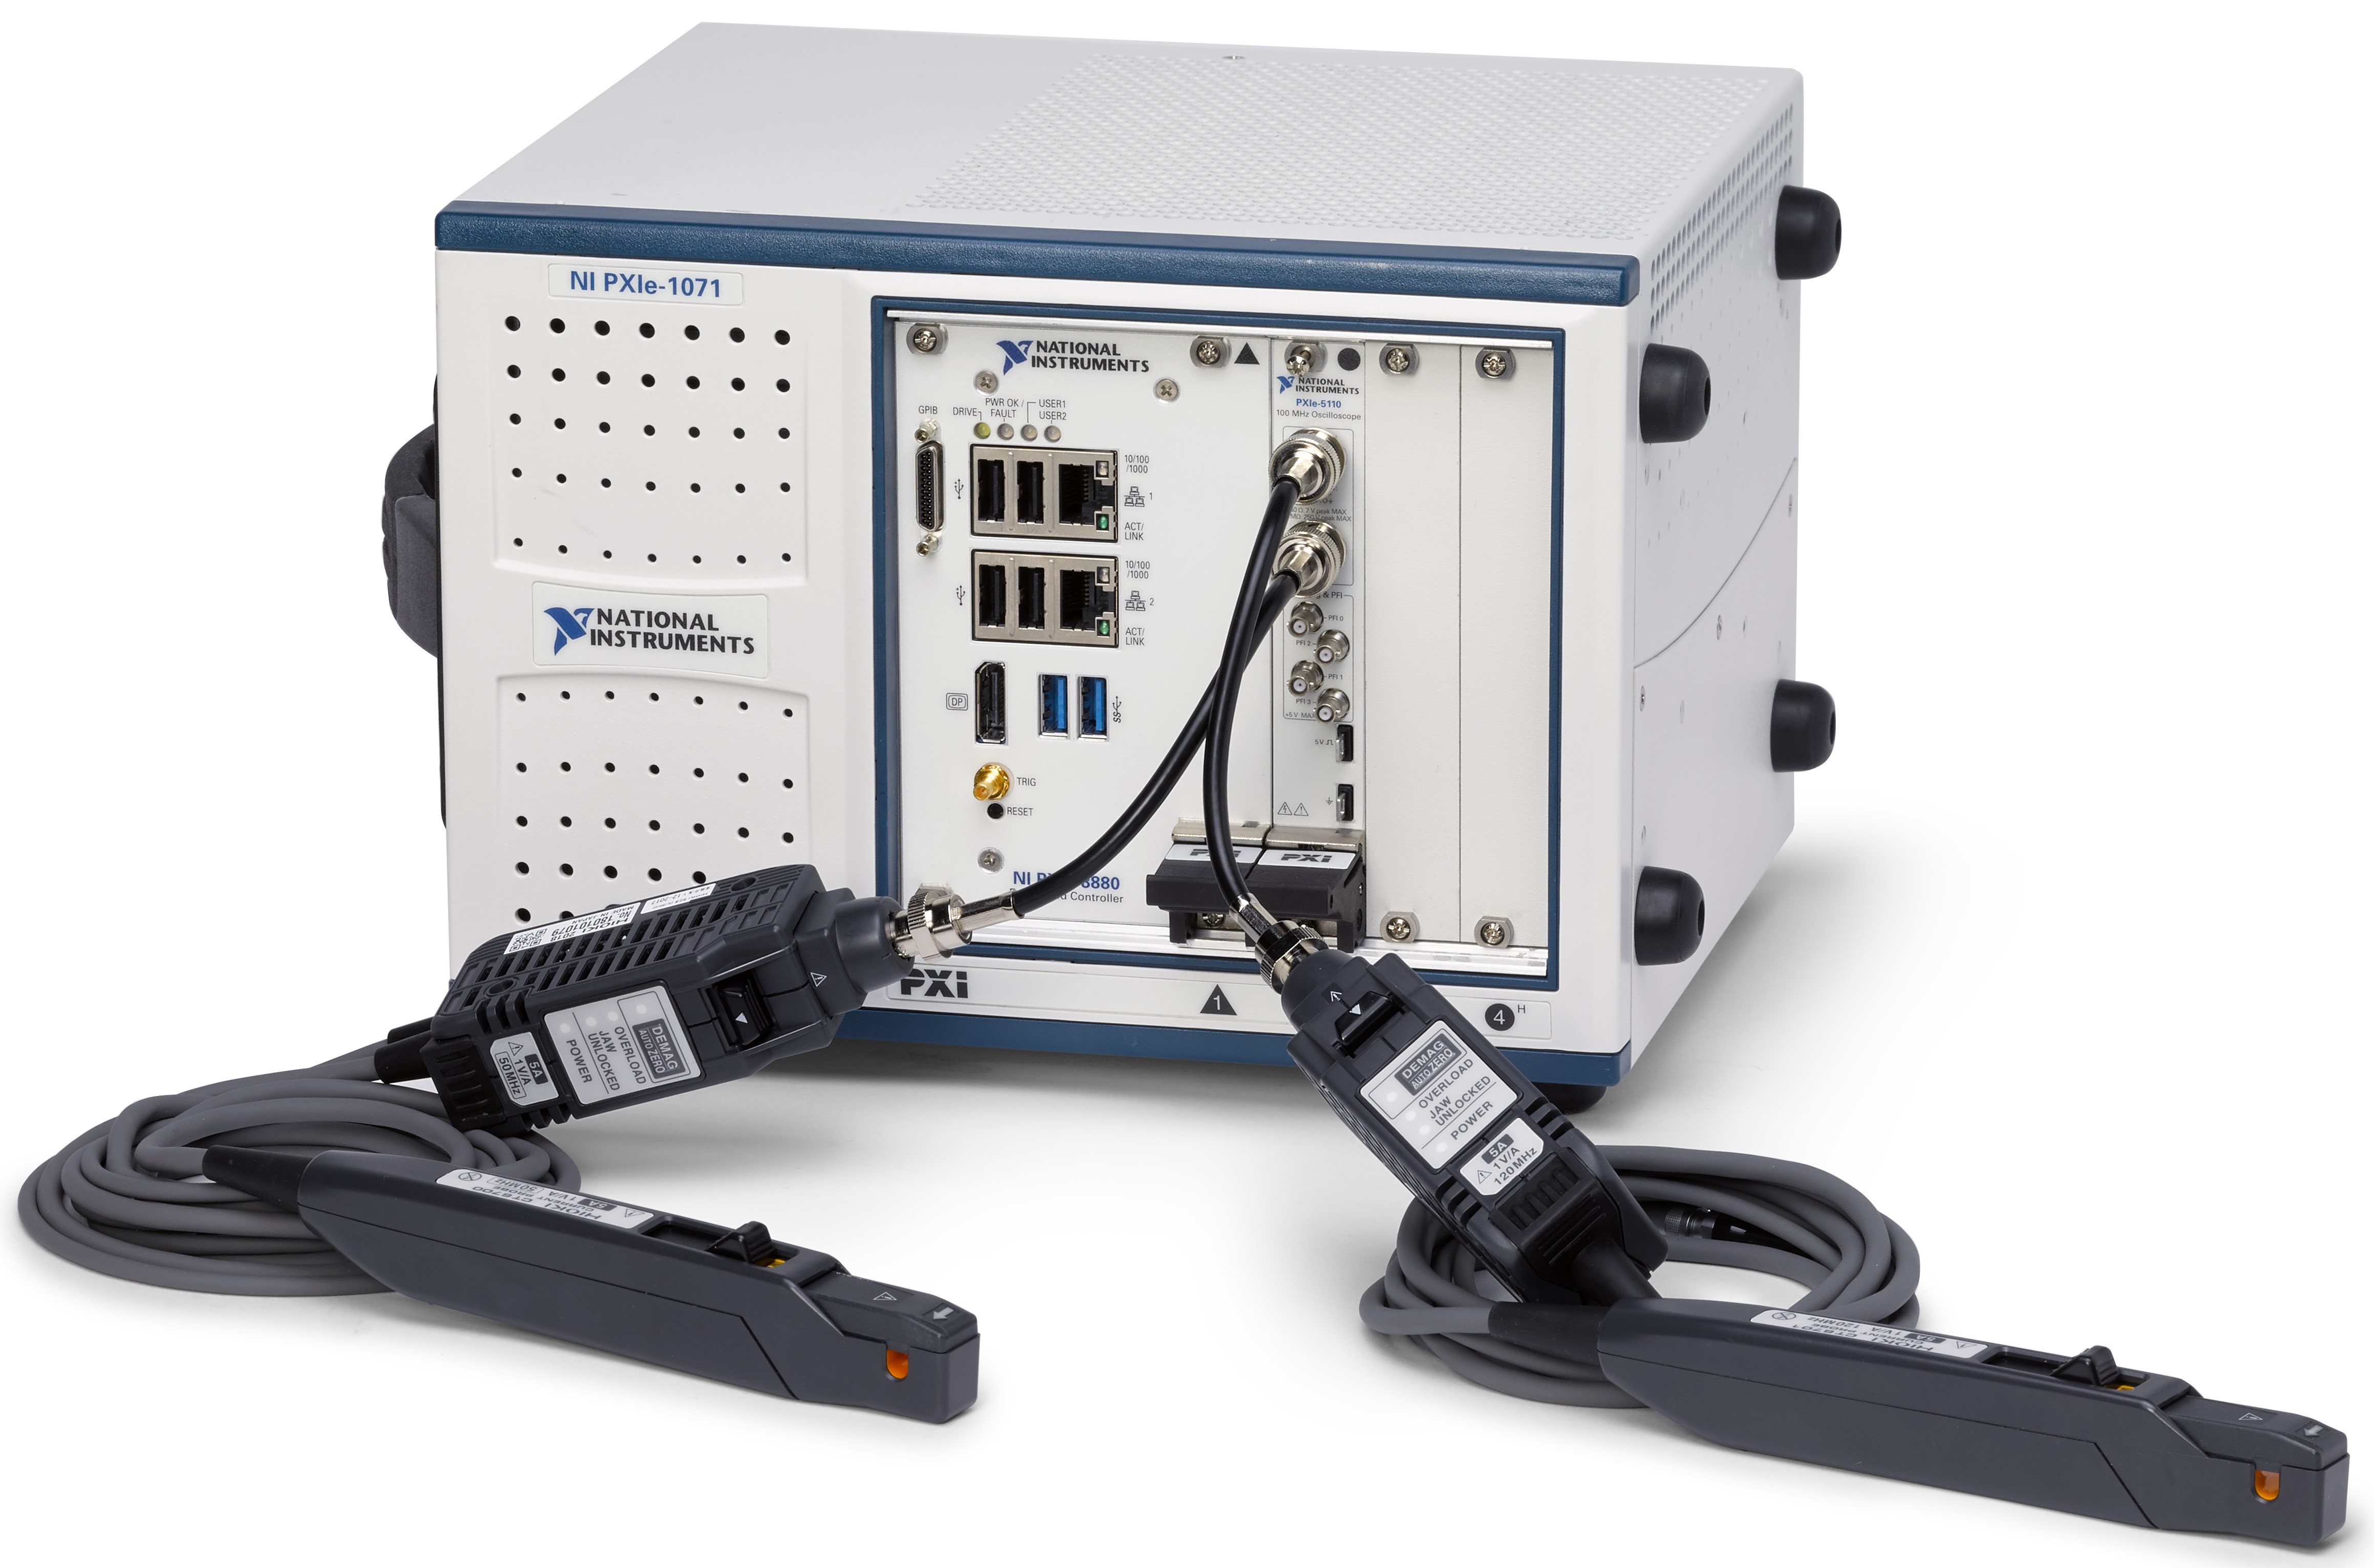
Not all PXI Oscilloscopes can be used with all probes - Hioki current probes are only compatible with PXI Oscilloscopes that have a 1 MΩ input. The use of current probes on adjacent BNC oscilloscope channels may require the use of a short BNC to BNC adapter due to proximity.
| NI Oscilloscope | All Models of Hioki Current Probes |
|---|---|
| PXIe-5105 | 1 |
| PXIe-5110 | |
| PXIe-5111 | |
| PXIe-5113 | |
| PXIe-5114 | |
| PXIe-5122 | |
| PXI-5124 | |
| PXI-5142 | |
| PXI-5152 | |
| PXI-5153 | — |
| PXI-5154 | — |
| PXIe-5160 | |
| PXIe-5162 | |
| PXIe-5163 | |
| PXIe-5164 | |
| PXIe-5170 | — |
| PXIe-5171 | — |
| PXIe-5172 | 1 |
| PXI-5922 |
1 Requires SMB to BNC adapter.
Table 5: PXI Oscilloscopes range in their compatibility with current probes.
Figure 14: Hioki current probes may require short BNC adapters when used with closely adjacent oscilloscope channels.
